Quantcast
Channel: Unixmen » Linux Mint
Viewing all 457 articles
Browse latest View live

Grive2 – An Unofficial, Google Drive Client For Linux

$
0
0


A year ago, we wrote an article about Grive, an unofficial, open source client for Google drive. Unfortunately, the developers of Grive abandoned it, and it is no longer being developed now. Don’t be disappointed. Vitaliy Filippov forked it and named his fork “Grive2″. The fork supports the new Google Drive REST API and it also includes a new feature called partial (directory) sync.

As you may know, Grive2 is a command line, open source, unofficial client for Google Drive. Grive can do two-side synchronization between the Google Drive and the local directory. The changes in the files/folders will be updated on both local and remote location(Google drive).

In this tutorial, let us see how to install, configure and use Grive2 in Ubuntu 15.04 LXDE desktop.

Install Grive2

To install latest Grive2 in Ubuntu 15.04 and previous versions, add the following PPA:

sudo add-apt-repository ppa:nilarimogard/webupd8

Update the sources list using command:

sudo apt-get update

Finally install Grive using command:

sudo apt-get install grive

That’s it.

Grive2 Command line Usage

To view all list of available options of grive command, run:

sudo grive --help

Sample output:

Grive options:
  -h [ --help ]         Produce help message
  -v [ --version ]      Display Grive version
  -a [ --auth ]         Request authorization token
  -p [ --path ] arg     Path to sync
  -s [ --dir ] arg      Subdirectory to sync
  -V [ --verbose ]      Verbose mode. Enable more messages than normal.
  --log-xml             Log more HTTP responses as XML for debugging.
  --new-rev             Create new revisions in server for updated files.
  -d [ --debug ]        Enable debug level messages. Implies -v.
  -l [ --log ] arg      Set log output filename.
  -f [ --force ]        Force grive to always download a file from Google Drive
                        instead of uploading it.
  --dry-run             Only detect which files need to be uploaded/downloaded,
                        without actually performing them.

Create a download/upload folder (Ex. sync) in your local system.

mkdir /home/sk/sync

Change to the newly created ‘sync’ directory.

cd sync/

Run the following command for the first time.

grive -a

The above command will display an URL.

-----------------------
Please go to this URL and get an authentication code:

https://accounts.google.com/o/oauth2/auth?scope=https%3A%2F%2Fwww.googleapis.com%2Fauth%2Fuserinfo.email+https%3A%2F%2Fwww.googleapis.com%2Fauth%2Fuserinfo.profile+https%3A%2F%2Fdocs.google.com%2Ffeeds%2F+https%3A%2F%2Fdocs.googleusercontent.com%2F+https%3A%2F%2Fspreadsheets.google.com%2Ffeeds%2F&redirect_uri=urn:ietf:wg:oauth:2.0:oob&response_type=code&client_id=22314510474.apps.googleusercontent.com

-----------------------

Copy and paste that URL in your browser. Next, you’ll be asked to give permission to access your Google drive. Enter your gmail credentials. Finally, an authentication code will be displayed. Copy the authentication code and paste it in the Terminal where you ran “grive -a” command. That’s it.

Now, whenever you want to synchronize files/folders to and from your Google drive, go to the “sync” folder and run the following command:

cd /home/sk/sync/
sync

Note that you don’t have to include “-a” parameter every time. Because we already have authenticated with google drive.

Install Grive-tools, a GUI Front-end for Grive

Working from Command Line is a bit difficult for Newbies. So, the fansclub team has developed a GUI front-end called grive-tools for Grive.

First, add the Grive-tools PPA for Ubuntu 15.04 and older versions and other Ubuntu derivatives.

sudo add-apt-repository ppa:thefanclub/grive-tools

Update the repositories and install Grive-tools using the following commands:

sudo apt-get update
sudo apt-get install grive-tools

Configure Grive

After installing Grive and Grive-tools, You should configure Google accounts for Grive. Search for “Grive Setup” either from the Menu or Dash. Also you can open it from the Terminal by typing “sudo grive-setup”:

Click Next to sign in to your google account.

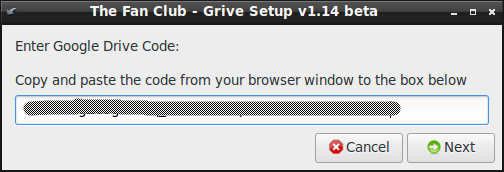
The Fan Club - Grive Setup v1.14 beta_001

A new browser window will now open and ask you to sign in to your Google Account. Enter your Gmail credentials and allow the Grive to access your Google Drive. An authentication code will be displayed. Copy/paste the code in the Grive window and click Next to continue.

The Fan Club - Grive Setup v1.14 beta_002

Now the installer will create a folder called Google Drive on your Home folder (ex. /home/sk/Google Drive), and sync all files from your google drive to your local folder.

The Fan Club - Grive Setup v1.14 beta_003

After sync is done, you should see a confirmation message that says: Installation is complete.

Click Done to complete the installation.

The Fan Club - Grive Setup_006

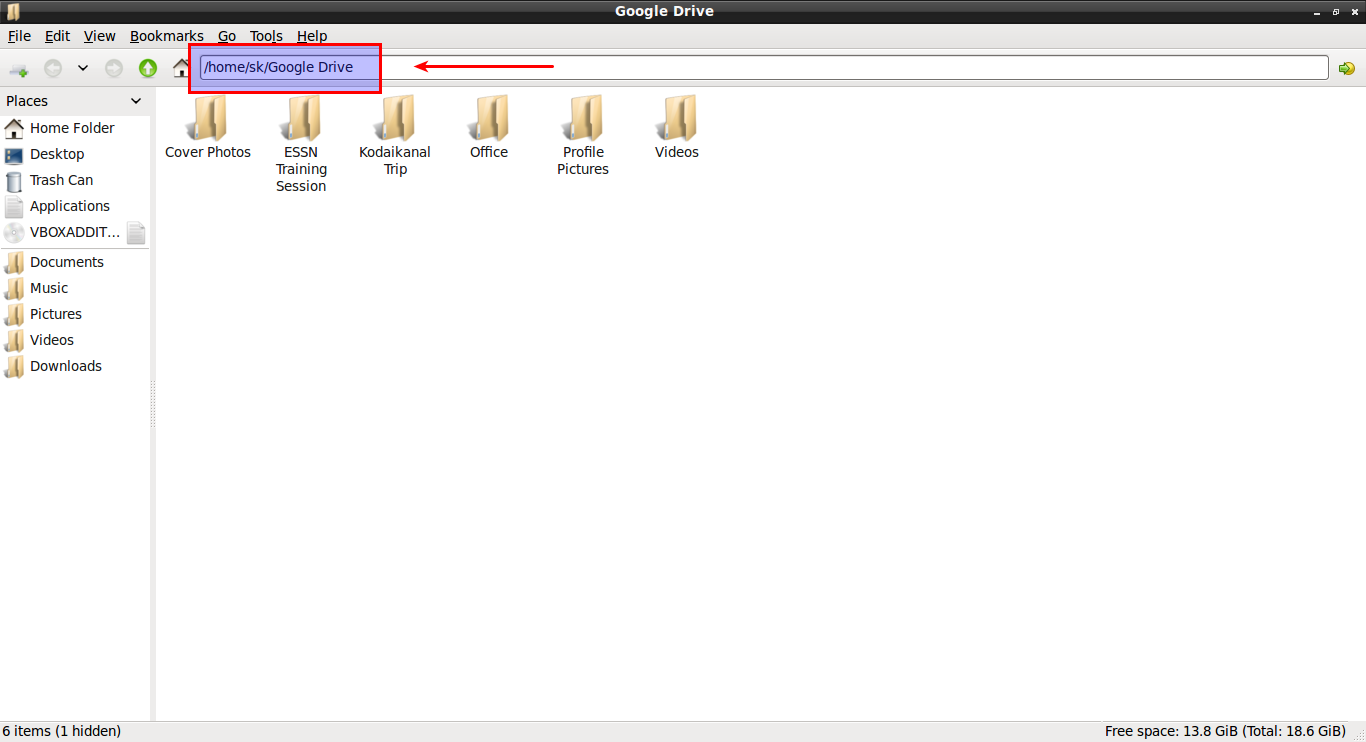
Now you can see all files from your Google Drive will be found in your local system Google Drive Folder.

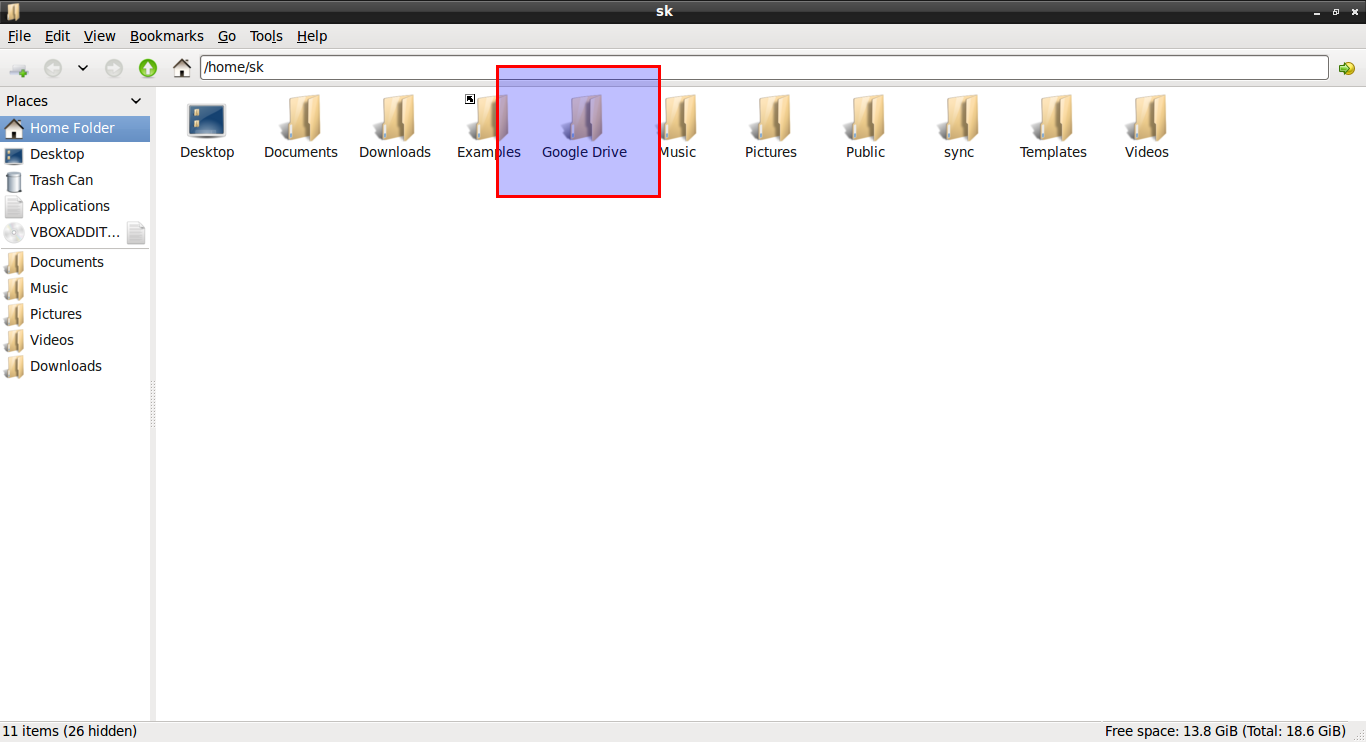
You can find your local Google Drive folder in your home directory. Refer the following screenshot.

sk_004

Google Drive_005

From now on, copy and paste the files/folders in the local Google Drive folder that you want to sync to your online Google Drive account.

That’s it. Start using your Google drive from your Ubuntu desktop.

Cheers!

Reference Links:

The post Grive2 – An Unofficial, Google Drive Client For Linux appeared first on Unixmen.


Dukto – An Easy, Multi-platform File Transfer Tool

$
0
0


About Dukto

Dukto is a free, Open Source file transfer utility that can be used to used to transfer files over Local area network (LAN). We can transfer files from any system or device to another system more easily. All you need to do is start Dukto utility on your local and destination systems and just drag and drop the files/folders that you want to transfer on the Dukto’s window, and the files/folders will be transferred to the destination system. No more configuration, no more concern about users, permissions, size or type of files, operating systems, protocols, clients, servers and so on. This utility just works. Cool, isn’t it? Although, the another notable thing is it is cross platform. Yes, It should work on almost all operating systems and devices, including Linux, Windows, Mac OS X, Meego, Android, Blackberry, Windows Phones and Symbian (for Nokia touch phones). It is released under GPL.

Features

Concerning about Dukto’s features, we can list the following.

  • Simple user interface ;
  • No server or internet connection needed ;
  • Zero configuration ;
  • Clients auto-discovery ;
  • High speed file transfer ;
  • Multi-OS native support ;
  • Portable version available ;
  • Multi files and folders transfer ;
  • Transfers log ;
  • Send and receive text snippets (eg. useful for sending URLs) ;
  • Open received files directly from the application ;
  • Windows 7 taskbar integration with progress and transfer indicator ;
  • Show your IP addresses on the IP connection page ;
  • Full Unicode support ;
  • Metro style UI ;
  • Free and open source.

Installation

Install Dukto in Ubuntu and it’s derivatives:

In LUbuntu 14.04 LTS (Not sure about Ubuntu 14.04 LTS), Dukto is available in the default repositories. So to install it, simply, run:

sudo apt-get install dukto

On other Ubuntu derivatives, do the following.

For xUbuntu 15.04 (Works well on Ubuntu 15.04 too) run the following:

sudo sh -c "echo 'deb http://download.opensuse.org/repositories/home:/colomboem/xUbuntu_15.04/ /' >> /etc/apt/sources.list.d/dukto.list"
sudo apt-get update
sudo apt-get install dukto

You can add the repository key to apt. To add the key, run:

wget http://download.opensuse.org/repositories/home:colomboem/xUbuntu_15.04/Release.key
sudo apt-key add - < Release.key

For xUbuntu 14.10 run the following:

sudo sh -c "echo 'deb http://download.opensuse.org/repositories/home:/colomboem/xUbuntu_14.10/ /' >> /etc/apt/sources.list.d/dukto.list"
sudo apt-get update
sudo apt-get install dukto

To add the key, run:

wget http://download.opensuse.org/repositories/home:colomboem/xUbuntu_14.10/Release.key
sudo apt-key add - < Release.key

For xUbuntu 14.04 run the following:

sudo sh -c "echo 'deb http://download.opensuse.org/repositories/home:/colomboem/xUbuntu_14.04/ /' >> /etc/apt/sources.list.d/dukto.list"
sudo apt-get update
sudo apt-get install dukto

To add the key, run:

wget http://download.opensuse.org/repositories/home:colomboem/xUbuntu_14.04/Release.key
sudo apt-key add - < Release.key

For xUbuntu 12.04 run the following:

sudo sh -c "echo 'deb http://download.opensuse.org/repositories/home:/colomboem/xUbuntu_12.04/ /' >> /etc/apt/sources.list.d/dukto.list"
sudo apt-get update
sudo apt-get install dukto

To add the key, run:

wget http://download.opensuse.org/repositories/home:colomboem/xUbuntu_12.04/Release.key
sudo apt-key add - < Release.key

Install Dukto CentOS:

For CentOS 7 run the following as root:

cd /etc/yum.repos.d/
wget http://download.opensuse.org/repositories/home:colomboem/CentOS_7/home:colomboem.repo
yum install dukto

Install Dukto in Fedora:

For Fedora 21 run the following as root:

cd /etc/yum.repos.d/
wget http://download.opensuse.org/repositories/home:colomboem/Fedora_21/home:colomboem.repo
yum install dukto

For Fedora 20 run the following as root:

cd /etc/yum.repos.d/
wget http://download.opensuse.org/repositories/home:colomboem/Fedora_20/home:colomboem.repo
yum install dukto

Install Dukto RHEL:

For RHEL 7 run the following as root:

cd /etc/yum.repos.d/
wget http://download.opensuse.org/repositories/home:colomboem/RHEL_7/home:colomboem.repo
yum install dukto

Usage

For the purpose of this tutorial, I will be using two Ubuntu desktops.

  1. Lubuntu 14.04 LTS desktop (Source system) ;
  2. Ubuntu 15.04 LXDE desktop (Destination).

As I mentioned above, you must install Dukto on both Source and destination systems.

After installing it, launch it either from Menu or Dash on both systems.

Or just type: duckto from your terminal.

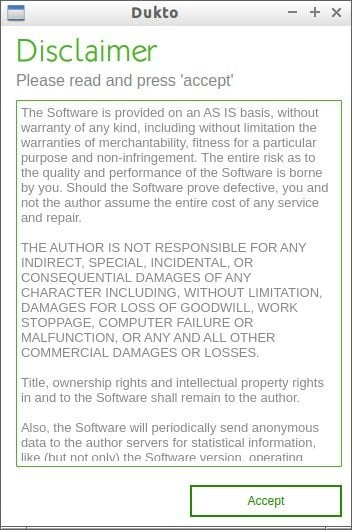
Accept the license agreement.

Dukto_001

The default interface of Dukto will look like below.

Dukto_005

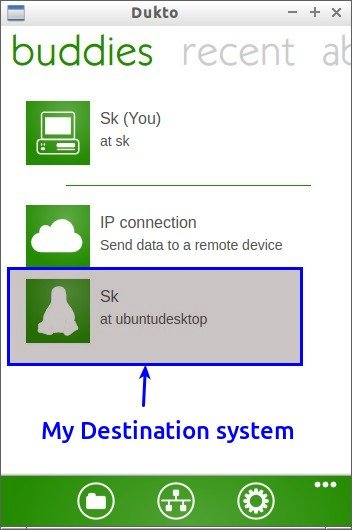
Dukto will automatically search and display other Duto installed devices or systems in the network. As you see in the below screenshot, Sk at ubuntudesktop is my destination system.

Dukto_005

Just click on your destination system to transfer files. You can either send some texts, files or folders. Refer the following screenshot.

Dukto_006

Let us send a sample file. To do that, click on “Send some files” tab. And select your files that your want to send. After sending the files, you’ll see the following confirmation message.

Dukto_007

Also, you can simply drag and drop the files or folders that you want to send to your destination system in the Dukto’s window.

Now, go and check on your destination system. You will see that the files have been successfully received from your source system.

Ubuntu 15.04 Desktop [Running] - Oracle VM VirtualBox_008

As you see in the above screenshot, I have successfully sent two files from my Source system (Lubuntu 14.04) to Ubuntu 15.04 (Destination) system.

You can find the successfully transferred files in your home directory (Ex. /home/sk/ in my case).

Ubuntu 15.04 Desktop [Running] - Oracle VM VirtualBox_009

Similarly, you can send texts or folders as shown above.

Let us send a sample text. To do that, click on the destination computer and click on the “Send some text” button.

Enter the text and click Send.

Dukto_013

Now, go to that destination, and see whether the text has been received or not.

Ubuntu 15.04 Desktop [Running] - Oracle VM VirtualBox_014

Cool. See the text that sent from my source system has been received on my destination computer. So easy, isn’t it? Yes, You don’t have to do any extra configuration. Simply run Dukto application on both systems and start transferring your files/folders/texts.

If you want to change storage location, click on gear button in the main interface.

Dukto_010

Click Change folder button and choose a different location of your choice.

Dukto_012

Removing Dukto

To remove it, just run the following command in Ubuntu and it’s derivatives.

sudo apt-get remove dukto

In CentOS/Fedora/RHEL, run:

sudo yum remove dukto

That’s it.

Conclusion

I must admit that I am very impressed while using Dukto. It is so easy to install, configure and use. You don’t need to be a system administrator or a hardcore computer user. Even a novice user can easily install and use this application within minutes. Since, it is multi-platform and portable, you can use this application almost all your desktops, laptops and mobile devices and even in servers. The only downside is it doesn’t has any security mechanisms right now. So, I recommend you to use it within your trusted networks. Apart from that, I haven’t noticed any issues while testing it in my local network. Just give it a try once and you’ll never look back for another utility for transferring files over LAN.

Cheers!

Reference links:

The post Dukto – An Easy, Multi-platform File Transfer Tool appeared first on Unixmen.

Wajig – An Alternative To APT Package Manager

$
0
0


Introduction

Wajig is a front-end Unified Package Manager for Debian. Instead of typing ‘apt-get’ command, you can type simply ‘wajig’ and let it do the rest. Wajig command is very simple and easy to use than ‘apt-get’ command.

Installation

Install Wajig using the following command:

apt-get install wajig

utorrent_(002)

Usage

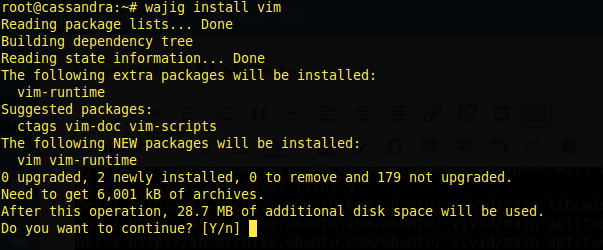
Let us explore the usage of Wajig command. For example, let me show you how to install ‘vim’ package with wajig.

wajig install vim

utorrent_(003)

Similarly, you can remove vim using wajig:

wajig remove vim

utorrent_(004)

Also, Wajig has a command line Interface that will help us to run commands inside it’s CLI Prompt.

Swtich to Wajig’s CLI using command:

wajig

Now, we have entered into Wajig’s interface:

wajig>

Then, Install a package, for example vim, as shown below.

wahig>install vim

Sample output:

wajig> install vim
Reading package lists... Done
Building dependency tree 
Reading state information... Done
Suggested packages:
 ctags vim-doc vim-scripts
The following NEW packages will be installed:
 vim
0 upgraded, 1 newly installed, 0 to remove and 179 not upgraded.
Need to get 0 B/1,021 kB of archives.
After this operation, 2,483 kB of additional disk space will be used.
Selecting previously unselected package vim.
(Reading database ... 176604 files and directories currently installed.)
Preparing to unpack .../vim_2%3a7.4.488-3ubuntu2_amd64.deb ...
Unpacking vim (2:7.4.488-3ubuntu2) ...
Setting up vim (2:7.4.488-3ubuntu2) ...
update-alternatives: using /usr/bin/vim.basic to provide /usr/bin/vim (vim) in auto mode
update-alternatives: using /usr/bin/vim.basic to provide /usr/bin/vimdiff (vimdiff) in auto mode
update-alternatives: using /usr/bin/vim.basic to provide /usr/bin/rvim (rvim) in auto mode
update-alternatives: using /usr/bin/vim.basic to provide /usr/bin/rview (rview) in auto mode
update-alternatives: using /usr/bin/vim.basic to provide /usr/bin/vi (vi) in auto mode
update-alternatives: using /usr/bin/vim.basic to provide /usr/bin/view (view) in auto mode
update-alternatives: using /usr/bin/vim.basic to provide /usr/bin/ex (ex) in auto mode
wajig>

If you want to know more details about a package, run:

wajig show vim

Sample output:

root@cassandra:~# wajig show vim
Package: vim 
State: installed
Automatically installed: no
Version: 2:7.4.488-3ubuntu2
Priority: optional
Section: editors
Maintainer: Ubuntu Developers <ubuntu-devel-discuss@lists.ubuntu.com>
Architecture: amd64
Uncompressed Size: 2,483 k
Depends: vim-common (= 2:7.4.488-3ubuntu2), vim-runtime (= 2:7.4.488-3ubuntu2), libacl1 (>= 2.2.51-8), libc6 (>= 2.15), libgpm2 (>= 1.20.4), libpython2.7 (>= 2.7),
 libselinux1 (>= 1.32), libtinfo5
Suggests: ctags, vim-doc, vim-scripts
Conflicts: vim
Provides: editor
Provided by: vim-athena, vim-gnome, vim-gtk, vim-nox
Description: Vi IMproved - enhanced vi editor
 Vim is an almost compatible version of the UNIX editor Vi. 
 
 Many new features have been added: multi level undo, syntax highlighting, command line history, on-line help, filename completion, block operations, folding, Unicode
 support, etc. 
 
 This package contains a version of vim compiled with a rather standard set of features. This package does not provide a GUI version of Vim. See the other vim-*
 packages if you need more (or less).
Homepage: http://www.vim.org/

If you want to get description of a package, then type:

wajig describe vim

Sample output:

root@cassandra:~# wajig describe vim
Package Description
========================-===================================================
vim Vi IMproved - enhanced vi editor
root@cassandra:~#

Let us locate how many packages are available for vim.

wajig list vim

utorrent_(006)

Find out where is a newly installed package is located exactly using command:

utorrent_(009)

Let us find out which packages are required to upgrade:

wajig toupgrade

utorrent_(007)

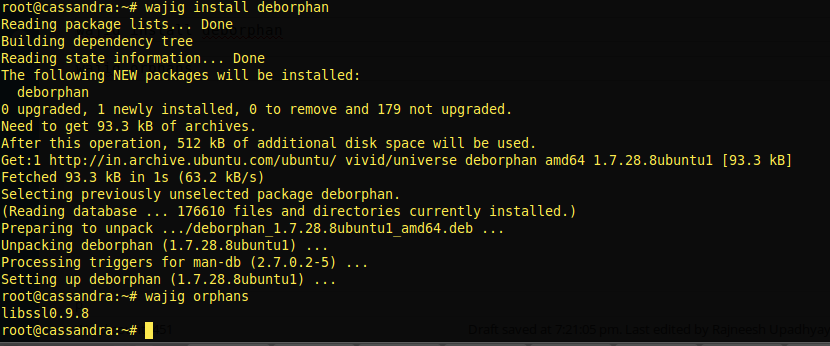
Find our which libraries are not required anymore using command:

wajig install deborphan
wajig orphans

utorrent_(008)

Now, you have list of libraries which are not required anymore. So, we can remove them to free up the disk space using the following command.

wajig purgeorphans

Sample output:

Reading package lists... Done
Building dependency tree 
Reading state information... Done
The following packages will be REMOVED:
libssl0.9.8*
0 upgraded, 0 newly installed, 1 to remove and 179 not upgraded.
After this operation, 2,445 kB disk space will be freed.
Do you want to continue? [Y/n] y
(Reading database ... 176654 files and directories currently installed.)
Removing libssl0.9.8:amd64 (0.9.8o-7ubuntu4) ...
Purging configuration files for libssl0.9.8:amd64 (0.9.8o-7ubuntu4) ...
Processing triggers for libc-bin (2.21-0ubuntu4) ...

For Security upgrades:

wajig upgradesecurity

For system upgrade:

wajig upgrade

To remove unused dependencies packages, run:

wajig autoremove

That’s it!

Have Fun!!

Reference links:

The post Wajig – An Alternative To APT Package Manager appeared first on Unixmen.

Setup Genymotion Android Emulator In Ubuntu

$
0
0


Introduction

Genymotion is an android emulator that can be used for development purpose or application testing purpose. You can feel the android without having an actual device. It is very fast, simple and easy to handle Application. You can go full Screen Size mode that will give you feeling of desktop, and you can easily copy and past and easy drag and drop feature is also available. This emulator also support GPS and wifi Internet  in real time.

Installation

First of all you will need to create a Account on Genymotion Website. Go to this link and create an account.

utorrent_

Check you email to  activate the account, then download Genymotion emulator.

Download Genymotion to your favorite location.

utorrent_(001)

Change permissions of that file:

chmod +x genymotion-2.5.2_x64.bin

utorrent_(002)

Execute the script:

./genymotion-2.5.2_x64.bin

Press Y and it will create a director named as ‘genymotion’ , go to the directory run the script.

utorrent_(004)

cd genymotion && ./genymotion

utorrent_(005)

A Setup window will appear accept T&C.

utorrent_(006)

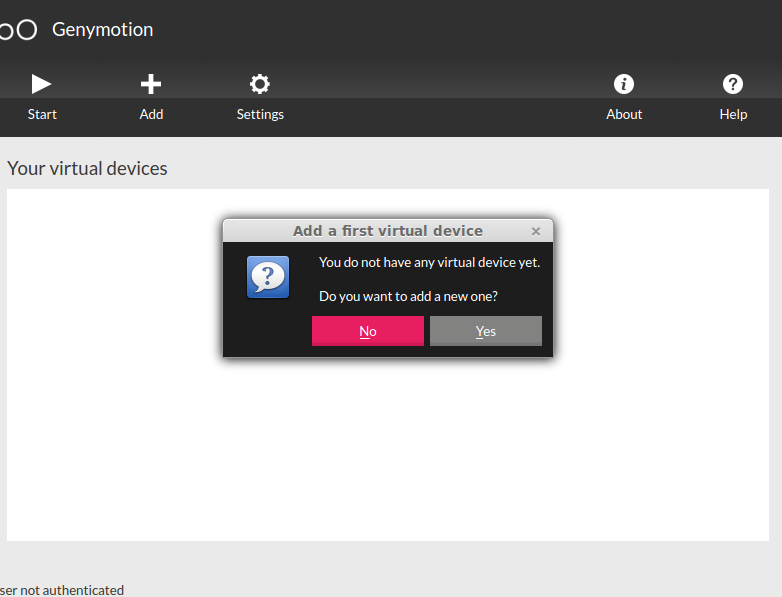
Click next, and to have some virtual devices click yes.

utorrent_(007)

Login with the user id ans password, that you can register with the Genymotion website in First Steps.

utorrent_(008)

 Select A virtual Device as per your requirement, click next.

utorrent_(009)

 Download required files from Internet.

utorrent_(010)

utorrent_(011)

Click finish.

utorrent_(013)

Now, Samsung Galaxy Virtual Device has been installed, test that device.

utorrent_(014)

Open That virtual device, you can simulate all of the functions in this virtual environment.

utorrent_(018)

GPS, Time settings, wifi/network management is available.

utorrent_(020)

Use available devices either for development or for testing purpose.

That’s it!! Have fun!!

The post Setup Genymotion Android Emulator In Ubuntu appeared first on Unixmen.

Transferring Files And Folders Over Network Like A Pro In Ubuntu

$
0
0


Transferring files and folders over network is becoming so easy nowadays. We already have featured an awesome, cross platform file transfer tool called “Dukto”.

Today, we would like to share two more tools that will help you to share files and folders over network.

  1. Nitroshare
  2. Retroshare

You don’t need to be an experienced Linux administrator to share files over LAN or WAN. These tools are really easy to setup, configure and use. And the good news is these are completely free and open source.

First, we will see about Nitroshare.

1. Nitroshare

NitroShare is a tool used to transfer files from one machine to another on the same network. Just install it on your Ubuntu systems and you will all set. NitroShare will instantly find each other systems in your network and start sharing files and folders. Nitroshare is written in C++ programming language, and it is completely free, and open source. This application was developed using the QT framework and therefore runs on any platform supported by QT, including Linux, Microsoft Windows, and Mac OS X.

Features

Some of the prominent features of NitroShare are listed below.

  • Automatic discovery: Nitroshare will automatically discover all systems in your network.
  • File transfer across network systems are really fast.
  • Size is not limited. You can transfer files or folders of any size.
  • It transfers anything. You can either transfer a file, folder, image or media.
  • Dynamic file compress during transfer to decrease transfer time and bandwidth.
  • CRC checksum generation to ensure file integrity during transfer.
  • Full compatibility with clients running on other operating systems.
  • A helpful configuration wizard to guide you through setting up the application on your machines.

Installing NitroShare

Head over to the Nitroshare download page and download the suitable version for your OS.

If you are suing Ubuntu, there is PPA available that will help you to easily install it.

Add the NitroShare PPA to your system using the following command:

sudo add-apt-repository ppa:george-edison55/nitroshare

Update source lists:

sudo apt-get update

Now, install Nitroshare in all systems in your network using command:

sudo apt-get install nitroshare

That’s it. Now, we will see how to use to send and files over network.

Usage

After installing, launch the NitroShare application either from menu or Dash.

An Introduction window will open at first launch. Just click Close.

NitroShare - Introduction — NitroShare_001

Now, select “Send Files…” or “Send Directory…” from the the AppIndicator or Tray icon menu in your Ubuntu system.

Refer the following screenshot.

Ubuntu 15.04 Desktop [Running] - Oracle VM VirtualBox_003

Let us send a folder (Ex. My Share) from my home directory.

To do that, right click on the Nitroshare icon and select “Send Directory…” option.

Menu_006

Select the folder you want to share.

Select Directory_007

You don’t need to manually search all systems in your network. Nitroshare will automatically search and list the available system in your source system.

Select the destination system and click Ok.

Select Device — NitroShare_008

After completing the transfer, a confirmation window will appear.

Transfers — NitroShare_009

Close the ‘File Transfer complete’ window.

Go to the destination device and check the folder is really received or not.

By default, the received files or folders will be saved in the Desktop folder of your destination system.

Ubuntu 15.04 Desktop [Running] - Oracle VM VirtualBox_010

Ubuntu 15.04 Desktop [Running] - Oracle VM VirtualBox_012

If you like, you can change the default download location from the Nitroshare Settings option.

Settings — NitroShare_013

Similarly, you can send and receive any files/folders of any size to any systems in the network. All you have to do is just launch the Nitroshare application in all systems and start sharing.

2. Retroshare

Retroshare is the next generation of peer to peer sharing networks. Unlike Nitroshare or any other classic peer to peer software, it only connects to trusted persons and not just anyone. Also, it not just a file sharing utility like Nitroshare, It is completely decentralized communication platform. It sends data over LAN and WAN.

Here is the list communication services in RetroShare:

  • Private chat with friends
  • Private or public chat lobbies, that allow chatting with friends and friends of friends
  • Messages to friends
  • Forums
  • Voice over IP

The problem with existing filesharing networks is that you have no control over who you share information with. Retroshare is basically a platform that establishes encrypted connections between authenticated friends. This connection is used for various communication services and file sharing. It is independent of any corporate system or central servers, all data is only sent to friends and in some cases relayed by them to their friends, making Retroshare a decentralized Social Sharing Network designed For the People. Encrypted communication, ensures that all shared information is only known to you and your friends.

Installing Retroshare on Ubuntu

Download the latest version from the Retroshare official download page. It is available for all platforms such as Linux, Mac OS X and Windows.

Retroshare is currently available on all Ubuntu distributions up to vivid (15.04).

Or, you can use the following PPA to get the latest version.

sudo add-apt-repository ppa:csoler-users/retroshare
sudo apt-get update
sudo apt-get install retroshare06

Usage

Launch it from the Dash or Menu in your Ubuntu systems.

The following screen should appear.

First of all, you need to create your identity. Enter your name, password and type of your node (Ex. Laptop or Desktop). You don’t have to use your valid email, just type e.g. “xxx” .

Note: Before proceeding, hover your mouse pointer over Retroshare window to help Retroshare collect as much as randomness as possible. Filling the progress bar to 20 % is needed. 100% is advised.

Then, Click Generate new profile and node.

Create new profile_001

Enter your password for PGP key.

PGP key passphrase_003

This is how my Retroshare page looks.

RetroShare 0.6.0x a secure decentralized communication platform - Senthilkumar (Laptop)_004

Now, you need to add friends to be able to connect to them. Once connected with them you can chat and share files.

Send Your Certificate to Friends:

Open the “Add a friend” wizard from the top right corner of the Retroshare window.

The following screen should appear.

Either use the “Send an Invitation by Email” function, or copy the certificate manually and send it to your friends via any Chat or Email.

Connect Friend Wizard_001

Copy your certificate and send it your friend via chat or email.

Connect Friend Wizard_002

Remember to ask your friends to send you back their certificate.

Add Your Friends to Your RetroShare:

When you receive your friends’ certificates:

  1. Click on the “Add a Friend Wizard” Button again.
  2. Select “Enter the certificate manually”.
  3. Cut and paste their certificates into the window (only one at a time).
  4. Click “Next” Button. A window with your friend’s details will appear.
  5. If it looks okay – Click “Finish” Button.

Note: The connection will not be made until BOTH friends have added each other’s certificates. As you are connecting directly to your friends and not indirectly over a server, you have to make sure the ports for RetroShare are open in your firewall and forwarded in your router. You can connect without opening your ports, but it will take longer and is more unreliable, however it is sufficient if either you or your friend has forwarded the ports.

Once you and your friend have set up Retroshare application with valid certificates on both sides, you will all set. Just start to chat, share files and send mails between you.

Conclusion

You might ask which application should I use. The answer is it depends. If you need just a file sharing utility to send and receive files over network, I recommend you to try “Nitroshare”. If you need more features like secure chatting, VoIP, Voice and Video, Forums, then “Retroshare” will be best choice. Both are pretty easy to setup and use. Give them a try, you won’t be disappointed.

Cheers!

The post Transferring Files And Folders Over Network Like A Pro In Ubuntu appeared first on Unixmen.

Install Easy Hosting Control Panel (EHCP) In Ubuntu 14.04

$
0
0


About Easy Hosting Control Panel

Easy Hosting Control Panel, also known as EHCP, is an open-source and powerful hosting control panel that lets you to host any websites, create email accounts, create additional (sub) domains, and create FTP accounts and many more via a web browser. It is only the first hosting control panel that provide the built-in support for nginx with PHP-FPM.

Prominent features

EHCP has many unique features compared to other control panels.

Here is the list of general Features of EHCP:

  • Full php, full opensource, easily modifiable, customazible, ehcp templates ;
  • Unlimited “resellers, panel users, domains, ftp users, emails, mysqls” ;
  • Domains, subdomains, ftp, mysql, dns (automatic), email etc. management ;
  • Password protected domains ;
  • Email forwarding, autoreply, catch-all emails ;
  • Web-stats (webalizer) ;
  • Web-ftp (net2ftp) ;
  • Easy Install Scripts/Programs (programs such as wordpress, durpal easily downloaded and copied by means of server; no need to deal with ftp etc. A total of 51 programs) ;
  • Add/setup domain & install wordpress in single step ;
  • Add domain, easy add domain, add domain to existing ftp, (use sub-ftp accounts) ;
  • Add ftp in main ftp, add custom ftp space (custom location) ;
  • Disk quota control ;
  • Custom http, custom dns, domain aliases, domain redirect ;
  • Ssl support ;
  • Different languages, templates support, a few lang/templates included ;
  • Different Menus/pages for Server Admin, Reseller, domain admin, email user ;
  • Server backup/restore ;
  • Domain transfer to another ehcp user ;
  • Simple, light, fast, host hundreds of domains in it ;
  • Free, full php, object oriented, modular, easily modifiable/extendable design ;
  • Add domain to my ftp ;
  • Add ftp with any directory under home ;
  • Add ftp with subdomain ;
  • Add ftp with subdirectory under domain name ;
  • Edit dns/apache template for a domain ;
  • Domain aliases ;
  • Email forwardings ;
  • Catch all email ;
  • Default domain settable for ehcp gui ;
  • Apache ssl support ;
  • More “easy install scripts”, a total of 30 scripts ;
  • Disk quota support ;
  • Smtp auth support ;
  • Bulk add domain feature ;
  • Separate mysql server support ;
  • And many.

Install Easy Hosting Control Panel In Ubuntu 14.04

In this How-to, we are going to setup EHCP in Ubuntu 14.04 64 bit Server. Also, It should work well on all other distributions such as Debian, RHEL and CentOS.

First, head over to EHCP download page and get the latest version of EHCP.

Or download the EHCP installation script using the following command:

wget http://www.ehcp.net/ehcp_latest.tgz

Extract the downloaded file using command:

tar -zxvf ehcp_latest.tgz

Now, switch to the extracted folder and run the installation script using the following commands:

cd ehcp/
sudo ./install.sh

Read the installer instructions very carefully and follow the instructions. The installer will install all the necessary packages like Apache, MySQL, Postfix and PHP. And also during the installation it will ask you to configure some services and to enter the passwords for EHCP admin accounts. The installation will take nearly 1 hour depending upon your internet speed. Make sure you have uninterrupted Internet connection.

Press enter to continue:

STAGE 1
=====================================================================

--------------------EHCP PRE-INSTALLER 0.35.3 -------------------------
-----Easy Hosting Control Panel for Ubuntu, Debian and alikes--------
-------------------------www.ehcp.net--------------------------------
---------------------------------------------------------------------

Now, ehcp pre-installer begins, a series of operations will be performed and main installer will be invoked. 
if any problem occurs, refer to www.ehcp.net forum section, or contact me, mail/msn: info@ehcp.net
Please be patient, press enter to continue

Again press Enter to continue:

Note that ehcp can only be installed automatically on Debian based Linux OS'es or Linux'es with apt-get enabled..(Ubuntu, Kubuntu, debian and so on) Do not try to install ehcp with this installer on redhat, centos and non-debian Linux's... To use ehcp on no-debian systems, you need to manually install.. 
this installer is for installing onto a clean, newly installed Ubuntu/Debian. If you install it on existing system, some existing packages will be removed after prompting, if they conflict with packages that are used in ehcp, so, be careful to answer yes/no when using in non-new system
Actually, I dont like saying like, 'No warranty, I cannot be responsible for any damage.... ', But, this is just a utility.. use at your own.
ehcp also sends some usage data to developer for statistical purposes
press enter to continue

Press Enter to continue:

---------------------------------------------------------------------
-----------------------EHCP MAIN INSTALLER---------------------------
------Easy Hosting Control Panel for Ubuntu, Debian and alikes ------
--------------------------www.ehcp.net-------------------------------

---------------------------------------------------------------------
ehcp version 0.35.3 
ehcp installer version 0.35.3

starting ehcp install, please read prompts/questions carefully !
Some install/usage info and your name/email is sent to ehcp developpers for statistical purposes and for improvements
Also note that, a reseller account of 'ehcp' is setup by default to support ehcp. you may delete it after install. (Please don't)

press enter to continue:

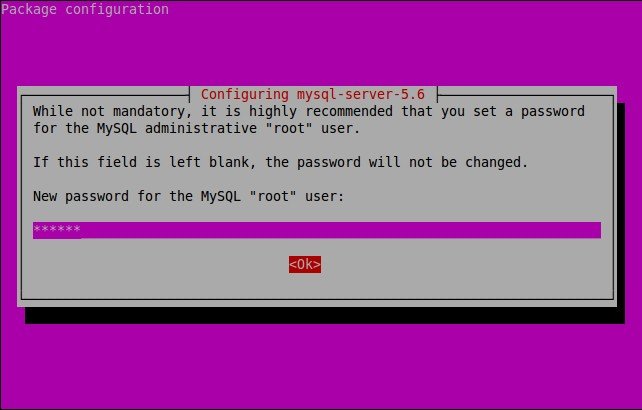
Enter the password for the MySQL “root” user and click OK.

sk@server: ~-ehcp_002

Re-enter the password and click OK.

sk@server: ~-ehcp_003

Enter your name and Email id:

==========================================================================
EHCP INSTALL - INPUTS/SETTINGS SECTION:
THIS SECTION IS VERY IMPORTANT FOR YOUR EHCP SECURITY AND PASSWORD SETTINGS.
 PLEASE ANSWER ALL QUESTIONS CAREFULLY
Please enter your name:SK 
Please enter your/admin email (used to send your panel info, ehcp news)- Enter an already working email:sk@unixmen.com

Enter your MySQL “root” user password which we have setup earlier. In my case, MySQL “root” user password is ubuntu:

=======> MYSQL PASSWORD SETTINGS IS VERY IMPORTANT - YOUR EHCP MAY NOT FUNCTION IF YOU MISS SOMETHING HERE.. ehcp related information will be stored in your local mysql server ==========
Enter your current MYSQL ROOT PASSWORD:ubuntu

Then, enter password for mysql user of ‘ehcp':

Enter NEW PASSWORD for mysql user of `ehcp` (default 1234):
Please pay attention that, you cannot use sign # in your password:ubuntu

Enter the EHCP panel admin user password twice:

Enter ehcp panel admin NEW PASSWORD (default 1234):ubuntu
Enter ehcp panel admin NEW PASSWORD AGAIN:ubuntu

Enter your hostname, IP address, preferred language etc. If you want to leave defaults, just press Enter. In my case, I go with defaults.

---------------------------------------------------------------------
Your hostname seems to be server, if it is different, enter it now, leave blank if correct

Hostname is set as server 
Your ip seems to be 192.168.1.200, if it is different or you want to use a different (external) ip, enter it now, leave blank if correct

ip is set as (192.168.1.103) in ehcp, (Your server's actual ip is not changed)

LANGUAGE SELECTION:

ehcp currently supports English,Turkish,German,Spanish,French (some of these partial) except installation 
enter language file you want to use (en/tr/german/spanish/nl/fr/lv [default en]):

Do you want to install some additional programs which are not essential but useful for a hosting environment, such as ffmpeg,... etc.. ? Answer no if you have small ram or you need a light/fast system (y/[n])

After few minutes, you’ll be asked configure database for roundcube with dbconfig-common. Select Yes and press Enter.

sk@server: ~-ehcp_004

Select the database used by roundcube. I select MySQL.

sk@server: ~-ehcp_004

Enter password of the database’s administrative user:

sk@server: ~-ehcp_005

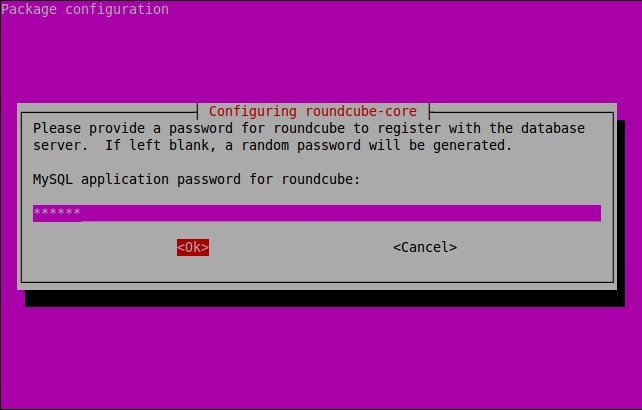
Enter MySQL application password for roundcube:

sk@server: ~-ehcp_006

Confirm password:

sk@server: ~-ehcp_007

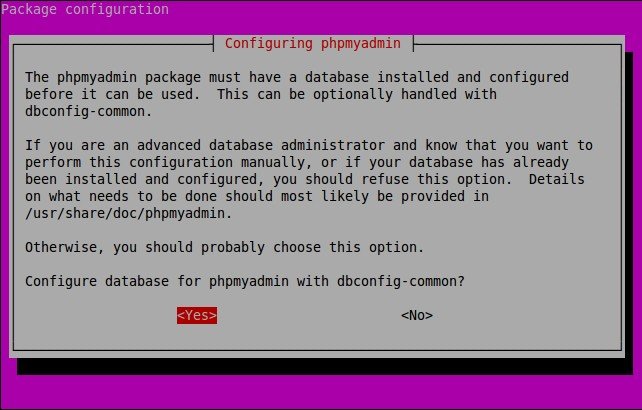
The phpmyadmin package must have a database installed and configured before it can be used. This can be optionally handled with dbconfig-common.

Select “Yes” to configure database for phpmyadmin with dbconfig-common and press Enter.

sk@server: ~-ehcp_008

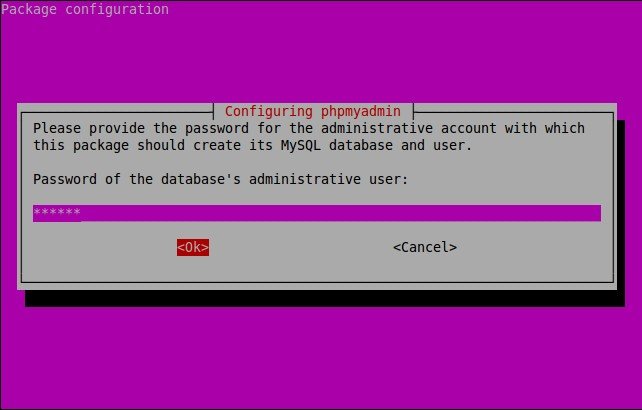
Enter password of the database’s administrative user:

sk@server: ~-ehcp_009

Enter MySQL application password for phpmyadmin:

sk@server: ~-ehcp_010

Confirm password:

sk@server: ~-ehcp_011

Now, choose the web server that should be automatically configured to run phpMyAdmin. I chose Apache.

sk@server: ~-ehcp_012

Now, It is time to select the mail server configuration type.

sk@server: ~-ehcp_013

Select the type of your mail configuration. I go with default selection.

sk@server: ~-ehcp_014

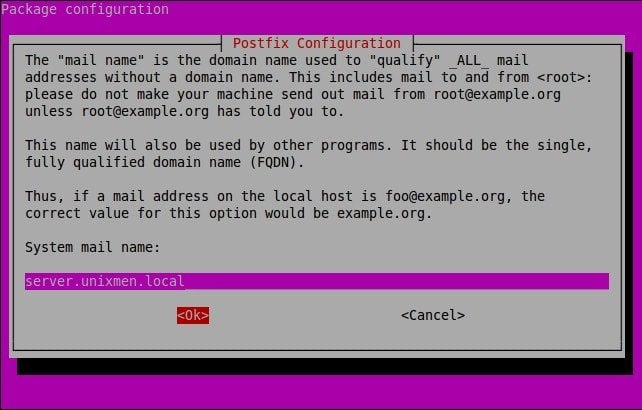
Enter the mail server name. If you want to use your system’s FQDN, just leave the defaults and select OK and press Enter.

sk@server: ~-ehcp_015

Select “Yes” to create directories for web-based administration.

sk@server: ~-ehcp_016

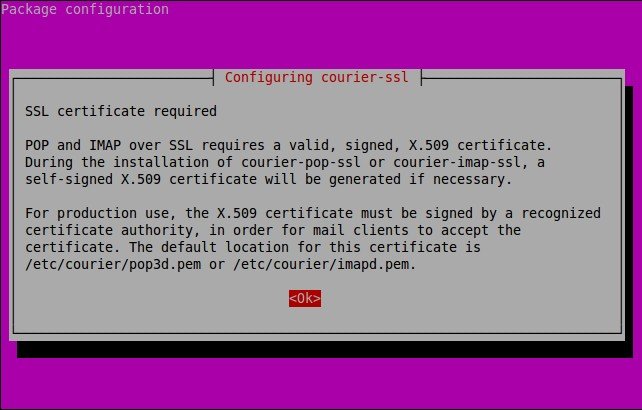
Press enter to create necessary SSL certificate:

sk@server: ~-ehcp_017

Note: Skip nginx webserver installation if you are asked to install it. Because, we already chose Apache webserver in our earlier steps. Simply type “n” and press enter to skip nginx installation wherever you are asked to do.

That’s it. The installation is now complete.

sk@server: ~-ehcp_001

Access EHCP Dashboard

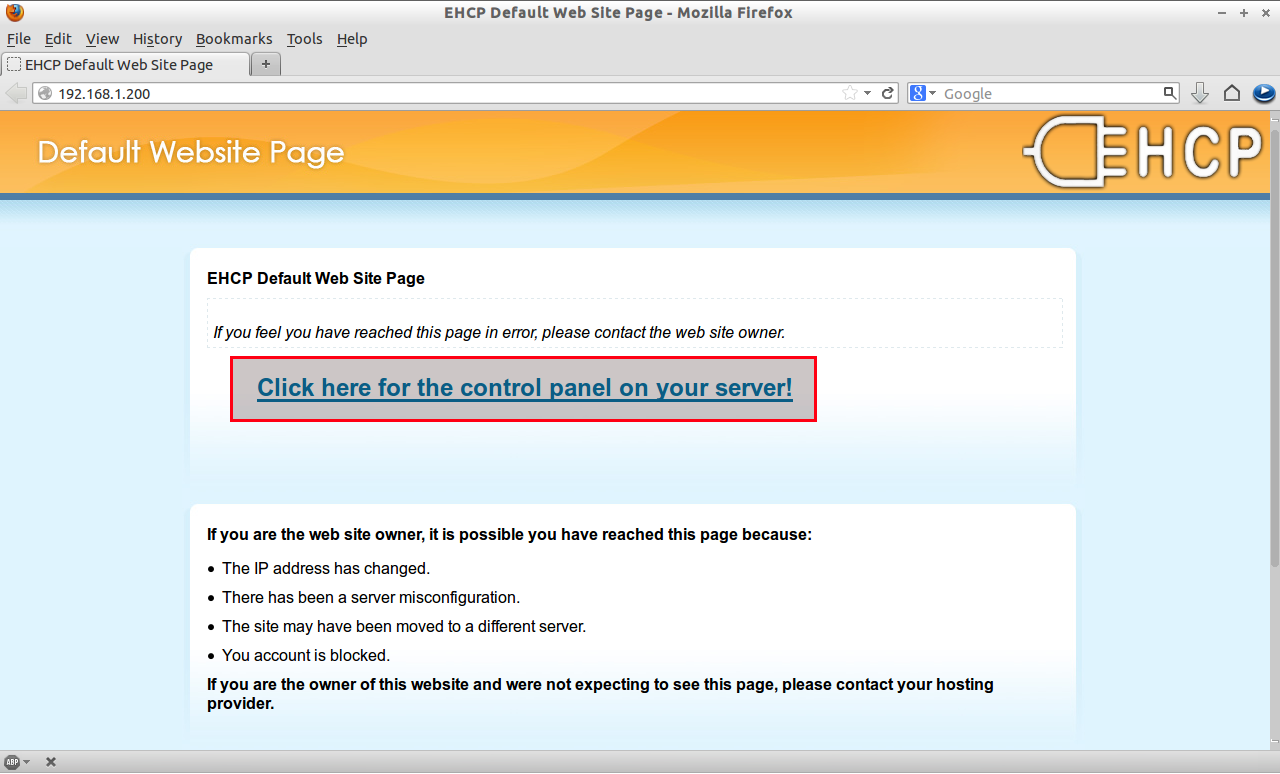
Now open the EHCP web console by pointing your web browser with “http://ip-address/” or “http://localhost”.

EHCP-Default-Web-Site-Page-Mozilla-Firefox_022

Click on the link “Click here for the control panel on your server”.

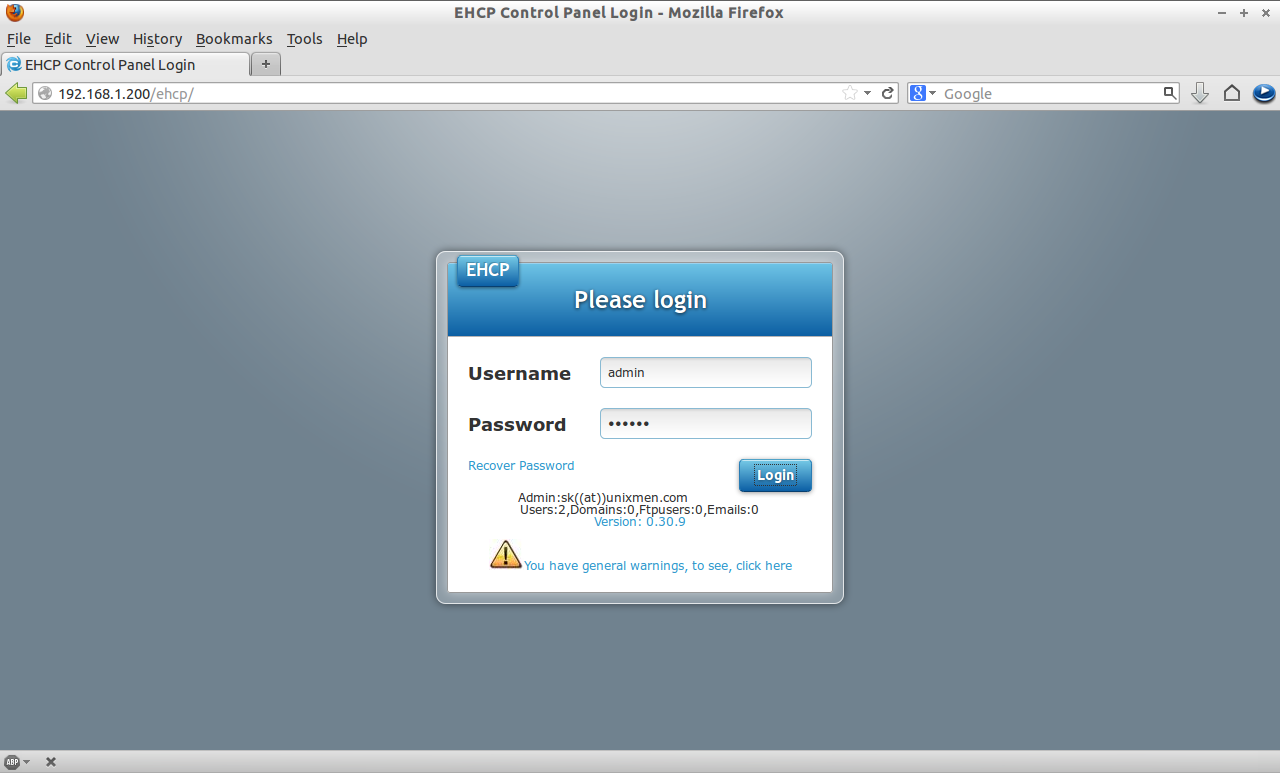
Enter the administrative credentials. The default username is admin and the password for admin account is the one you setup during installation. If you haven’t setup any password for admin account, then the default password is 1234.

EHCP-Control-Panel-Login-Mozilla-Firefox_023

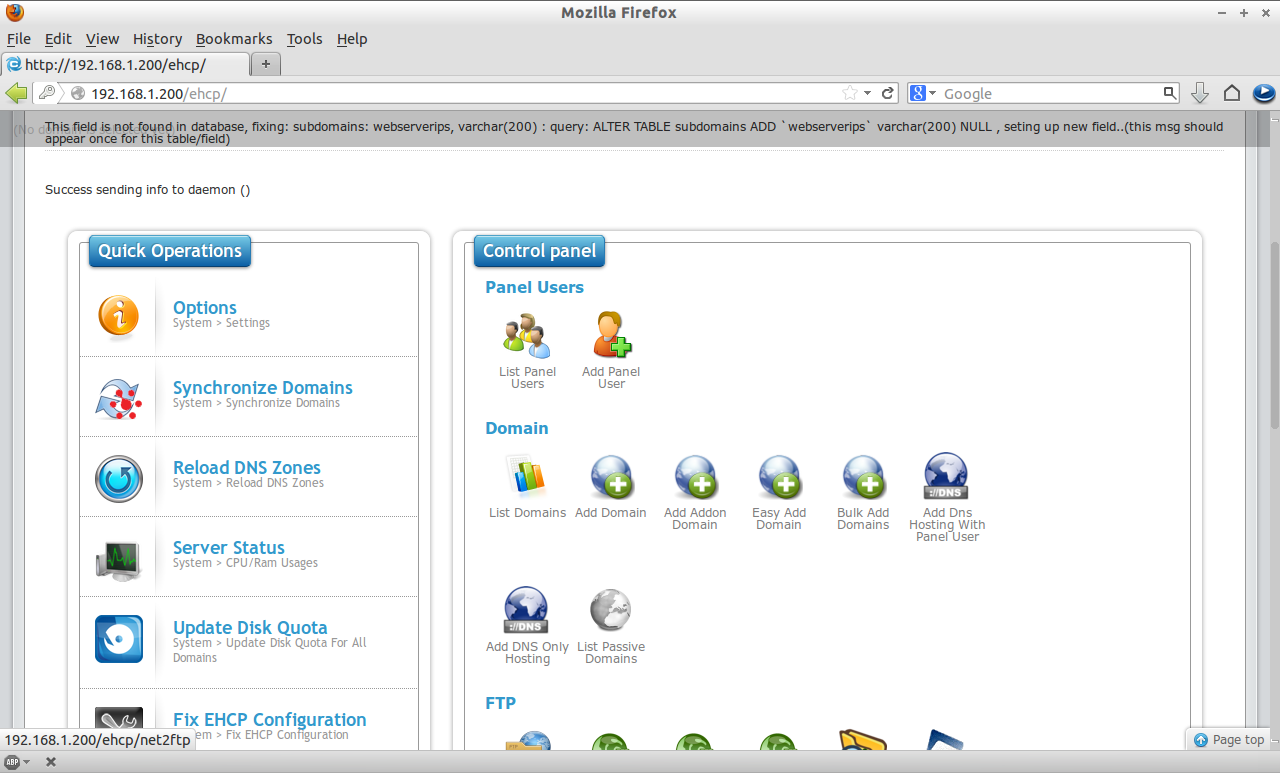
The main console window EHCP will look like below.

Mozilla-Firefox_024

From here, you can create domains, users, FTP accounts and databases and email accounts for the domains.

The post Install Easy Hosting Control Panel (EHCP) In Ubuntu 14.04 appeared first on Unixmen.

How To Install Nagios 4.1 In Ubuntu 15.04

$
0
0


About Nagios

Nagios is an enterprise class, open source software that can be used for network and infrastructure monitoring. Using Nagios, we can monitor servers, switches, applications and services etc. It alerts the System Administrator when something goes wrong and also alerts back when the issues have been rectified.

Features

Using Nagios, you can:

  • Monitor your entire IT infrastructure.
  • Identify problems before they occur.
  • Know immediately when problems arise.
  • Share availability data with stakeholders.
  • Detect security breaches.
  • Plan and budget for IT upgrades.
  • Reduce downtime and business losses.

Scenario

For the purpose of this tutorial, I will be using the following two systems.

Nagios server:

  • Operating system : Ubuntu 15.04 Server
  • IP Address : 192.168.1.102/24

Nagios client:

  • Operating System : Ubuntu 14.04 Server
  • IP Address : 192.168.1.103/24
  • Hostname : server.unixmen.local

Prerequisites

Make sure your server have installed with fully working LAMP stack. If not, follow the below link to install LAMP server.

And, install the following prerequisites too:

sudo apt-get install build-essential libgd2-xpm-dev apache2-utils unzip

Create Nagios User And Group

Create a new nagios user account:

sudo useradd -m nagios
sudo passwd nagios

Create a new nagcmd group for allowing external commands to be submitted through the web interface. Add both the nagios user and the apache user to the group.

sudo groupadd nagcmd
sudo usermod -a -G nagcmd nagios
sudo usermod -a -G nagcmd www-data

Download Nagios And Plugins

Go to the nagios download page, and get the latest version. As of writing this, the latest version was 4.1.0 release candidate 2.

wget https://assets.nagios.com/downloads/nagioscore/releases/nagios-4.1.0rc2.tar.gz

And, download nagios plugins too. Nagios plugins allow you to monitor hosts, devices, services, protocols, and applications with Nagios

wget http://nagios-plugins.org/download/nagios-plugins-2.0.3.tar.gz

Install Nagios And Plugins

Install nagios:

Go to the folder where you’ve downloaded nagios, and extract it using command:

tar xzf nagios-4.1.0rc2.tar.gz

Change to the nagios directory:

cd nagios-4.1.0rc2/

Run the following commands one by one from the Terminal to compile and install nagios.

sudo ./configure --with-command-group=nagcmd
sudo make all
sudo make install
sudo make install-init
sudo make install-config
sudo make install-commandmode
Install Nagios Web interface:

Enter the following commands to compile and install nagios web interface.

sudo make install-webconf

You may get the following error:

/usr/bin/install -c -m 644 sample-config/httpd.conf /etc/httpd/conf.d/nagios.conf
 /usr/bin/install: cannot create regular file ‘/etc/httpd/conf.d/nagios.conf’: No such file or directory
 Makefile:296: recipe for target 'install-webconf' failed
 make: *** [install-webconf] Error 1

The above error message describes that nagios is trying to create the nagios.conf file inside the /etc/httpd.conf/directory. But, in Ubuntu systems the nagios.conf file should be placed in /etc/apache2/sites-enabled/directory.

So, run the following command instead of using sudo make install-webconf.

sudo /usr/bin/install -c -m 644 sample-config/httpd.conf /etc/apache2/sites-enabled/nagios.conf

Check if nagios.conf is placed in /etc/apache2/sites-enabled directory.

sudo ls -l /etc/apache2/sites-enabled/

Sample output:

total 4
lrwxrwxrwx 1 root root 35 Aug 4 15:54 000-default.conf -> ../sites-available/000-default.conf
-rw-r--r-- 1 root root 982 Aug 4 16:19 nagios.conf

Create a nagiosadmin account for logging into the Nagios web interface. Remember the password you assign to this account. You’ll need it while logging in to nagios web interface..

sudo htpasswd -c /usr/local/nagios/etc/htpasswd.users nagiosadmin

Restart Apache to make the new settings take effect.

In Ubuntu 15.04:

sudo systemctl restart apache2

In Ubuntu 14.10 and previous versions:

sudo service apache2 restart
Install Nagios plugins:

Go to the directory where you downloaded the nagios plugins, and extract it.

tar xzf nagios-plugins-2.0.3.tar.gz

Change to the nagios plugins directory:

cd nagios-plugins-2.0.3/

Run the following commands one by one to compile and install it.

sudo ./configure --with-nagios-user=nagios --with-nagios-group=nagios
sudo make
sudo make install

Wait, We are not finished yet.

Configure Nagios

Nagios sample configuration files will be found in the /usr/local/nagios/etc directory. These sample files should work fine for getting started with Nagios. However, if you want, you’ll need to put your actual email ID to receive alerts.

To do that, Edit the /usr/local/nagios/etc/objects/contacts.cfg config file with your favorite editor and change the email address associated with the nagiosadmin contact definition to the address you’d like to use for receiving alerts.

sudo nano /usr/local/nagios/etc/objects/contacts.cfg

Find the following line and enter the email id:

[...]
define contact{
        contact_name                    nagiosadmin             ; Short name of user
        use                             generic-contact         ; Inherit default values from generic-contact template (defined above)
        alias                           Nagios Admin            ; Full name of user

        email                           sk@unixmen.com  ; <<***** CHANGE THIS TO YOUR EMAIL ADDRESS ******
        }
[...]

Save and close the file.

Then, Edit file /etc/apache2/sites-enabled/nagios.conf,

sudo nano /etc/apache2/sites-enabled/nagios.conf

And edit the following lines if you want to access nagios administrative console from a particular IP series.

Here, I want to allow nagios administrative access from 192.168.1.0/24 series only.

[...]
## Comment the following lines ##
#   Order allow,deny
#   Allow from all

## Uncomment and Change lines as shown below ##
Order deny,allow
Deny from all
Allow from 127.0.0.1 192.168.1.0/24
[...]

Enable Apache’s rewrite and cgi modules:

sudo a2enmod rewrite
sudo a2enmod cgi

Restart apache service.

sudo systemctl restart apache2

Or,

sudo service apache2 restart

Check nagios,conf file for any syntax errors:

sudo /usr/local/nagios/bin/nagios -v /usr/local/nagios/etc/nagios.cfg

If there are no errors, start nagios service and make it to start automatically on every boot.

sudo service nagios start
sudo ln -s /etc/init.d/nagios /etc/rcS.d/S99nagios

Note: In Ubuntu 15.04, you will see the following error message while starting nagios service.

Failed to start nagios.service: Unit nagios.service failed to load: No such file or directory.

Or

[....] Starting nagios (via systemctl): nagios.serviceFailed to start nagios.service: Unit nagios.service failed to load: No such file or directory.
 failed!

To fix this error, copy /etc/init.d/skeleton to /etc/init.d/nagios using the following command:

sudo cp /etc/init.d/skeleton /etc/init.d/nagios

Edit file /etc/init.d/nagios:

sudo nano /etc/init.d/nagios

Add the following lines:

DESC="Nagios"
NAME=nagios
DAEMON=/usr/local/nagios/bin/$NAME
DAEMON_ARGS="-d /usr/local/nagios/etc/nagios.cfg"
PIDFILE=/usr/local/nagios/var/$NAME.lock

Save and close the file.

Finally you need to change the permissions of the file

sudo chmod +x /etc/init.d/nagios

Now, you can start nagios service using command:

sudo /etc/init.d/nagios start

Access Nagios Web Interface

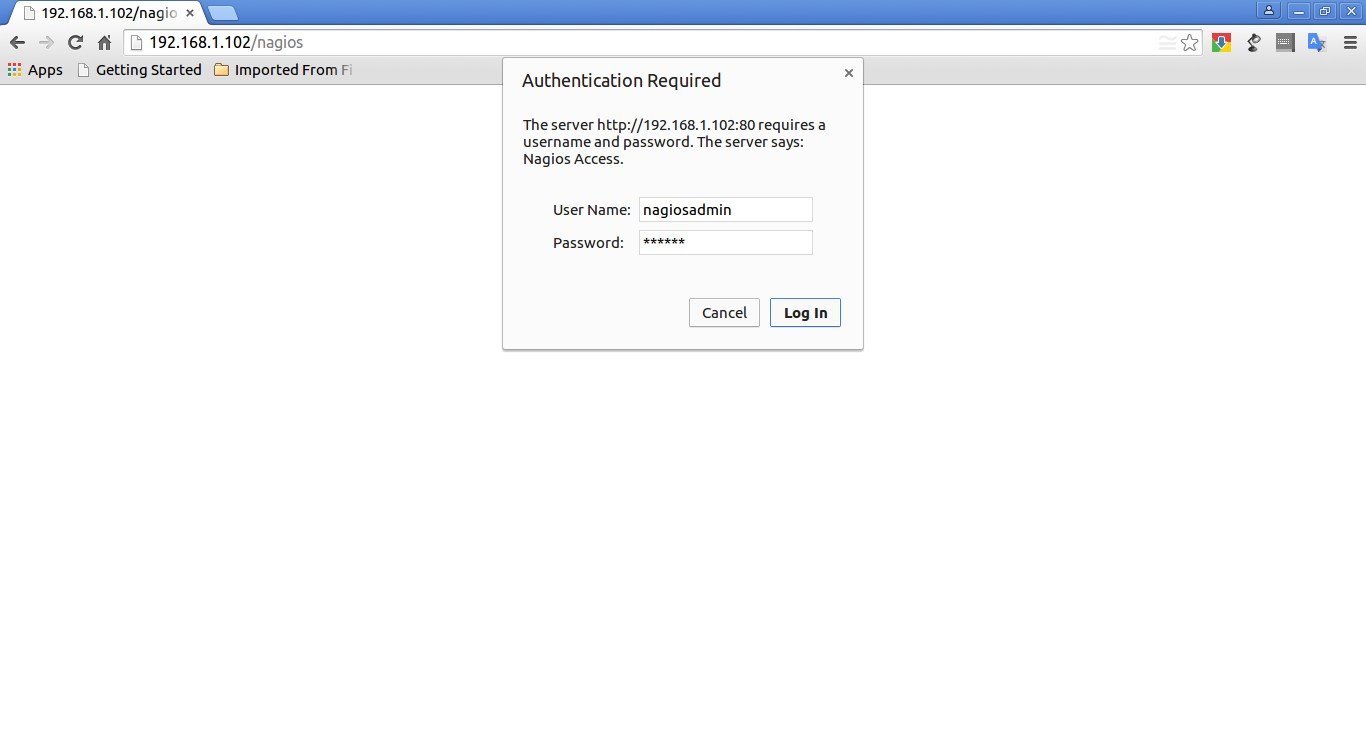
Open up your web browser and navigate to http://nagios-server-ip/nagios and enter the username as nagiosadmin and its password which we created in the earlier steps.

192.168.1.102-nagios - Google Chrome_001

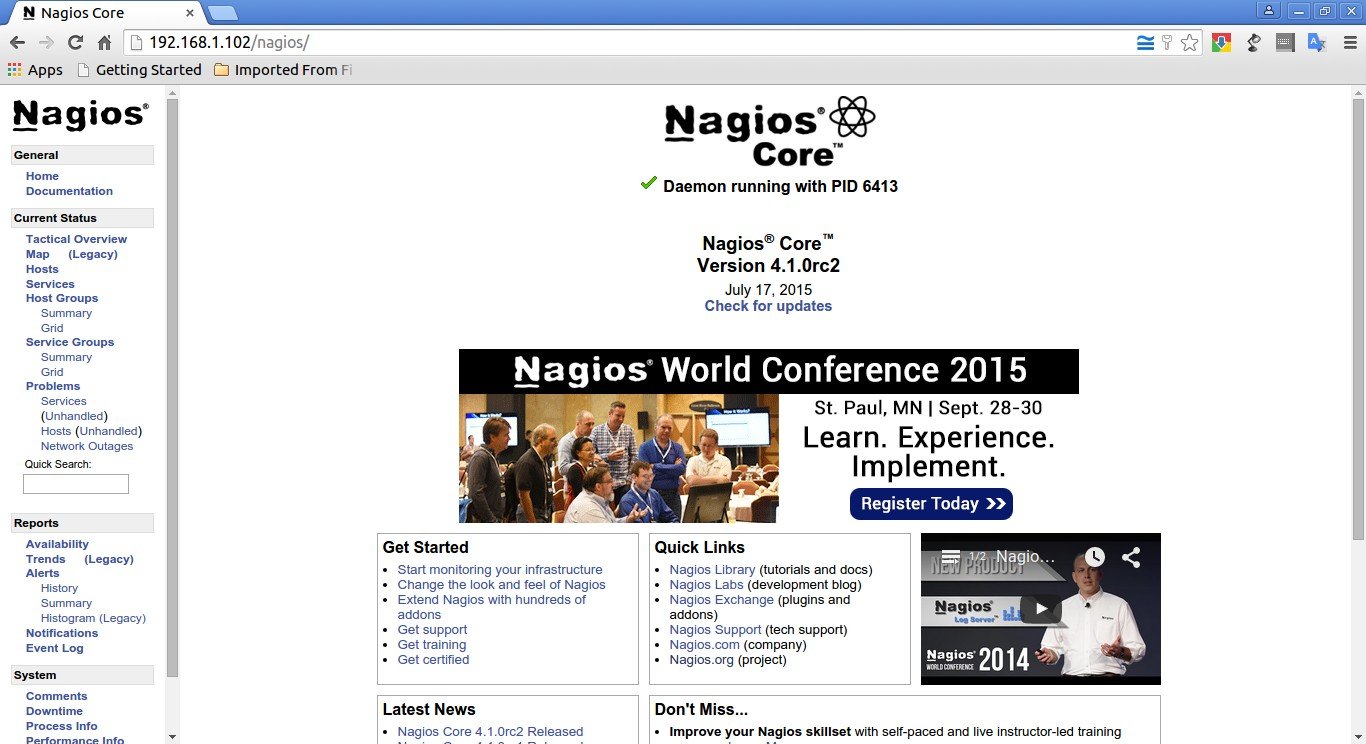
This is how Nagios administrative console looked:

Nagios Core - Google Chrome_002

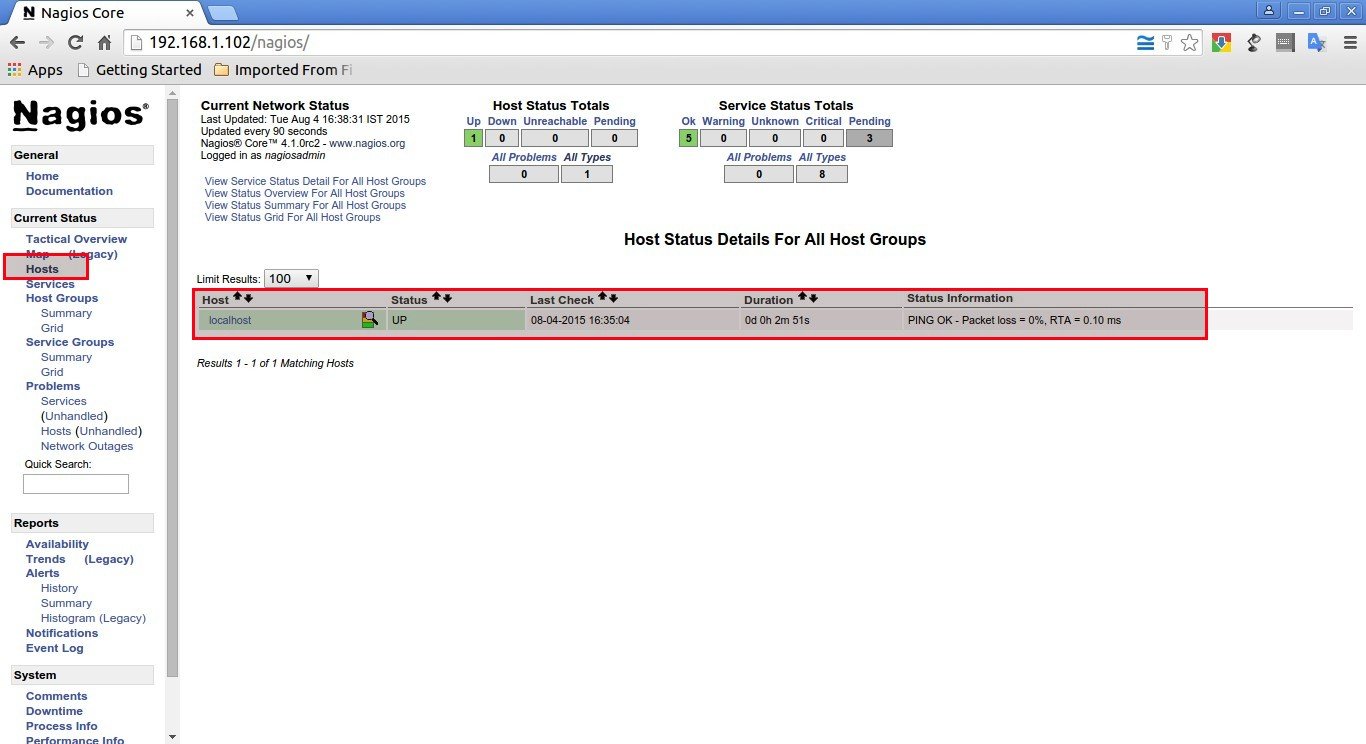
Click on the “Hosts” section in the left pane of the console. You will see there the no of hosts being monitored by Nagios server. We haven’t added any hosts yet. So it simply monitors the localhost itself only.

Nagios Core - Google Chrome_003

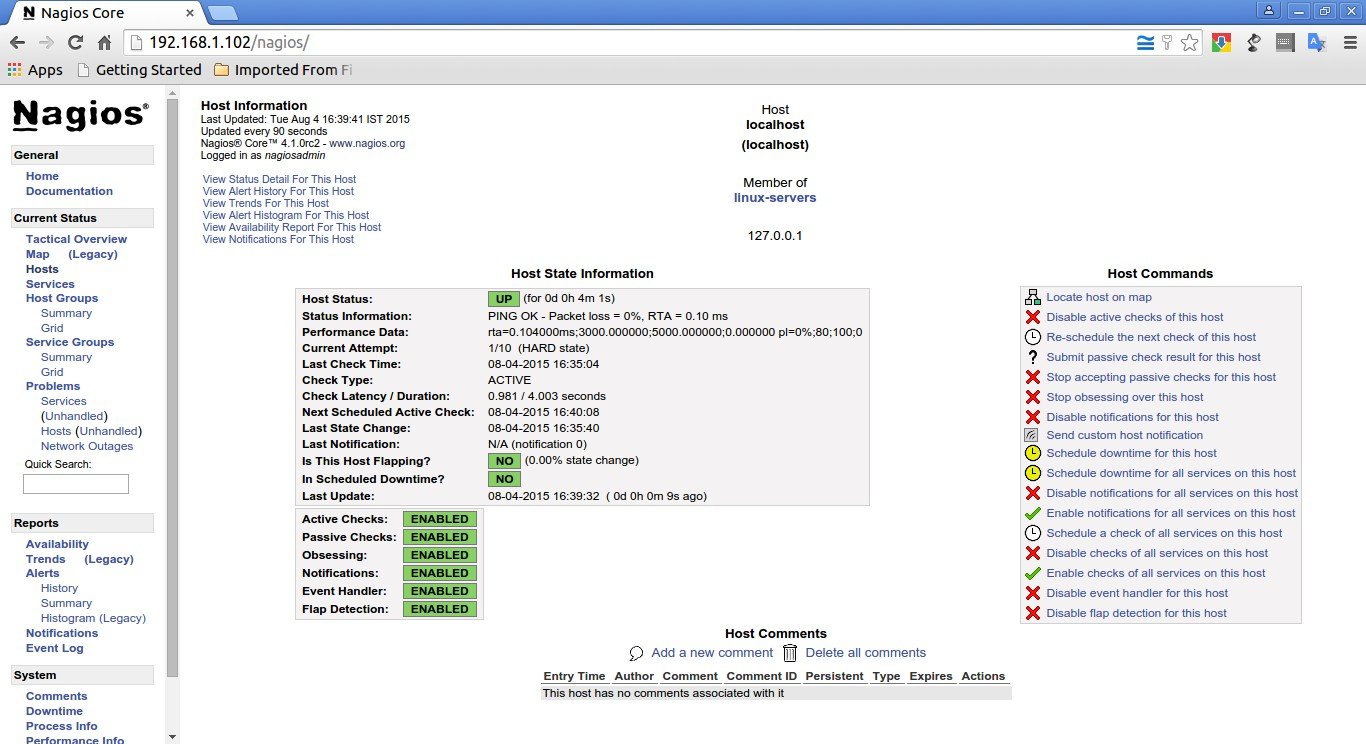
Click on the localhost to display more details:

Nagios Core - Google Chrome_004

That’s it. We have successfully installed and configure Nagios core in our Ubuntu 15.04 server.

Add Monitoring targets to Nagios server

Now, let us add some clients to monitor by Nagios server.

To do that we have to install nrpe and nagios-plugins in our monitoring targets.

On CentOS/RHEL/Scientifc Linux clients:

Add EPEL repository in your CentOS/RHEL/Scientific Linux 6.x or 7 clients to install nrpe package.

To install EPEL on CentOS 7, run the following command:

yum install epel-release

On CentOS 6.x systems, refer the following link.

Install “nrpe” and “nagios-plugins” packages in client systems:

yum install nrpe nagios-plugins-all openssl
On Debian/Ubuntu clients:
sudo apt-get install nagios-nrpe-server nagios-plugins

Configure Monitoring targets

Edit /etc/nagios/nrpe.cfg file,

sudo nano /etc/nagios/nrpe.cfg

Add your Nagios server ip address:

[...]
## Find the following line and add the Nagios server IP ##
allowed_hosts=127.0.0.1 192.168.1.102
[...]

Start nrpe service on CentOS clients:

CentOS 7:

systemctl start nrpe
chkconfig nrpe on

CentOS 6.x:

service nrpe start
chkconfig nrpe on

For Debian/Ubuntu Clients, start nrpe service as shown below:

sudo /etc/init.d/nagios-nrpe-server restart

Now, go back to your Nagios server, and add the clients ( in the configuration file.

To do that, Edit “/usr/local/nagios/etc/nagios.cfg” file,

sudo nano /usr/local/nagios/etc/nagios.cfg

and uncomment the following lines.

## Find and uncomment the following line ##
cfg_dir=/usr/local/nagios/etc/servers

Create a directory called “servers” under “/usr/local/nagios/etc/”.

sudo mkdir /usr/local/nagios/etc/servers

Create config file to the monitoring target (client):

sudo nano /usr/local/nagios/etc/servers/clients.cfg

Add the following lines:

define host{

use                             linux-server

host_name                       server.unixmen.local

alias                           server

address                         192.168.1.103

max_check_attempts              5

check_period                    24x7

notification_interval           30

notification_period             24x7

}

Here, 192.168.1.103 is my nagios client IP address and server.unixmen.local is the client system’s hostname.

Finally, restart nagios service.

sudo /etc/init.d/nagios restart

Or

sudo service nagios restart

Wait for few seconds, and refresh nagios admin console in the browser and navigate to “Hosts” section in the left pane. Now, You will see the newly added client will be visible there. Click on the host to see if there is anything wrong or any alerts it has.

Nagios Core - Google Chrome_005

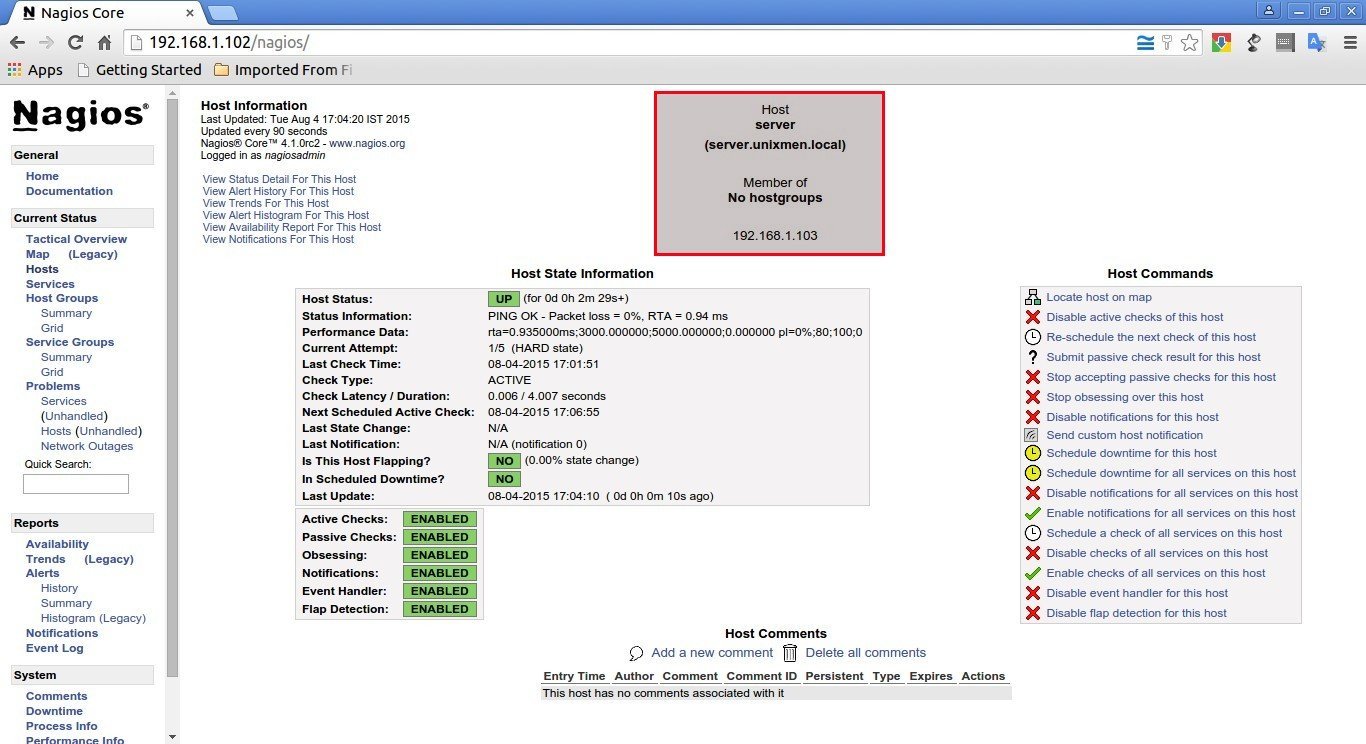
Click on the monitoring target (client system) to view the detailed output:

Nagios Core - Google Chrome_006

Similarly, you can define more clients by creating a separate config files “/usr/local/nagios/etc/servers”directory for each client.

Define services

We have just defined the monitoring host. Now, let us add some services of the monitoring host. For example, to monitor the ssh service, add the following lines shown in bold in the“/usr/local/nagios/etc/servers/clients.cfg” file.

sudo nano /usr/local/nagios/etc/servers/clients.cfg

Add the following lines shown in bold:

define host{

use                             linux-server

host_name                       server.unixmen.local

alias                           server

address                         192.168.1.103

max_check_attempts              5

check_period                    24x7

notification_interval           30

notification_period             24x7

}

define service {
        use                             generic-service
        host_name                       server.unixmen.local
        service_description             SSH
        check_command                   check_ssh
        notifications_enabled           0
        }

Save and close the file. Restart Nagios.

sudo /etc/init.d/nagios restart

Or,

sudo service nagios restart

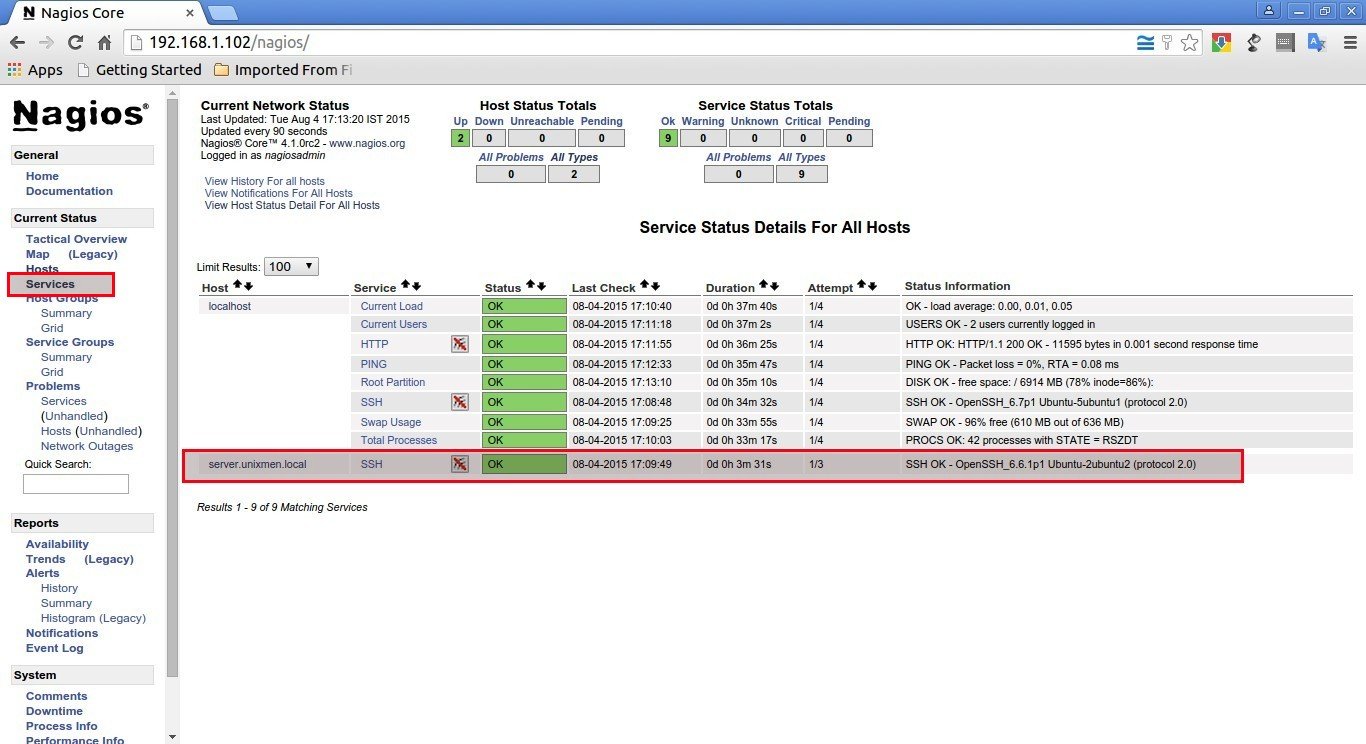
Wait for few seconds (90 seconds by default), and check for the added services (i.e ssh) in the nagios web interface. Navigate to Services section on the left side bar, you’ll see the ssh service there.

Nagios Core - Google Chrome_007

To know more about object definitions such as Host definitions, service definitions, contact definitions, please visit here. This page will explain you the description and format of all object definitions.

Additional Tip:

I would like to thank our Unixmen reader for this useful tip.

If you’re trying to use check_http with the -S flag (for https), this guide misses a big step.

Make sure you install openssl and libssl-dev first. And yes, even if your Nagios server is checking a remote client, you need openssl and libssl-dev locally.

The when you get to configuring the Nagios plugins, add –with-openssl so you end up with:

./configure --with-nagios-user=nagios --with-nagios-group=nagios --with-openssl

That’s it. Cheers!

Further reading:

Check out the following official documents for how to go about monitoring other things.

Reference links:


The post How To Install Nagios 4.1 In Ubuntu 15.04 appeared first on Unixmen.

Setup Local Repository In Ubuntu 15.04

$
0
0


Why Local repository is important?

As a System administrator, you have to install software, security updates and fixes often in all systems. Obviously, it will consume more Internet bandwidth. So instead of downloading and installing applications every time in all systems from the Ubuntu repositories, it is good idea to save all applications in a local server in your LAN and distribute them to the other Ubuntu systems when required. Having a local repository is really fast and efficient way, because all required applications will be transferred over the fast LAN connection from your local server. So that it will save the Internet bandwidth and ultimately it reduces the annual cost of Internet.

In this tutorial, I will show you how to setup local repository in Ubuntu 15.04 server in two methods.

  1. APT-Mirror ;
  2. APT-Cacher.

Both methods are very easy to set up and configure.

All you need is sufficient hard drive space. At least 50GB or more free space in your local or external hard drive is recommended. Also, you can use an external hard drive to setup a portable repository. So, you can use the portable repository on multiple locations in your LAN.

Method 1: APT-Mirror

In this method, we are going to pull all packages from the public repository (Ubuntu global server) and save them in our local Ubuntu server hard drive.

First install Apache server. Apache web server is important to share the packages over the network.

sudo apt-get install apache2

Now, install APT-Mirror using command:

sudo apt-get install apt-mirror

Now, create a directory to save all packages.

For example, let us create a directory called “/myrepo”. We are going to save all packages in this directory:

sudo mkdir /myrepo

Now, open the file /etc/apt/mirror.list file,

sudo vi /etc/apt/mirror.list

Add the line: set base_path    /myrepo

############# config ##################
#
# set base_path /var/spool/apt-mirror

set base_path /myrepo

#
# set mirror_path $base_path/mirror
# set skel_path $base_path/skel
# set var_path $base_path/var
# set cleanscript $var_path/clean.sh
# set defaultarch <running host architecture>
# set postmirror_script $var_path/postmirror.sh
# set run_postmirror 0
set nthreads 20
set _tilde 0
#
############# end config ##############

deb http://archive.ubuntu.com/ubuntu trusty main restricted universe multiverse
deb http://archive.ubuntu.com/ubuntu trusty-security main restricted universe multiverse
deb http://archive.ubuntu.com/ubuntu trusty-updates main restricted universe multiverse
#deb http://archive.ubuntu.com/ubuntu trusty-proposed main restricted universe multiverse
#deb http://archive.ubuntu.com/ubuntu trusty-backports main restricted universe multiverse

deb-src http://archive.ubuntu.com/ubuntu trusty main restricted universe multiverse
deb-src http://archive.ubuntu.com/ubuntu trusty-security main restricted universe multiverse
deb-src http://archive.ubuntu.com/ubuntu trusty-updates main restricted universe multiverse
#deb-src http://archive.ubuntu.com/ubuntu trusty-proposed main restricted universe multiverse
#deb-src http://archive.ubuntu.com/ubuntu trusty-backports main restricted universe multiverse

clean http://archive.ubuntu.com/ubuntu

In the above configuration file, you can add the Ubuntu source lists depending upon the distribution you use.

For this tutorial, I use the default source list. Change them as per your requirements.

If you use both 32bit and 64bit architectures, you should name them separately in the above file. For example, if you use 32bit architecture, the lines should start with deb-i386 and for 64bit, the lines should start as deb-amd64. Clear? Well, once you saved the configuration file, populate your repository using the following command:

sudo apt-mirror

Sample output:

Downloading 162 index files using 20 threads...
Begin time: Wed Aug 5 16:09:16 2015
[20]... [19]... [18]... [17]... [16]... [15]... [14]... [13]... [12]... [11]... [10]... [9]... [8]... [7]... [6]... [5]... [4]...

Now the packages from the Ubuntu public repositories are being pulled and saved to your local directory (In our case it’s /myrepo). Depending upon your Internet speed, it will take hours.

You can cancel this process at any time. When you start it again, it will resume the downloading process where you left it off.  I strongly advise you to use a fast broadband Internet connection.

You don’t have to run this command every day to get new softwares/updates. You can schedule this process using a cron job. So your machine will automatically run the apt-mirror command on a regular daily basis and will keep your repository up-to-date.

To do that, edit file /etc/cron.d/apt-mirror,

sudo vi /etc/cron.d/apt-mirror

Uncomment the line shown in bold:

#
# Regular cron jobs for the apt-mirror package
#
0 4 * * * apt-mirror /usr/bin/apt-mirror > /var/spool/apt-mirror/var/cron.log

As per the above example, the cron job will run every day morning 4am and will start to download the packages.

As I mentioned above, all downloaded packages are saved in “/myrepo” directory on our local server.

Let us have a look under the /myrepo directory to make sure the packages are downloaded as shown below:

ls /myrepo/

Sample output:

mirror  skel  var

Now the contents of /myrepo directory should be made available over HTTP (web) to our clients. To do that, simply create a symbolic link to the /myrepo directory:

cd /myrepo/
sudo ln -s /myrepo/mirror/us.archive.ubuntu.com/ubuntu/ ubuntu

Please note: I made this article only for the testing purpose. So I didn’t download the whole public repository. I canceled the download process after a couple of minutes.

Client Configuration

It’s quite easy to configure in client side. Just open your client systems /etc/apt/sources.list file,

sudo vi /etc/apt/sources.list

and add your local repository path:

[...]
deb http://192.168.1.102/ubuntu trusty universe
deb http://192.168.1.102/ubuntu trusty main restricted
deb http://192.168.1.102/ubuntu trusty-updates main restricted
[...]

That’s it. Here 192.168.1.102 is my Ubuntu server IP address.

Now, update the sources list using command:

sudo apt-get update

Finally, install packages of your choice using command:

sudo apt-get install <package-name>

That’s it. The clients need not to be connected to the Internet to download packages. Instead, it will get all packages and updates from your Ubuntu server’s local repository.

Method 2: APT-Cacher

APT-Cacher is different from APT-Mirror. It does not mirror the entire repository contents. Instead, It saves the packages requested by the clients on your local network and make them available to the rest of the clients for future use.

First install Apache server. This is required to share the packages to your Ubuntu clients over the network:

sudo apt-get install apache2

Now install APT-Cacher.

sudo apt-get install apt-cacher

Choose daemon to run as a standalone daemon and click OK.

sk@server: -myrepo_001

Now, Edit file /etc/default/apt-cacher,

sudo vi /etc/default/apt-cacher

and set autostart=1 if it is 0, else leave as it is.

# apt-cacher daemon startup configuration file

# Set to 1 to run apt-cacher as a standalone daemon, set to 0 if you are going
# to run apt-cacher from /etc/inetd or in CGI mode (deprecated).  Alternatively,
# invoking "dpkg-reconfigure apt-cacher" should do the work for you.
#
AUTOSTART=1

# extra settings to override the ones in apt-cacher.conf
# EXTRAOPT=" daemon_port=3142 limit=30 "

You can also allow or deny the no of hosts to access the cache (packages).

To do that, open the /etc/apt-cacher/apt-cacher.conf file.

sudo vi /etc/apt-cacher/apt-cacher.conf

Uncomment and update the value for allowed_hosts to match the individual hosts. Here I allowed systems from 192.168.1.20 to 192.168.1.30.

[...]
## Uncomment and set the IP range ##
allowed_hosts = 192.168.1.20 - 192.168.1.30
#denied_hosts = 
[...]

After completing all the steps, restart apache2 service:

sudo systemctl restart apache2

Or,

sudo service apache2 restart

Client Side Configuration

Now, create a file called /etc/apt/apt.conf.d/01proxy:

sudo nano /etc/apt/apt.conf.d/01proxy

Add the following line:

Acquire::http::Proxy "http://192.168.1.102:3142";

Here, 192.168.1.102 is my Ubuntu local repository server’s IP address. Replace the IP address with your server IP address.

Now, update the sources list using command:

sudo apt-get update

Finally, install packages of your choice using command:

sudo apt-get install <package-name>

That’s it.

Conclusion

Due to lack of resources, time and Internet bandwidth, I didn’t completely test both methods. As far as I know, both methods should work fine and they are highly recommended to save your Internet bandwidth. Although, both methods are pretty easy to configure and maintain. You don’t need to be a master In Linux to setup local repository. Give it a try, you won’t be disappointed.

Good luck!


The post Setup Local Repository In Ubuntu 15.04 appeared first on Unixmen.

Setup Local APT Repository Using Installation Media In Debian 8

$
0
0


Few days ago, we wrote an article that describes how to setup a local repository using APT-Cacher and APT-Mirror in Ubuntu. Today, we are going to setup the same in Debian 8 using Installation CD/DVD. Lately, I downloaded all Debian 8 Jessie installation DVDs from Debian site. Here is the steps that describes how I created the local repository and how I made it accessible to all local clients over LAN.

As you may know, the main goal of setting up a local repository is to save Internet bandwidth. Because whenever we install a package, the client system pulls the package from Debian public servers. If you have large number of systems in your network, then it certainly consumes more Internet bandwidth while installing, updating or upgrading packages.

So, today we will setup a central local repository in our Debian server, so that the clients can install, update and upgrade the packages from the central repository without using internet. I tested this article in Debian 8, although it might work on other Debian/Ubuntu versions and it’s Debian derivatives.

Setup Local APT Repository In Debian 8

Update your Debian server

First of all, log in to your Debian server with root user and update the system using command:

apt-get update && apt-get upgrade

Then, install the essential packages which are needed to setup local repository using command:

apt-get install build-essential

Install Apache

We need to setup a web server to server all packages to the clients. In our case, let us install Apache web server.

To install apache, run:

apt-get install apache2

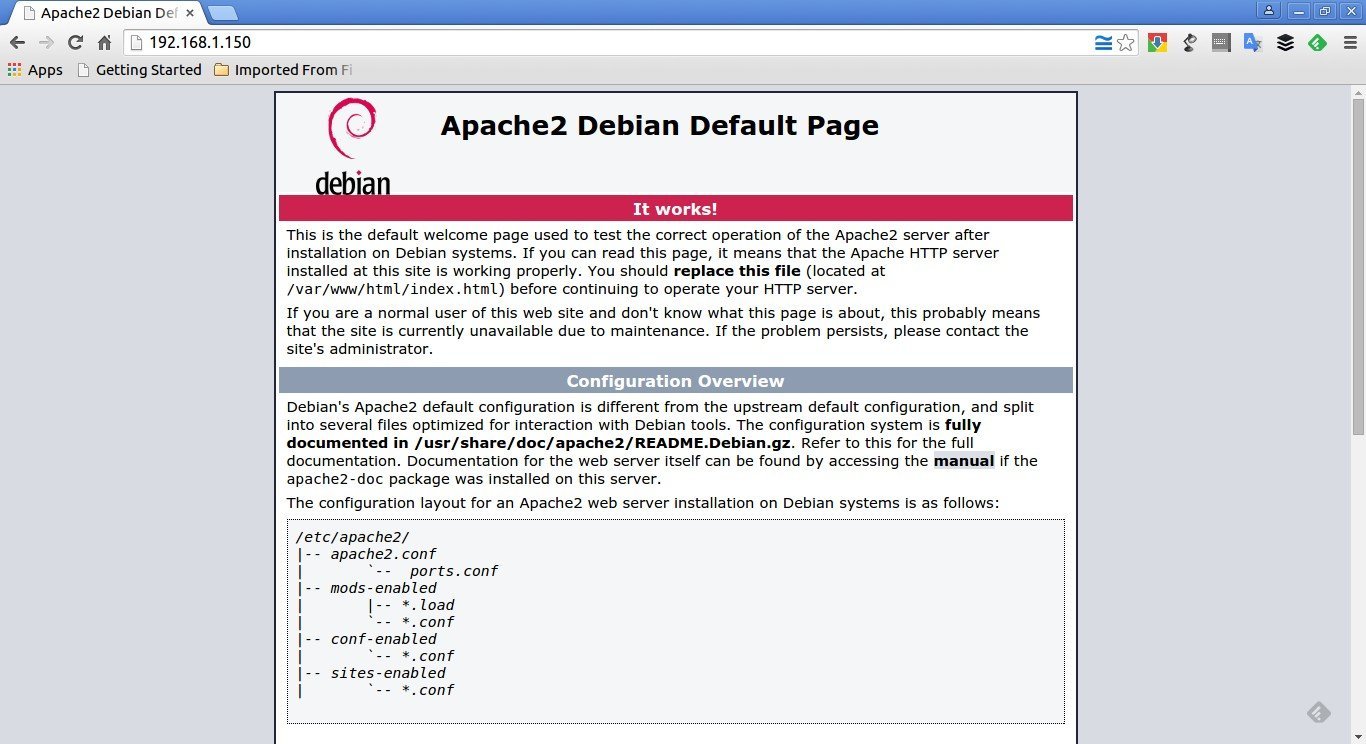
To test if Apache is working, open up your web browser and navigate to: http://<IP-Address>.

You should see the following output:

Apache2 Debian Default Page: It works - Google Chrome_001

Congratulations! Apache server is working!!

Create A directory to store all packages

Create a directory called packages under apache root document folder i.e /var/www/html.

mkdir /var/www/html/packages

Now, create additional directories under /var/www/html/packages/ to save packages depending upon your system’s architecture. For example, If you use 32 bit systems, create a directory called “i386″ or if you use 64 bit systems, create “amd64″ directory. You can keep both directories and serve packages to different architecture systems at the same time.

Here, I am using 64 bit systems in my LAN, so I am going to create a directory called “amd64″ under /var/www/html/packages/ directory.

mkdir /var/www/html/packages/amd64

Copying all DEB files from Debian installation media

Mount the first CD/DVD and copy all .deb packages to /var/www/packages/amd64/ directory from your CD/DVD.

mount /dev/cdrom /media/cdrom
find /media/cdrom/pool/ -name "*.deb" -exec cp {} /var/www/html/packages/amd64 \;

After copying all deb files, unmount the first DVD using the following command.

umount /media/cdrom

Again mount all remaining CD/DVD one by one and copy the .deb files as shown above.

To verify the files, navigate to http://192.168.1.150/packages/amd64/ from your browser. You will see all packages of your Debian DVD’s. Here 192.168.1.150 is my Debian 8 server’s IP address.

Index of -packages-amd64 - Google Chrome_002

Create Catalog file

Switch to your repository directory i.e /var/www/html/packages/amd64/ :

cd /var/www/html/packages/amd64/

and enter the following command to create a catalog file for APT use. You should run this command so that Synaptic Manager or APT will fetch the packages from our local repository. Otherwise the packages in your local repository will not be shown in Synaptic and APT.

dpkg-scanpackages . /dev/null | gzip -9c > Packages.gz

This command will scan all deb files and create the local repository in your Debian server. This may take a while depending upon the number of packages in your local repository folder. Be patient or grab a cup of coffee.

Sample output:

dpkg-scanpackages: warning: Packages in archive but missing from override file:
dpkg-scanpackages: warning: accountsservice acl acpi acpi-support-base acpid adduser adwaita-icon-theme apache2-bin apg apt apt-listchanges apt-offline apt-utils aptitude aptitude-common aptitude-doc-en aspell aspell-en at at-spi2-core avahi-daemon

[...]

xserver-xorg-video-neomagic xserver-xorg-video-nouveau xserver-xorg-video-openchrome xserver-xorg-video-r128 xserver-xorg-video-radeon xserver-xorg-video-savage xserver-xorg-video-siliconmotion xserver-xorg-video-sisusb xserver-xorg-video-tdfx xserver-xorg-video-trident xserver-xorg-video-vesa xserver-xorg-video-vmware xterm xwayland xz-utils yelp yelp-xsl zenity zenity-common zlib1g

dpkg-scanpackages: info: Wrote 1151 entries to output Packages file.

Please note that whenever you add a new deb file in this repository, you should run the above command to create catalog file.

Done! We created the catalog file.

Configure Server sources list

After creating the catalog file, go to your server(local) system. Open /etc/apt/sources.list file.

nano /etc/apt/sources.list

Comment out all lines and add your APT repository location as shown below.

deb file:/var/www/html/packages/amd64/ /

Here is my Debian 8 server (Repository server) /etc/apt/sources.list file contents.

cat /etc/apt/sources.list

Sample output:

# 

# deb cdrom:[Debian GNU/Linux 8.0.0 _Jessie_ - Official amd64 CD Binary-1 20150425-12:54]/ jessie main

#deb cdrom:[Debian GNU/Linux 8.0.0 _Jessie_ - Official amd64 CD Binary-1 20150425-12:54]/ jessie main

#deb http://mirror.cse.iitk.ac.in/debian/ jessie main
#deb-src http://mirror.cse.iitk.ac.in/debian/ jessie main

#deb http://security.debian.org/ jessie/updates main
#deb-src http://security.debian.org/ jessie/updates main

# jessie-updates, previously known as 'volatile'
#deb http://mirror.cse.iitk.ac.in/debian/ jessie-updates main
#deb-src http://mirror.cse.iitk.ac.in/debian/ jessie-updates main

#deb http://security.debian.org/ jessie/updates main contrib non-free
#deb-src http://security.debian.org/ jessie/updates main contrib non-free
#deb http://http.us.debian.org/debian jessie main contrib non-free

deb file:/var/www/html/packages/amd64/ /

Please note that I have disabled all external repository list in the above file except the local repository. Now update source list with following command:

apt-get update

Testing Repository

I am going to install vsftpd package from my local repository.

apt-get install vsftpd

Sample output:

Reading package lists... Done
Building dependency tree       
Reading state information... Done
The following NEW packages will be installed:
  vsftpd
0 upgraded, 1 newly installed, 0 to remove and 0 not upgraded.
Need to get 0 B/165 kB of archives.
After this operation, 374 kB of additional disk space will be used.
WARNING: The following packages cannot be authenticated!
  vsftpd
Install these packages without verification [y/N]? y
Preconfiguring packages ...
Selecting previously unselected package vsftpd.
(Reading database ... 40161 files and directories currently installed.)
Unpacking vsftpd (from .../amd64/./vsftpd_3.0.2-18_amd64.deb) ...
Processing triggers for man-db ...
Setting up vsftpd (3.0.2-18) ... 
Starting FTP server: vsftpd.

As you seen in the above output, i will able to install vsftpd package from my local repository.

Configure Clients

After creating the catalog file, go to your client systems. Open /etc/apt/sources.list file.

sudo nano /etc/apt/sources.list

Add the server repository location as shown below. Comment out all sources list except the local repository.

deb http://192.168.1.150/packages/amd64/ /

For 32 bit systems:

deb http://192.168.1.150/packages/i386/ /

Note: Put a space between deb and http://192.168.1.150/packages/amd64/ and /.

That’s it. Now run,

sudo apt-get update
sudo apt-get install <package-name>

You will be able to install, update and upgrade packages from your local Debian server repository without Internet Connection.

That’s all for now. Cheers!


The post Setup Local APT Repository Using Installation Media In Debian 8 appeared first on Unixmen.

Introducing ‘Aptly’, A Debian Repository Management Tool

$
0
0


About Aptly

Aptly is a free Debian repository management tool that allows you to mirror remote repositories, manage local package repositories, take snapshots, pull new versions of packages along with dependencies, publish as Debian repository. It is available both as CLI tool and HTTP REST service.

Features

Using Aptly, you can:

  • Take and update mirrors of any Debian/Ubuntu remote repository ;
  • Take Snapshot of the mirror ;
  • Merge two or more snapshots into one ;
  • Publish Snapshots as repository ;
  • Search for any required packages including the dependencies ;
  • Manage your own local repositories ;
  • Merge your local repositories into official repositories ;
  • Publish your repositories directly to Amazon S3 as public or private repositories ;
  • Upload packages using HTTP, manage your repositories, snapshots, published repositories etc ;
  • And more yet to come.

For more details, have a look here.

Why Aptly is important?

The answer is to save bandwidth. Nowadays, Computers are so imperative in every organization. Each organization has hundreds of systems running with Linux operating systems. You may need to install applications, software updates, security fixes in all computers everyday. You may wish to add some third party repositories to get softwares which are not available in the official repositories. Also, sometimes, you may want to package your own software. In such cases, setting up and maintaining a local repository is mandatory. Not only it saves lot of bandwidth, also it will help us to publish our own or modified versions of official packages in the repositories. This is where Aptly comes in handy.

Install Aptly in Debian/Ubuntu

Aptly is available in the default repositories of Debian 8 and Ubuntu 15.04. So, you can install it using command:

sudo apt-get install aptly

For older versions, you can install by adding aptly repository.

First, import aptly key using command:

apt-key adv --keyserver keys.gnupg.net --recv-keys E083A3782A194991

Edit /etc/apt/sources.list file:

sudo vi /etc/apt/sources.list

Add the following line:

deb http://repo.aptly.info/ squeeze main

Then update your source list and install it as shown below.

sudo apt-get update
sudo apt-get install aptly

Or,

If you have Go environment set up (go 1.3+ required), you can build aptly from source by cloning it and building with gom:

$ go get -u github.com/mattn/gom
$ mkdir -p $GOPATH/src/github.com/smira/aptly
$ git clone https://github.com/smira/aptly $GOPATH/src/github.com/smira/aptly
$ cd $GOPATH/src/github.com/smira/aptly
$ gom -production install
$ gom build -o $GOPATH/bin/aptly
$ aptly

Aptly basic usage

The list of available commands in aptly is:

  • mirror: manage, update mirrors of remote repositories
  • repo: manage local package repositories, add, remove, move, copy packages
  • snapshot: create, merge, manage snapshots
  • publish: publish snapshot or local repository
  • serve: quickly export published repositories via HTTP
  • task: manage aptly tasks
  • db: cleanup database and package pool, recover database after failure
  • api: REST API service
  • config: configuration management
  • task: multi-command tasks

Creating local repositories

To create a new repository, just enter:

aptly -distribution="vivid" -architectures=amd64 repo create skrepo

Here, skrepo is my local repository name.

Sample output:

Config file not found, creating default config at /home/sk/.aptly.conf

Local repo [skrepo] successfully added.
You can run 'aptly repo add skrepo ...' to add packages to repository.

Viewing available repositories

To see list of available repositories, run:

aptly repo list

Sample output:

List of local repos:
 * [skrepo] (packages: 0)

To get more information about local repository, run `aptly repo show <name>`.

Adding packages to the repository

As you see in the above output, there is no packages in “skrepo”.

To add a package in repository, go to the directory where you have kept .deb files and run:

aptly repo add skrepo *deb

Sample output:

Loading packages...
[+] libmysqlclient18_5.6.24-0ubuntu2_amd64 added
[+] mysql-client-5.6_5.6.24-0ubuntu2_amd64 added
[+] mysql-client-core-5.6_5.6.24-0ubuntu2_amd64 added
[+] mysql-client_5.6.24-0ubuntu2_all added
[+] mysql-common_5.6.24-0ubuntu2_all added
[+] mysql-server-5.6_5.6.24-0ubuntu2_amd64 added
[+] mysql-server-core-5.6_5.6.24-0ubuntu2_amd64 added
[+] mysql-server_5.6.24-0ubuntu2_all added

Viewing the details of a repository

To view the complete details of a repository, run:

aptly repo show skrepo

Sample output:

Name: skrepo
Comment: 
Default Distribution: vivid
Default Component: main
Number of packages: 8

Creating snapshot of a repository

To create a snapshot of a repository (Ex.test-skrepo), run:

aptly snapshot create test-skrepo from repo skrepo

Here, test-skrepo is the snapshot of skrepo.

Sample output:

Snapshot test-skrepo successfully created.
You can run 'aptly publish snapshot test-skrepo' to publish snapshot as Debian repository.

Viewing Snapshot list

To view list of available snapshots, run:

aptly snapshot list

Sample output:

List of snapshots:
 * [test-skrepo]: Snapshot from local repo [skrepo]

To get more information about snapshot, run `aptly snapshot show <name>`.

Publishing Snapshots

To publish a Snapshot, run:

aptly -architectures="amd64" -skip-signing=true publish snapshot -architectures="amd64" test-skrepo

Sample output:

Loading packages...
Generating metadata files and linking package files...
Finalizing metadata files...

Snapshot test-skrepo has been successfully published.
Please setup your webserver to serve directory '/home/sk/.aptly/public' with autoindexing.
Now you can add following line to apt sources:
 deb http://your-server/ vivid main
Don't forget to add your GPG key to apt with apt-key.

You can also use `aptly serve` to publish your repositories over HTTP quickly.

Publish repositories over HTTP

To publish your snapshots over HTTP, simply run:

aptly serve

Sample output:

Serving published repositories, recommended apt sources list:

# ./vivid [amd64] publishes {main: [test-skrepo]: Snapshot from local repo [skrepo]}
deb http://server:8080/ vivid main

Starting web server at: :8080 (press Ctrl+C to quit)...

Configuring client systems to use local repository

Configure your /etc/apt/sources.list file by adding your local repository server in your client systems.

Edit /etct/apt/sources.list file:

vi /etc/apt/sources.list

Add the following line:

deb http://ip-address:8080/ vivid main

That’s it. Comment out all remaining lines and update your repository list using command:

sudo apt-get update

Then, you can install any packages of your choice from your local repository.

sudo apt-get install <package-name>

Removing Snapshots

To remove a snapshot, run:

aptly snapshot drop test-skrepo

If snapshot is published, it can’t be dropped (first remove publishing for snapshot). If snapshot is used as source for other snapshots (using merge or pull), aptly would refuse to drop such snapshot, use flag -force to override this check.

Removing repositories

To remove a repository, run:

aptly snapshot drop skrepo

For more usage details, refer the official documentation.

Conclusion

I didn’t test ‘aptly’ completely, Still I am testing and exploring it. I will make an another interesting article about Aptly soon. As far as I know during the testing process, Aptly worked just fine as it’s advertised. I strongly recommend you to try aptly if you are planning to setup a local repository.

Good luck!

Source and reference:


The post Introducing ‘Aptly’, A Debian Repository Management Tool appeared first on Unixmen.

shellinabox – A Web based AJAX Terminal Emulator

$
0
0


About shellinabox

Greetings Unixmen readers!

We, usually, access any remote servers using well known communication tools like OpenSSH, and Putty etc. But, one important thing is we can’t access the remote systems using those tools behind a Firewall or the firewalls that allow only HTTPS traffic. No worries! We, still, have some options to access your remote systems even if you’re behind a firewall. And also, you don’t need to install any communications tools like OpenSSH or Putty. All you need is only a modern JavaScript and CSS enabled browser. And you don’t need to install any plugins or third party softwares either. 

Meet Shell In A Box, pronounced as shellinabox, a free, open source, web based AJAX Terminal emulator developed by Markus Gutschke. It uses AJAX technology to provide the look and feel of a native shell via a web browser. The shellinaboxd daemon implements a webserver that listens on the specified port. The web server publishes one or more services that will be displayed in a VT100 emulator implemented as an AJAX web application. By default, the port is 4200. You can change the default port to any random port number of your choice. After installing shellinabox on all your remote servers that you want to access them from your local system, open up the web browser and navigate to: http://IP-Address:4200/. Enter your user name and password and start using your remote system’s shell. Seems interesting, isn’t it? Indeed!

Disclaimer:

Shellinabox is not a ssh client or any sort of security software. It is just a application that emulates a remote system’s shell via a web browser. Also, It has nothing to do with SSH in anyway. It’s not a bullet proof security way to remote your systems. It is just one of the easiest methods so far. You should not run it on any public network for any reason.

Install shellinabox

In Debian/Ubuntu based systems:

shellinabox is available in the default repositories. So, you can install it using command:

$ sudo apt-get install shellinabox

In RHEL/CentOS systems:

First, install EPEL repository using command:

# yum install epel-release

Then, install shellinabox using command:

# yum install shellinabox

Done!

Configure shellinabox

As I mentioned before, shellinabox listens on port 4200 by default. You can change this port to any random number of your choice to make it difficult to guess by anyone.

The shellinabox config file is located in /etc/default/shellinabox file by default in Debian/Ubuntu systems. In RHEL/CentOS/Fedora, the default location of config file is /etc/sysconfig/shellinaboxd.

If you want to change the default port,

In Debian/Ubuntu:

$ sudo vi /etc/default/shellinabox

In RHEL/CentOS/Fedora:

# vi /etc/sysconfig/shellinaboxd

Change your port to any random number. Since I am testing it on my local network, I use the default values.

# Shell in a box daemon configuration
# For details see shellinaboxd man page

# Basic options
USER=shellinabox
GROUP=shellinabox
CERTDIR=/var/lib/shellinabox
PORT=4200
OPTS="--disable-ssl-menu -s /:LOGIN"

# Additional examples with custom options:

# Fancy configuration with right-click menu choice for black-on-white:
# OPTS="--user-css Normal:+black-on-white.css,Reverse:-white-on-black.css --disable-ssl-menu -s /:LOGIN"

# Simple configuration for running it as an SSH console with SSL disabled:
# OPTS="-t -s /:SSH:host.example.com"

Restart shelinabox service.

In Debian/Ubuntu:

$ sudo systemctl restart shellinabox

Or

$ sudo service shellinabox restart

In RHEL/CentOS systems run the following command to start shellinaboxd service automatically on every reboot.

# systemctl enable shellinaboxd

Or

# chkconfig shellinaboxd on

Remember to open up port 4200 or any port that you assign if you are running a firewall.

For example, in RHEL/CentOS systems, you can allow the port as shown below.

# firewall-cmd --permanent --add-port=4200/tcp
# firewall-cmd --reload

Usage

Now, go to your client systems, open up the web browser and navigate to: https://ip-address-of-remote-servers:4200.

Note: Mention the correct port if you have changed it.

You’ll get a warning message of certificate issue. Accept the certificate and go on.

Privacy error - Google Chrome_001

Enter your remote system’s username and password. Now, you’ll be able to access the remote system’s shell right from the browser itself.

sk@server1:~ - Shell In A Box - Google Chrome_003

You can get some additional menu options which might be useful by right clicking on the empty space of your browser.

sk@server1:~ - Shell In A Box - Google Chrome_004

From now on, you can do whatever you want to do in your remote server from the local system’s web browser.

Once you done, type exit in the shell.

To connect again to the remote system, click the Connect button and then type the user name and password of your remote server.

sk@server1:~ - Shell In A Box - Google Chrome_005

For more details about shellinabox, type the following command in your Terminal:

# man shellinabox

Or

# shellinaboxd -help

Also, refer the shellinabox wiki page for comprehensive usage details.

Conclusion

Like I mentioned before, web-based SSH tools are very useful if you’re running servers behind a Firewall. There are many web-based ssh tools, but Shellinabox is pretty simple and useful tool to emulate a remote system’s shell from anywhere in your network. Since, it is browser based, you can access your remote server from any device as long as you have a JavaScript and CSS enabled browser.

That’s all for now. Have a good day!

Reference link:


The post shellinabox – A Web based AJAX Terminal Emulator appeared first on Unixmen.

Install And Configure PXE Server On Ubuntu 15.04

$
0
0


This tutorial describes how to setup a PXE server on Ubuntu 15.04 server and how to configure a PXE client.

We have already written PXE server guides for CentOS distribution. Refer the following links if you want to setup PXE boot environment in CentOS 6 and CentOS 7.

Now, let us start to setup and configure PXE server on Ubuntu 15.04. This method should work on previous Ubuntu versions like Ubuntu 14.10, 14.04 etc.

Scenario

My test box(pxe server) details are given below:

  • Operating System: Ubuntu 15.04 server.
  • IP Address: 192.168.1.101/24.

Install PXE Server

First, you should Install and configure DHCP server on your PXE server. To install and configure DHCP server in Ubuntu, refer the following link:

Now, install the following necessary packages for setting up PXE environment:

sudo apt-get install apache2 tftpd-hpa inetutils-inetd

Configure PXE Server

Edit file /etc/default/tftpd-hpa,

sudo nano /etc/default/tftpd-hpa

Add the following lines to enable TFTP server.

[...]
RUN_DAEMON="yes"
OPTIONS="-l -s /var/lib/tftpboot"

Then, edit file /etc/inetd.conf,

sudo nano /etc/inetd.conf

Scroll down to the end, and modify or add the following line.

tftp    dgram   udp    wait    root    /usr/sbin/in.tftpd /usr/sbin/in.tftpd -s /var/lib/tftpboot

Save and close the file. If you use IPv6, please change the word udp to udp4.

Restart tftp service:

sudo /etc/init.d/tftpd-hpa restart

Copying Ubuntu Installation files to PXE Server

You can either mount the Ubuntu Installation ISO image and copy them to your PXE server or can directly copy the files from your Installation CD/DVD.

For the testing purpose, Here I am going to deploy Ubuntu 15.04 server OS on my PXE client, so I mounted the ISO image on /mnt directory.

I already have the ISO image on my home directory, so I ran the following command to mount it on /mnt directory.

sudo mount -o loop /home/sk/ubuntu-15.04-server-amd64.iso /mnt/

The Ubuntu 14.04 ISO image has been mounted successfully. Now, go to the /mnt/ directory, and copy the required files from the ISO image to /var/lib/tftpboot/ directory.

cd /mnt/
sudo cp -fr install/netboot/* /var/lib/tftpboot/

Create a directory called ubuntu in the apache root document folder.

sudo mkdir /var/www/html/ubuntu

Note: On Ubuntu 14.10 and previous versions, the apache root document folder is /var/www/.

Copy all the files from the Ubuntu ISO.

sudo cp -fr /mnt/* /var/www/html/ubuntu/

Now, edit file /var/lib/tftpboot/pxelinux.cfg/default,

sudo nano /var/lib/tftpboot/pxelinux.cfg/default

Add the following contents at the end. Make sure you’ve replaced the IP address with your own.

[...]
label linux
        kernel ubuntu-installer/amd64/linux
        append ks=http://192.168.1.101/ks.cfg vga=normal initrd=ubuntu-installer/amd64/initrd.gz
ramdisk_size=16432 root=/dev/rd/0 rw  --

For 32bit PXE clients:

[...]
label linux
        kernel ubuntu-installer/i386/linux
        append ks=http://192.168.1.101/ks.cfg vga=normal initrd=ubuntu-installer/i386/initrd.gz
ramdisk_size=16432 root=/dev/rd/0 rw  --

Replace 192.168.1.101 with your own PXE server’s IP address.

Save and close the file.

Configure DHCP Server

Now, we have to configure the DHCP server to work with PXE server.

Edit file /etc/dhcp/dhcpd.conf,

sudo nano /etc/dhcp/dhcpd.conf

Add the following lines at the end:

allow booting;
allow bootp;
option option-128 code 128 = string;
option option-129 code 129 = text;
next-server 192.168.1.101;
filename "pxelinux.0";

Save and close the file.

Now, We have come to the end of the PXE server configuration. Restart DHCP server.

sudo service isc-dhcp-server restart

Congratulations! We have completed the PXE server configuration.

PXE Client Configuration

The client may be any system that has network boot enabled option (PXE boot). You can enable this option in your Bios settings.

Due to lack of resources, I have created a Virtual Machine client on my Oracle VirtualBox.

Open up the Oracle VirtualBox. Click on the New button in the menu bar.

Oracle VM VirtualBox Manager_001

Enter the Virtual machine name.

Create Virtual Machine_002

Enter the RAM size to the Virtual machine.

Create Virtual Machine_003

Select “Create a virtual hard drive now” option and click Create.

Create Virtual Machine_004

Select the Virtual hard drive file type. If you don’t know to what to select, leave the default option and click Next.

Create Virtual Hard Disk_005

Select whether the new virtual hard drive file should grow as it is used or if it should be created as fixed size.

Create Virtual Hard Disk_006

Enter the Virtual hard drive size.

Create Virtual Hard Disk_007

That’s it. Our Virtual Client machine has been created. Now, we should make the client to boot from the network. To do that, go to the Vitual machine Settings option.

Oracle VM VirtualBox Manager_008

Select the System tab on the left, and Choose Network from the boot order option, and un-check all the other options on the right side.

Ubuntu 15.04 PXE client - Settings_009

Then, go to the Network tab and select “Bridged Adapter” from the “Attached to” drop down box.

Ubuntu 15.04 PXE client - Settings_010

Once you done all the above steps, click OK to save the changes. That’s it. Now power on the Virtual client system. You should see the following screen.

Ubuntu 15.04 PXE client [Running] - Oracle VM VirtualBox_011

That’s it. The rest of the installation is same as the way we do in local installation. Start installing Ubuntu on your client using the PXE server.

Ubuntu 15.04 PXE client [Running] - Oracle VM VirtualBox_012

Good luck!

Reference:


The post Install And Configure PXE Server On Ubuntu 15.04 appeared first on Unixmen.

Citadel – A Free, Open Source, Email And Collaboration Suite

$
0
0


About Citadel

Citadel is a free, open source Collaboration suite that can be used to setup and manage Email server, Calendars, address books, Instant messenger, mailing lists and much more. It is written mostly using “C” language and is a highly integrated Groupware Platform with a AJAX-powered “Web 2.0” interface, but also providing SMTP, IMAP, POP3, and GroupDAV access to its content.

Citadel offers versatile email services with very low administration needed. It provides its own implementations of these server protocols:

  • IMAP
  • POP3
  • SMTP
  • ManageSieve
  • XMPP
  • Citadel

It works well on most Linux operating systems, Solaris, and *BSD systems.

Prominent Features

Citadel has lot of useful features. Here, I list some important features.

  • Email
  • Calendar/scheduling
  • Address books
  • Bulletin boards (forums)
  • Mailing list server
  • Instant messaging
  • Wiki and blog engines
  • Multiple domain support
  • A powerful web interface
  • RSS aggregation
  • and more…

Installation

1. Install required prerequisites

Log on to your system as root user and install the following prerequisites.

In DEB based systems:

apt-get update
apt-get upgrade
apt-get install build-essential curl g++ gettext shared-mime-info libssl-dev

In RPM based systems:

yum update
yum groupinstall "Development Tools"

The following additional packages are also recommended:

yum install gettext shared-mime-info openssl-devel

If you want to use system icons such as the GNOME File Icons in WebCit, install:

yum install gnome-icon-theme

Then, create proper symlinks as shown below in RPM based systems such as RHEL, CentOS.

cd /usr/local/webcit/static
ln -s /usr/share/icons/gnome/24x24/mimetypes icons

In Arch Linux:

pacman -S curl expat libical libsieve perl-berkeleydb

2. Install Citadel using Easy install script

After installing the required prerequisites, run the following command to install Citadel.

wget -q -O - http://easyinstall.citadel.org/install | sh

Press Enter to start:

Welcome to Citadel Easy Install
Running on: Linux Debian jessie/sid ( 3.19.0-15-generic x86_64)
We will perform the following actions:

Installation:
* Download/install supporting libraries (if needed)
* Download/install Citadel (if needed)
* Download/install WebCit (if needed)

Configuration:
* Configure Citadel
* Configure WebCit

Perform the above installation steps now? ## Press Enter ##

Accept License terms:

[...]

Do you accept the terms of this license?
If you do not accept the General Public License, Easy Install will exit.
Enter Y or Yes to accept: Y ## Type Y and Press Enter key ##

Be mindful that it will take lot of time, because this command will compile a lot of code.

Please enter the name of the Citadel user account that should be granted administrative privileges once created.

root@server: -home-sk_001

Enter a password for the system administrator.

root@server: -home-sk_002

Citadel needs to run under its own user ID. This would typically be called “citadel”, but if you are running Citadel as a public site, you might also call it “bbs” or “guest”. The server will run under this user ID. Please specify that user ID here. You may specify either a user name or a numeric UID.

root@server: -home-sk_003

Please specify the IP address which the server should be listening to. You can name a specific IPv4 or IPv6 address, or you can specify “*” for “any address”, “::” for “any IPv6 address”, or simply “0.0.0.0” for “any IPv4 address”.

If you leave this blank, Citadel will listen on all addresses. This can usually be left to the default unless multiple instances of Citadel are running on the same computer.

root@server: -home-sk_004

Specify the TCP port number on which your server will run. Normally, this will be port 504, which is the official port assigned by the IANA for Citadel servers. You will only need to specify a different port number if you run multiple instances of Citadel on the same computer and there is something else already using port 504.

root@server: -home-sk_005

Please choose the user authentication mode. By default Citadel will use its own internal user accounts database. If you choose Host, Citadel users will have accounts on the host system, authenticated via /etc/passwd or a PAM source.

LDAP chooses an RFC 2307 compliant directory server, the last option chooses the nonstandard MS Active Directory LDAP scheme. Do not change this option unless you are sure it is required, since changing back requires a full reinstall of Citadel.

  • 0 – Self contained authentication
  • 1 – Host system integrated authentication
  • 2 – External LDAP – RFC 2307 compliant directory
  • 3 – External LDAP – nonstandard MS Active Directory

root@server: -home-sk_006

Select Yes and press enter.

root@server: -home-sk_007

Select Yes and press enter to automatically start Webkit (Web console for Citadel) at every reboot.

root@server: -home-sk_008

Select the locale webcit should use. In my case, I selected “en_US”.

root@server: -home-sk_010

Select on which port do you want WebCit to listen for HTTP requests. You can use the standard port (80) if you are not running another web server (such as Apache), otherwise select another port.

I go with defaults, because I don’t have any existing web server.

root@server: -home-sk_011

Select On which port do you want WebCit to listen for HTTPS requests.

root@server: -home-sk_012

Congratulations! Citadel has been installed.

root@server: -home-sk_013

Please note that Citadel will be installed to ”/usr/local/citadel” directory, WebCit will be installed to ”/usr/local/webcit”, and the supporting libraries will be installed to ”/usr/local/ctdlsupport”.

Now, let us go further and configure Citadel for daily usage.

Accessing Citadel Web console

Open your web browser and navigate to http://ip-address:2000/ or http://domain:2000.

The following page should appear. Enter your administrative account name and it’s password which we have created during the installation process. In my case, my administrative account is “sk”, and it’s password is “ubuntu”. I recommend you to set any strong password to tighten your security.

- Citadel Server - Google Chrome_001

This is how my Citadel Dashboard looks.

Lobby - Citadel Server - Google Chrome_002

From here, you can create multiple domains if you want, create users, create blog posts and so on.

First, let us create some domains and users.

Creating new domains

To create a domain, click on the Administration button on the bottom of the left column menu.

Lobby - Citadel Server - Google Chrome_002

In the next window, click “Domain names and Internet mail configuration” link in the Global Configuration section.

Lobby - Citadel Server - Google Chrome_003

In the Local host aliases and Directory domains sections, enter your domain name without prefix www and click Add button.. For example, in my case I entered unixmen.local.

Lobby - Citadel Server - Google Chrome_006

You can add as many domains as you want.

Next, we need to create some users.

Creating new users

Go back to Administration page and click on the link that says “Add, change, delete user accounts” in the User account management section.

Enter your desired username and click Create button.

Lobby - Citadel Server - Google Chrome_008

In the next window, set password for the newly created user account. Also, make sure the Permission to send internet mail option is checked. Click the Save changes button.

Lobby - Citadel Server - Google Chrome_009

Similarly, you can create as many users as you want.

Now, let us check whether the newly created user is able to send and receive mail.

Composing a Test mail

Click on Mail button in the left column box of Citadel dashboard. Click Writemail to compose a mail.

Mail - Citadel Server - Google Chrome_010

Enter the recipient’s mail id (Ex. senthil@server.unixmen.local) and compose your message and finally click Send message.

Mail - Citadel Server - Google Chrome_011

Now, log off from the current user and log in again as a new user. In my case, my newly created user is “senthil”.

Go to the Mail section and check for the new mail.

Mail - Citadel Server - Google Chrome_012

As you see in the above screenshot, I got a new mail. To read the mail, just click on it.

Mail - Citadel Server - Google Chrome_013

Congratulations! Our mail server is working!!

Citadel screenshots

Here is some sample screenshots that will give a basic ideas of it’s various features.

Citadel Calendar:

Calendar - Citadel Server - Google Chrome_014

Citadel Contacts:

Contacts - Citadel Server - Google Chrome_015

Citadel Notes:

Notes - Citadel Server - Google Chrome_016

Citadel Tasks:

Tasks - Citadel Server - Google Chrome_017

Citadel Chat room:

Tasks - Citadel Server - Google Chrome_018

For more usage details, I recommend you to refer the official documentation page.

Also, refer Citadel FAQ/Knowledge base page for any kind of troubleshooting.

Uninstalling Citadel

I hope you won’t do it. In case, you don’t like Citadel, you can easily uninstall it simply by deleting the following directories.

  • /usr/local/citadel
  • /usr/local/webcit
  • /usr/local/ctdlsupport

Then, remove the entries for “citadel” and “webcit” in your init scripts (/etc/init.d) directory.

Conclusion

As far as I know, Citadel is an impeccable groupware solution and it just works out of the box. It is one of the most easiest suite ever I have tried. Even, a novice user can easily install and configure Citadel in few hours. If you’re looking for a Groupware, Citadel might be suitable solution. Give it a try, you won’t be disappointed.

Cheers!

Reference links:


The post Citadel – A Free, Open Source, Email And Collaboration Suite appeared first on Unixmen.

Gnome Boxes – A Front-end Tool For QEMU And KVM

$
0
0


About Gnome Boxes

As we all know, there are is no doubt that Linux has tremendous support for Virtualization. There are so many virtualization softwares available including VMWare, VirtualBox, OpenVZ, XEN, KVM, Docker and the list goes. These software are mainly for intermediate and advanced Linux users. If you’re a beginner and having very little knowledge in Virtualization, then it is bit difficult to use the above mentioned tools. You may, probably, need an Intermediate or an expert user’s help. I bet you what? you don’t need anyone help. Yes. Meet Gnome Boxes, a beginner friendly, lightweight, graphical tool that makes virtualization lot easier.

Gnome Boxes is a graphical front-end tool similar to Virt-manager that can be used to create, view, access and manage Virtual machines based on QEMU and KVM. KVM, aka Kernel-based virtual machines, is an open source virtualization technology built into the Linux kernel. KVM is the fork of QEMU and Virt-manager is a graphical front-end of KVM and QEMU.

For more details about KVM and QEMU refer the following links.

Using Boxes, any Linux user, even a novice, can easily try and test different operating systems in their Linux box without having any help from a system administrator. And the good news is you can run Gnome Boxes almost on all Linux operating systems. Be mindful that Gnome Boxes requires either the Intel VT-x or AMD-V hardware virtualization extensions in your Computer.

Why Gnome Boxes?

You might wonder why should we use Boxes, while Virt-manager has many advantages. The answer is simple. Gnome Boxes is light weight, and comes with selective options only for beginners who just want an easy way to create VMs or access remote machines. Gnome Boxes will not provide many of the advanced options to tweak virtual machines provided by virt-manager, but It will focus on getting things working out of the box with very little input from user. This is where Boxes comes in handy.

Features

Concerning about features, we can list the following:

  • View, access, and use:
    • remote machines
    • remote virtual machines
    • local virtual machines
    • When technology permits, set up access for applications on local virtual machines
  • View, access, and use virtual machines on removable media
  • View, access, and use shared connection / machines
  • Upload / publish virtual machines
  • and many.

Install Gnome Boxes

We can install Gnome Boxes either using distribution’s package manager or directly compile from the source.

1. Install using package manager

Gnome Boxes is available in the default repositories of all modern Linux distributions.

To install it on Debian/Ubuntu and derivatives, run:

sudo apt-get install gnome-boxes

On RHEL/CentOS/Fedora:

sudo yum install gnome-boxes

Or,

sudo dnf install gnome-boxes

On SUSE/openSUSE:

sudo zypper in gnome-boxes

On Mageia:

sudo urpmi gnome-boxes

2. Compile the latest version from Source

Gnome Boxes might be out-dated in the distribution’s repositories. If you want most recent version, it is good idea to compile it from the Source.

Download the latest version from here.

wget https://git.gnome.org/browse/gnome-boxes/snapshot/gnome-boxes-3.17.90.tar.xz

Once the download process is complete, launch your terminal and run following command to extract the downloaded file.

tar xvf gnome-boxes-3.17.90.tar.xz

Go to the extracted directory:

cd gnome-boxes

Then, run the following command to start the installation process.

./configure

Once “configure” is completed successfully, run following command:

make

Finally, run the following command to complete the installation of Gnome Boxes.

make install

Usage

After installing Gnome Boxes, launch it either from Menu or Dash. Probably it will be found in Applications > System Tools.

The default interface of Boxes look like below.

This interface shows the list of available guest virtual machines.

The right-hand side of the screen has two buttons:

  • The search button, to search for guest virtual machines by name.
  • The selection button.

Boxes_001

Click on the New button on the top right corner of Boxes window. The following screen will appear. Click Continue.

Boxes_002

Now, select the Installation source.

You may either select the installation ISO from your local system or specify an URL or path to an ISO file. This can also be used to access a remote machine. The address should follow the pattern of protocol://IPaddress?port;, for example:

spice://192.168.1.100?port=5906;

Here, I am going to select an ISO from my local system

Boxes_003

In the Next screen, you’ll see the details of newly created VM details. You can either continue with the default values or you can customize the RAM, disk size details of the VM as per your liking.

Boxes_005

After customizing your VM settings, click on the reverse arrow button (<) on the top left corner to go back to the previous screen.

Boxes_007

Finally, click on the Create button on the top right corner.

Boxes_008

That’s it. Now, newly created will start to boot.

Boxes_009

Now, continue the installation as the way you do in the physical machine.

Conclusion

Gnome Boxes is a great application designed with simplicity and ease of use in mind. Though it doesn’t has many advantages than any other virtualization tools, it just works out of the box and ideal to test or try various operating systems without having to pollute your system or without having to install third party softwares like VirtualBox, VMWare, and XEN etc..

That’s all for now.

Cheers! Happy weekend!!


The post Gnome Boxes – A Front-end Tool For QEMU And KVM appeared first on Unixmen.

Mail-in-a-Box: An Open Source Mail Server Solution

$
0
0


About Mail-in-a-Box

Mail-in-a-Box is a free, Open Source, mail server solution developed by Joshua Tauberer. Using Mail-in-a-Box, anyone can easily turn a fresh cloud system into a Mail server in few hours. It can host mail for multiple users and multiple domain names. Mail-in-a-Box is based on Ubuntu 14.04 LTS 64-bit and includes automatic DNS configuration, spam filtering, greylisting, backups to Amazon S3, static website hosting, and easy SSL certificate installation.

The architecture of Mail-in-a-Box:

Mail-in-a-Box

Install Mail-in-a-Box on Ubuntu 14.04

Requirements

To setup Mail server using Mail-in-a-Box, you must have the following requirements.

  1. Ubuntu 14.04 64bit VPS (Fresh installation).
  2. 768MB RAM or more. 1GB is recommended.
  3. 30GB or more Hdd free space.
  4. Add proper MX records in your DNS server.
  5. If your mail server is behind a firewall/Router, you should allow the following ports: 22 (SSH), 25 (SMTP), 53 (DNS; must be open for both tcp & udp), 80 (HTTP), 443 (HTTPS), 587 (SMTP submission), and 993 (IMAP).

Mail-in-a-Box Limitation:

Mail-in-a-Box must be installed on a fresh machine that will be dedicated to Mail-in-a-Box, and you cannot modify the box after installation (configuration changes will get overwritten by the box’s self-management). If you are looking for something more advanced, try iRedMail, Sovereign, or Modoboa.

Well, now let us setup Mail-in-a-Box in Ubuntu 14.04 server.

First update your server:

sudo apt-get update
sudo apt-get upgrade

Then, run the following command to install Mail-in-a-Box

curl -s https://mailinabox.email/bootstrap.sh | sudo bash

Sample output:

Installing git . . .
Selecting previously unselected package liberror-perl.
(Reading database ... 55887 files and directories currently installed.)
Preparing to unpack .../liberror-perl_0.17-1.1_all.deb ...
Unpacking liberror-perl (0.17-1.1) ...
Selecting previously unselected package git-man.
Preparing to unpack .../git-man_1%3a1.9.1-1ubuntu0.1_all.deb ...
Unpacking git-man (1:1.9.1-1ubuntu0.1) ...
Selecting previously unselected package git.
Preparing to unpack .../git_1%3a1.9.1-1ubuntu0.1_amd64.deb ...
Unpacking git (1:1.9.1-1ubuntu0.1) ...
Processing triggers for man-db (2.6.7.1-1ubuntu1) ...
Setting up liberror-perl (0.17-1.1) ...
Setting up git-man (1:1.9.1-1ubuntu0.1) ...
Setting up git (1:1.9.1-1ubuntu0.1) ...

Downloading Mail-in-a-Box v0.13b. . .

Installing packages needed for setup...
[...]

After a few minutes the following introductory message will appear. Press Enter to continue.

sk@server: ~_001

Enter a mail ID which will need to manage your Box later. This account will also have access to the box’s admin control panel.

sk@server: ~_002

Enter your FQDN name.

sk@server: ~_003

Select the Country where you live or where your organization is based.

sk@server: ~_004

Now, sit back and relax. It will take a while to download and install all necessary packages. During the installation, you’ll be asked to setup Mail-in-a-Box administrative account. For example in my case, my administrative account is sk@server.unixmen.local

Finally, you’ll see the following installation completed message:

Sample output:

Primary Hostname: server.unixmen.local
Public IP Address: xxx.xxx.xx.xx
Private IP Address: 192.168.1.101
Mail-in-a-Box Version: v0.13b

Updating system packages...
Installing system packages...
Firewall is active and enabled on system startup
Creating initial SSL certificate and perfect forward secrecy Diffie-Hellman parameters...
Generating DH parameters, 2048 bit long safe prime, generator 2
This is going to take a long time
....................................+............+....................................................................................................................................................................................................................+.............+..........................................................................................................................+..................................................................+........+........................................................................+....................................................................................................+....+...........................................................................................................................................................+..............................................................+..................................................+.......+............................................................................................................................................................................+...................................................................................................................................................................................................+.......+............+....................................................................+...............................................++*++*
Installing nsd (DNS server)...
Generating DNSSEC signing keys. This may take a few minutes...
Installing Postfix (SMTP server)...
Installing Dovecot (IMAP server)...
Creating new user database: /home/user-data/mail/users.sqlite
Installing OpenDKIM/OpenDMARC...
Installing SpamAssassin...
Installing Nginx (web server)...
Installing Roundcube (webmail)...
Installing ownCloud (contacts/calendar)...
creating sqlite db
ownCloud is already latest version
Installing Z-Push (Exchange/ActiveSync server)...
Installing Mail-in-a-Box system management daemon...
Installing Munin (system monitoring)...
updated DNS: server.unixmen.local
web updated

Okay. I'm about to set up sk@server.unixmen.local for you. This account will also
have access to the box's control panel.
password:  ## Enter the password to administrative account password
 (again):  ## Enter the password again

mail user added


-----------------------------------------------

Your Mail-in-a-Box is running.

Please log in to the control panel for further instructions at:

https://xxx.xxx.xx.xx/admin

You will be alerted that the website has an invalid certificate. Check that
the certificate fingerprint matches:

AC:15:B9:14:9B:BD:C6:B2:FD:98:94:75:E4:0T:14:B0:D5:F2:0G:5A

Then you can confirm the security exception and continue.

Now, let us access Mail-in-a-Box admin control panel.

Access Mail-in-a-Box Control Panel

Open up your web browser and navigate to: https://domain-name/admin or https://IP-address/admin.

server.unixmen.local - Mail-in-a-Box Control Panel - Google Chrome_005

In the next window, the series of system status checks will be initiated. The System status checks will analyze all configuration including DNS Glue records, SSH public keys, and domain name etc. If everything Ok, all outputs will be shown in Green.

Note: As you see in the below screenshot, There are many issues in my setup. Because, I have setup the Mail server in my local system and haven’t add any Glue records or any firewall rules to allow the important ports. If you follow the same steps in your Cloud system with a public IP, you won’t get any issues as shown below.

server.unixmen.local - Mail-in-a-Box Control Panel - Google Chrome_006

Creating users

To create a new user, go to Mail > Users.

The following screen should appear. Enter the username (Ex. senthil@server.unixmen.local) and it’s password.

server.unixmen.local - Mail-in-a-Box Control Panel - Google Chrome_007

Similarly, you can add as many users as you want.

To add an additional user to a new domain, go to Mail > Users in the admin control panel and create mail users for your new domain. If the email address of new user is at a new domain, Mail-in-a-box will automatically add appropriate new settings for it. Also, don’t forget to add proper DNS records for the New domain.

To see the current DNS settings, go to System > External DNS. To add your own entries, navigate to System > Custom DNS.

Contacts & Calendar

Mail-in-a-Box can hold your contacts and calendar, just like it holds your email.

To access Contacts, navigate to https://domain-name/cloud/contacts.

To access Calendar, navigate to https://domain-name/cloud/calendar.

Make sure you have added your Domain name in the trusted domain list.

Configure the “trusted_domain” setting in config/config.php. An example configuration is provided in config/config.sample.php.

Access Mail-in-a-Box Webmail

To access the Mail-in-a-Box web mail, navigate to: https://domain-name/mail.

The following screen should appear. Enter yhe username and it’s password which we created in the Control panel.

Mail-in-a-Box-Roundcube Webmail :: Welcome to Mail-in-a-Box-Roundcube Webmail - Google Chrome_009

This is how the user’s mail box looks.

Mail-in-a-Box-Roundcube Webmail :: Inbox - Google Chrome_010

Mail-in-a-Box uses Roundcube mail app as it’s default mail client. Now, you can send/receive mails as the way do in the Gmail, Yahoomail accounts.

That’s for now.

For more details, refer the official Setup guide and Maintenance guide.

Also, the project founder has uploaded a video tutorial in Youtube.

Cheers!


The post Mail-in-a-Box: An Open Source Mail Server Solution appeared first on Unixmen.


Trident – Setup Your Own Social Network Website

$
0
0


About Trident

Trident is a full featured, modular, responsive, powerful, and open source software platform that you can use to setup your own Social network website like Facebook. Trident is designed as a completely mobile friendly CMS to setup social networking media platform without having any overly technical knowledge and complicated module installations. Since It is designed as mobile friendly and responsive, It will work without any issues on almost all devices like desktops, Laptops, mobile phones, and tablets etc. Trident is fine-tuned to make your social networks feel modern, sleek and well friendly! The administrators can easily manage their social networks on the go. It is developed and maintained by BoonEx – the makers of the popular Dolphin Smart Community Builder.

Installation

Since Trident is a web-based SCMS (Social Content Management System), it can be installed on any Modern operating systems that has a web server like Apache or Nginx. Before gong to install it, you must setup a working LAMP or LEMP stack in your hosting computer.

In this tutorial, we are going to see how to setup Trident in Ubuntu 15.04 server. The steps are identical to all other distros. All you need to consider is to find the correct web root folder path in the distribution of your choice and install a working LAMP or LEMP stack in the distribution you want to deploy Trident social platform.

Prerequisites

First, setup LAMP or LEMP stack in your Ubuntu server. For the purpose of this tutorial, I am going to setup LAMP (Linux, Apache, MariaDB and PHP) stack in Ubuntu.

To do that, refer the following link.

Also, install the following PHP modules:

sudo apt-get install php5-curl php5-gd

Once you done, Log in to your MariaDB console using command:

mysql -u root -p

Create a new MySQL database for Trident to use and assign a user to it with full permissions as shown below.

For example, I am going to create a database called “tridentdb” and a user called “tridentuser” with password “ubuntu”. I recommend you to use any strong password that make it so difficult to guess.

Welcome to the MariaDB monitor. Commands end with ; or \g.
Your MariaDB connection id is 52
Server version: 10.0.20-MariaDB-0ubuntu0.15.04.1 (Ubuntu)

Copyright (c) 2000, 2015, Oracle, MariaDB Corporation Ab and others.

Type 'help;' or '\h' for help. Type '\c' to clear the current input statement.

MariaDB [(none)]> CREATE DATABASE tridentdb;
Query OK, 1 row affected (0.01 sec)

MariaDB [(none)]> GRANT ALL PRIVILEGES ON tridentdb.* TO 'tridentuser'@'localhost' IDENTIFIED BY 'ubuntu';
Query OK, 0 rows affected (0.00 sec)

MariaDB [(none)]> FLUSH PRIVILEGES;
Query OK, 0 rows affected (0.01 sec)

MariaDB [(none)]> quit
Bye

Download Trident

Download the latest version from Trident download page

At the time of writing this tutorial, the latest version was 8.0 beta version 2.

wget http://ci.boonex.com/builds/Trident-v.8.0.0-B2.zip

Extract the archive using command:

unzip Trident-v.8.0.0-B2.zip

The above command will extract the archive in the current directory. Copy the entire extracted folder to your web root directory.

Note: If you want to install Trident to a subfolder (i.e. example.com/trident), create a subfolder in “/var/www/html/” directory and copy files to it. Don’t just copy the Trident folder. Open it on your computer and copy the entire folder contents – all the files and folders inside of it to your hosting server. Pay attention to .htaccess file, it maybe hidden on *nix systems and in some FTO clients.

I am going to deploy the site in a sub-folder.

sudo mv Trident-v.8.0.0-B2/ /var/www/html/trident

Set the proper permission to the Trident folders and files as shown below.

sudo chown www-data:www-data -R /var/www/html/trident/
sudo chmod 755 /var/www/html/trident/plugins/ffmpeg/ffmpeg.exe

Access web-based Trident installer

Open your favourite web browser and navigate to http://domain-name/trident/ or http://ip-address/trident/. If you copied the Trident folder contents to the main apache root folder, then the URL will be: http://domain-name/.

The following screen should appear.

Trident 8.0.0-B2 Installation - Google Chrome_002

Now, you may start click “Start installation” button to install Trident or click “Server audit” to check for any software incompatibilities or incorrect settings. Hence, I don’t have any issues, i clicked “Server installation”.

In the Next window, the installer will verify that all permissions have been properly set to the files and folders and display the result. If you don’t have any issues, click Continue button.

Trident 8.0.0-B2 Installation - Google Chrome_003

Next, enter your site details such as database name, database user and it’s password, site tittle, site email, admin email, administrative account name and it’s password etc.

Also, you need to enter BoonEx key and BonEx secret values. These numbers are required for Trident to check software version updates, buy and download Extensions and check licenses. Just click “Get BoonEx Key And Secret” link to get the numbers via your registered BoonEx account.

To get your Keys an Secrets, go to the link: http://www.boonex.com/oauth/key_and_secret.

Log in to your account or create a new user account if you don’t have one.

BoonEx Dolphin › Social Network Software | Social CMS - Google Chrome_004

Enter the username and password if you already have or click on the Join button to create a new account. Enter your username, password and a valid email Id to get the secret key.

You’ll be redirected to the your Boonex account dashboard. Click on the link that says: Keys & Secrets.

Selection_006

You’ll see your Keys and Secrets.

Selection_005

Now, copy the Keys & Secrets and head back to your Trident installer wizard and paste them in the required boxes and click Submit. Refer the following screenshot.

Trident 8.0.0-B2 Installatio_ - http___192.168.1.102_trident_install_index.php

Congratulations! Trident has been successfully installed on your Ubuntu server.

Trident 8.0.0-B2 Installation - Google Chrome_007

Post installation instructions

1. Setup the following cron jobs command:

crontab -e

Add the following lines:

MAILTO=sk@unixmen.com
* * * * * /usr/bin/php -q /var/www/html/trident/periodic/cron.php

Replace sk@unixmen.com with your own mail id.

Restart cron service.

sudo systemctl restart cron

2. Remove /install/ folder from the script root folder.

sudo rm -rf /var/www/html/trident/install/

Access Trident admin console

Now, go to Trident Studio for further customization by navigating to the URL: http://IP-address/trident/studio/ or http://domain-name/trident/studio/.

You’ll be pleased with the following screen. It will show a small snippet of each module. If you want to know what each module does, click Next or Click the Close button to go to the Trident Studio dashboard.

Studio - Google Chrome_008

Here it is what Trident Studio dash board looks like.

Studio - Google Chrome_009

That’s it. Now, start adding extensions; adjusting site settings; setting membership levels and access permissions; building pages and enjoying your Social network.

Once you done, you can visit the newly created site using URL: http://domain-name/trident.

Unixmen_trident

Congratulations! Now, ask your friends, colleagues to register on your Social network and start sharing your news, status, updates and have fun!

Cheers!

Reference link:


The post Trident – Setup Your Own Social Network Website appeared first on Unixmen.

How to Install And Configure FTP Server In Ubuntu

$
0
0


Today, we will walk thorough how to install, configure and test an ftp server.  Let’s began then.

First, what is FTP?

The File Transfer Protocol (FTP) is a standard network protocol used to transfer computer files from one host to another host over a TCP-based network, such as the Internet or over LAN (Local Area Network). So, you can upload your files on a FTP server that you have and you can provide a url/link of that file to your friend to download. Your friend then can use a FTP client to download the file.  Usually FTP runs on port 21.

We will use vsftpd so that it act like a FTP service on a server and hence we will call it FTP server.

I am assuming that you are running a Linux operating system distribution like Ubuntu, Debian, CentOS, RedHat or Fedora.  I am using Ubuntu 14.04.3 LTS as my Linux distribution.

Note: To begin, make sure you have a static IP address manually assigned on your interface on the machine where your Linux is running and where we are going to install vsftpd.  If you get an IP address from a DHCP server, then you may have IP address dynamically assigned to your interface and it will change time to time.

# STEP 1

Update your package lists from the repositories. To do this, open a terminal.

Now type the following command in the terminal.

If you are a Ubuntu, Debian user:

sudo apt-get update

aptgetupdateimage

This will also ask for your root password. Wait till it gets updated.

# STEP 2

We will need a file editor to edit our configuration files. Here, I will use vim as an editor to edit our configuration file. Usually every Linux distribution comes up with vi installed and if you are familiar with vi, you can skip step 2. But vim has many advantages over vi and hence vim is more popular as a editor.

If you don’t have vim installed on your Linux, please issue the following command on your terminal.

If you are a Ubuntu, Debian user:

sudo apt-get install vim

If you are a CentOS/RedHat/Fedora user:

sudo yum install vim

aptgetinstallvim

It will install vim on your Linux distribution. Wait till the installation of vim gets finished.

# STEP 3 

Now it’s time to install vsftpd which will act like a FTP server. Issue the following command in the terminal which will download and install vsftpd on your Linux.

If you are a Ubuntu, Debian user:

sudo apt-get install vsftpd

If you are a CentOS/RedHat/Fedora user:

sudo yum install vsftpd

installing_vsftpd

Guess what, in this state your FTP server is already up & running. But we need to modify it a little bit to work properly.

# STEP 4

To configure your FTP server more, please open the following file on vim by typing the following command in your terminal.

If you are a Ubuntu, Debian user:

sudo vim /etc/vsftpd.conf

If you are a CentOS/RedHat/Fedora user:

sudo vim /etc/vsftpd/vsftpd.conf

editingvsftpd

Let’s change some parameter to configure it more to act like a real FTP server.

# STEP 5

By changing the value to anonymous_enable=YES, you can enable anonymous user. Then anyone can use the user name “anonymous” to login into your FTP server, which is a potential security threat. Don’t enable this unless it is required.

anonymousftpuser

# STEP 6

Uncomment write_enable=YES

writeenable

# STEP 7

Uncomment line xferlog_file=/var/log/vsftpd.log for enabling log for your FTP server.

xferlog_file

For viewing log files of vsftpd, please type the following command in the terminal

sudo cat /var/log/vsftpd.log

To view the log file in real time, type the following command in the terminal

sudo tail -f /var/log/vsftpd.log

The above command will show last 20 lines dynamically for the FTP server log.

# STEP 8

Uncomment ftpd_banner and place your own welcome text.

uncommentbanner

Here, I typed, “Welcome to TBDIT FTP service” for my own banner. Please type yours one.

# STEP 9

Now, save & exit from the vsftpd.conf file. To do so, if you are using vim then

Press esc then press & hold shift button and then press : and then finally press x and then press enter. This will save and exit from the file.

# STEP 10

Our initial configuring is done. Now, make sure you are restarting your vsftpd service to accept the changes that we had made so far. To do so, please type the following in your terminal

sudo service vsftpd restart

restartvsftpd

This will restart the vsftpd service with the new configuration that we had made so far.

# STEP 11

Though you will came to know form the previous step that your vsftpd is up and running, still we need to make sure that it is properly listening to port 21.

To do so, please type the following in your terminal and wait for something like this

sudo telnel localhost 21

telnetftp

You will see the welcome text banner that you had wrote before. It means everything is fine and working ☺

Also, you can type the following in your terminal to see whether vsftpd is up and running for you

ps -aux | grep vsftpd

psaux

And lastly, type the following in the terminal and see that vsftpd is listening on the port 21 for any incoming FTP connection.

sudo netstat -ntaulp | grep vsftpd

netstat

# STEP 12

Now, add a user in your Linux.

To add a user in your Linux distribution, type the following in your terminal

sudo adduser ftp1user

adduser

This will add a user named ftp1user on your Linux OS.

Type a password that you can remember easily or write in a safe place in case if you forget it.

# STEP 13

Now, use another computer or workstation (laptop/desktop) whatever you have to download Filezilla. Please visit this link https://filezilla-project.org/ and download filezilla according to your operating system. We will use Filezilla application, which is an open source ftp client and widely used for uploading and download files to & from any FTP server.

Actually, there are few ways of uploading or downloading files to our FTP server. One is, we can use command line terminal and the other one is using a free or paid ftp client like Filezilla. We can use a web browser to download file from our FTP server as well.

After downloading Filezilla, just follow on screen instructions to install it. It’s very easy to install it.

Important thing is, make sure you are using the same network subnet or class for this computer or workstation where you are installing Filezilla. Say, your FTP server has an IP address of 192.168.0.1/32 where you install the vsftpd. So, the computer or workstation that you are using to install Filezilla must have an IP address of that same class as well such as 192.168.0.2/32. You can use whatever IP address you want to use except the broadcast IP address of that class. If the IP address are not from the same class, your workstation and the FTP server will not be able to communicate between them.

# STEP 14 

It’s time to connect our FTP server by using Filezilla application. Here, my FTP server IP address is 192.168.1.11

Open FileZilla application.

Type your FTP server IP address in the Host imput field. My FTP server IP address is 192.168.1.11. Type ftp1user as your User Name in the Username field. And your password that you have set earlier for the user ftp1user in the Password field. Type 21 in the Port field.

Now, click quickconnect and it will connect to your server and it will move you to the user home directory on the right hand side panel.

filizillarighthand

Now, browse to any directory and upload a file. Here, I am uploading a file name Hello FTP.txt to my FTP server.

To download the file you can use filezilla or you can use any web browser to download the file.

Type ftp://192.168.1.11/ on your favorite web browser from your workstation (laptop/desktop).

Here 192.168.1.11 is my FTP server IP address. Please use your FTP server IP address.

It will ask for your username & password and enter ftp1user and it’s password respectively.

downloadbrowseruser

If everything goes well, you will see the file that you have uploaded earlier. I can see my Hello FTP.txt file there. Now click the file to download it.

file listingwebbrowser

That’s all for today. Hope you enjoyed it.

Feature image: Craig Chapman-Hall via Flickr.


The post How to Install And Configure FTP Server In Ubuntu appeared first on Unixmen.

Install Webuzo Control Panel In Ubuntu 15.04

$
0
0


Introduction

Webuzo is a single user control panel/Application Manager which allow users to deploy popular web applications like Word Press, Zoomla and  drupal etc  with a single click. No Sys Admin level expertise are required to install such applications, you have to focus on using the application instead of maintaining that applications, it is an cPanel like  control panel.Webuzo is ideal for use in Enterprises, Small and Medium business environments, almost 240 web applications are supported by Webuzo. It is also suitable for web developers as  along-with web applications, system applications like MongoDB, Apache, NGINX, Java etc. can also be installed.List of available app plug-ins which are supported by Webuzo are available In  this link.

Requirements

Minimum 2 GB RAM, 5-10 GB Free Disk Space, Latest Ubuntu LTS or CentOS.

Installation

Download installation script from this link

Run the following commands as root user.

# wget http://files.webuzo.com/install.sh

Change permissions of downloaded file:

# chmod 755 install.sh

Run the script:

# ./install.sh

Above step will take a while to complete the installation process.

Selection_002

Go the browser and and type <IP_addr:2004>

Selection_003

Web login default username will be ‘soft’ and Password which we  have provided in above step.

Selection_004

After Login Click  ‘end user Panel’ Link

Selection_005

The Complete cPanel Like Control panel will appear in front of you in “Enduser Panel”

Selection_006

Now, installation is over you can download various scripts.

Install Open Blog

Opn in browser  IP_Addr:2002 -> Click Blogs (Visible in Left Side Menu) -> Select OpenBlog -> Install

Selection_008

Install Squirrelmail

Similarly you can install Mail Client ‘Squirrelmail’ listed in Right Hand Panel under Mails Section.

Selection_009

Access Installed Squirrelmail with typing  “Your_IP_addr/squirrel” to the browser

Selection_010 Install System App

Just Like Web Apps we can manage and quickly install System apps also, click to App link visible at top of the Panel.

Selection_011

Let us  try to install MongoDB

Selection_012

Manage Domain Services

Go to the Manage Domain.

Selection_013

Add a new Domain, click add domain.

Selection_014

The new domain has been added successfully.

Selection_015

You can see that lots of options are available with Webuzo Admin tool, you can explore them and utilize them.

Conclusion

As far as I know, Webuzo is a very versatile package which help end user to manage web and system based application with a single click. But there are certain limitations also, only limited packages are provided with Open Source version of the package, for actual benefits you will need to purchase license key from the software vendor. To conclude, it is a good solution for the users which do not have a System Admin level of expertise and wants to use these Web and System based applications.

Have Fun!!


The post Install Webuzo Control Panel In Ubuntu 15.04 appeared first on Unixmen.
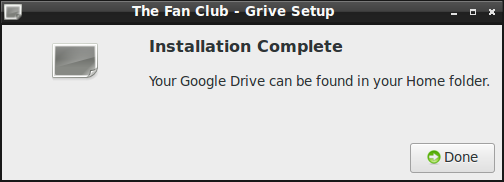
Using Tcpdump To Capture And Analyze Network Traffic

$
0
0


Introduction

Tcpdump is one of the finest tools available for network analysis. It is a must have tool for all of the Network Administrators and users who wants to understand TCP/IP.It enable users to capture packets transmitted or received over the network/Internet. It is important to know that super user  authentication is required to run tcpdump, it is absolutely free tool available under BSD License.

Features

It is a command line tool available for Debian and Redhat based systems, packets can be saved in log form which can be analysed later on with tcpdump.  You can apply filters on the packets and can avoid the traffic which you do not wants to see.It understand hostname and almost all of the TCP and UDP protocols.

Installation

For CentOS:

# yum install tcpdump

For Ubuntu distribution:

# apt-get install tcpdump

for Debian OS:

# pkg install tcpdump

Utility Examples

1. Use tcpdump without any option it will dump output to the scree
# tcpdump

Sample Output:

Selection_012

2. Specify some interface to capture network traffic
# tcpdump -i eth1

Sample output:

Selection_013

Note that  in above example that Packet captured, packet received and packets drops are described at the end of each output.

3. Capture packet from some specific host
# tcpdump src host 192.51.15.1

Sample Output:

Selection_014

# tcpdump src host unixmen.com

Selection_015

4. Read data with time stamp
# tcpdump -i eth0 -n -tttt

Sample output:

Selection_016

5. Scan network for some specific ip range
# tcpdump net 192.51.15.0/24

Sample output:

Selection_017

6. Grab some icmp traffic for specific interface
# tcpdump -i eth1  icmp

Sample output:

Selection_018

7. Record log of tcpdump to some specific file
# tcpdump -w unixmen.cap

unixmen.cap is file name.

Read that recored log with tcpdump

# tcpdump -r unixmen.cap

Sample output:

Selection_019

8. Capture only ARP packets for any interface
# tcpdump -v arp

Sample output:

Selection_020

9. Capture the data using ip address
# tcpdump -n -i eth0

Sample output:

Selection_021

10. Scan network more deeply
# tcpdump -nnvvXS

Sample output:

Selection_022

There are lots of utility which can be used with tcpdump, we will try to provide more tutorials of security tools in future.

Conclusion

tcpdump is a easy to use tool, no supporting packages are required to install or configure this tool, .cap log format is supported which is common for most of network scanning tools.

Have fun!!


The post Using Tcpdump To Capture And Analyze Network Traffic appeared first on Unixmen.

How To Install, Configure And Integrate Spamassassin With Qmail In Ubuntu

$
0
0


Who in the world don’t get a spam mail? Is there anyone? We all are familiar with spam mail.

Today we will learn how To install, configure and integrate spamassassin with qmail in Ubuntu for your mail server.

A mail server is a server, which is used to send & receive mails within and outside of it’s domain. There are a number of MTA (Mail Transfer Agents) out there for acting as a mail server like sendmail, postfix, qmail etc. It’s good to have your own mail server so that you can have the full control over your mail server. A mail server usually use port 25 for SMTP (Simple Mail Transfer Protocol). Post Office Protocol version 3 (POP3) is a standard mail protocol used to receive emails from a remote server to a local email client. This runs on port 110.

Spamassassin is an Open Source anti-spam platform giving system administrators a filter to classify email and block spam (unsolicited bulk email). To know more about Spamassassin, please visit spamassassin.apache.org.

Let’s start without wasting any more time.

For this, we will use Ubuntu 14.04.3 LTS Linux distribution. I am considering that you have already installed qmail on your system and qmail is able to send & receive mails. It’s a prerequisite for us. Installing and configuring qmail are not that difficult as well.

# STEP 1

Make sure that you have FQDN hostname for your server. For this example, I am setting the FQDN hostname as mail.iftekheracer.local.

To set your FQDN hostname, please use the following command in the terminal. I am using vim for my editor. You can use your favorite one.

sudo vim /etc/hosts

SPAMD1

Then set your FQDN hostname as your wish. Though the convention is to start the hostname with mail. Below is mine one.

SPAMD2

# STEP 2

Now, we will install Spamassassin.

Let’s update the repository for packages lists by issuing the following command in the terminal. It’s a good practice to do so.

sudo apt-get update

To install Spamassassin, issue the following command in the terminal.

sudo apt-get install spamassassin spamc

SPAMD3

Hit y/Y to continue. This will download all the dependencies packages for Spamassassin and will install Spamassassin on your system. Once this is installed, you will see something like this in your terminal.

SPAMD4

I hope you note that it creates a user and group named debian-spamd during the installation.  The home directory for this user is  “/var/lib/spamassassin”. Once Spamassassin is installed, there are few more steps that have to be made to make it operational.

# STEP 3

Now, we need to edit some files.

Open the file /etc/default/spamassassin by using your favorite editor from terminal. Mine is vim. So, I will issue the following command in my terminal

sudo vim /etc/default/spamassassin

SPAMD5

To enable Spamassassin, find the line by using search function of your editor.

ENABLED=0

Replace 0 by 1 like this:

ENABLED=1

For automatic rule updates to get the latest spam filtering rules find the following line in the file /etc/default/spamassassin.

CRON=0

Replace 0 by 1 like this:

CRON=1

This will update rules automatically.

After changing these two values, the file will look like below.

SPAMD6

Now, save & exit from the file.

# STEP 4

Now, open the file /etc/spamassassin/local.cf in your editor. I am issuing the following command to open it in my terminal

sudo vim /etc/spamassassin/local.cf

SPAND7

Once the file is open, add these following lines just before the last line of the file.

The file must look like as follows:

rewrite_header Subject *****SPAM*****
required_score 5.0
dns_available yes
use_bayes 1
bayes_auto_learn 1
bayes_file_mode 0700
include /etc/mail/spamassassin/autowhitelist
bayes_path /etc/mail/spamassassin/.spamassassin/bayes bayes_auto_learn_threshold_nonspam 0.1
bayes_auto_learn_threshold_spam 12.0
ok_languages en hi
ok_locales en

SPAMD8

So, change the file just like I mentioned above. Save & exit from the file.

# STEP 5

Now, check the syntax of the local.cf file that you have edited in previous step. To check the syntax, issue the following command on your terminal.

sudo spamassassin --lint

SPAMD9

If you typed correctly, then it will not echo any error message.

# STEP 6

As we are done with our initial configuration, it’s time to start the spamassassin.

To do so, issue the following command in your terminal.

sudo service spamassassin start

SPAMD10

After putting the above command, you will see something like below.

SPAMD11

# STEP 7

To test whether spamassassin is running or not, please issue the following command in your terminal.

sudo service spamassassin status

It will let you know whether Spamassassin is running or not. You will see something like below.

SPAMD12

# STEP 8

Finally, let’s update the Spamassassin spam mail database. To do so, issue the following command in the terminal. When you installed Spamassassin, usually a automatic schedule is set by cronjob at night time so that it can update it’s database for spam filtering. It helps Spamassassin database to stay up to date.

sudo sa-update

SPAMD13

Thanks and hope you enjoy it.

Featured image credit: gino borio


The post How To Install, Configure And Integrate Spamassassin With Qmail In Ubuntu appeared first on Unixmen.

Viewing all 457 articles
Browse latest View live