Quantcast
Viewing all 457 articles
Browse latest View live

X2Go: An Open Source Remote Desktop Solution For Linux

About X2Go

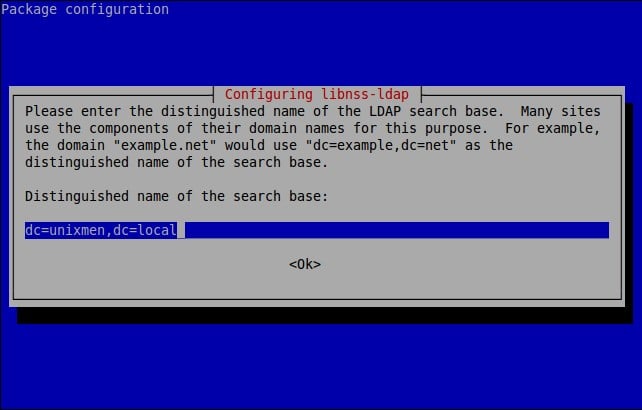
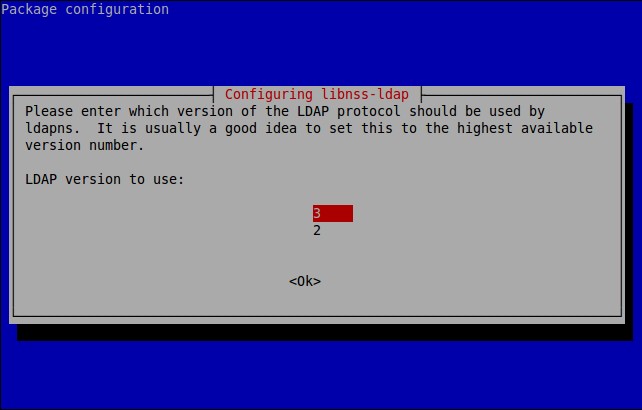
X2Go is an Open Source remote desktop application for GNU/Linux that uses NX technology protocol. The main difference between X2Go and other remote desktop applications is it provides secure standalone remote desktop sessions via SSH. So, each session connected using X2Go is strongly encrypted and safe. X2Go allows you mainly to connect to Linux systems from Linux, Windows, or Mac OS systems. Also, many clients can simultaneously connect and use single X2Go server. It comes with two components, namely X2Go server and X2Go client. X2Go server is a system that is being accessed from a client system. And, the X2Go is a system which can be used to access the X2Go server. This Client will be able to connect to X2Go server(s) and start, stop, resume and terminate (running) desktop sessions. X2Go Client stores different server connections and may automatically request authentication data from LDAP directories. Furthermore it can be used as fullscreen loginscreen (replacement for loginmanager like xdm).

X2Go server package can only be installed in Linux systems, whereas X2Go client package can be installed on many OS, including Linux, Windows, and Mac OS X.

Features

  • Graphical Remote Desktop that works well over both low bandwidth and high bandwidth connections;
  • The ability to disconnect and reconnect to a session, even from another client;
  • Support for sound;
  • Support for as many simultaneous users as the computer’s resources will support;
  • Traffic is securely tunneled over SSH;
  • File and printer Sharing from client to server;
  • Easily select from multiple desktop environments (e.g., MATE, GNOME, KDE);
  • Remote support possible via Desktop Sharing;
  • The ability to access single applications by specifying the name of the desired executable in the client configuration or selecting one of the pre-defined common applications;
  • Server-side list of available applications is displayed on the client, and you can run any number of them from within the same session like Citrix MetaFrame/Presentation Server/XenApp;
  • The ability to access a Windows computer that supports RDP via X2Go-proxied RDP;
  • X2Go client can also serve as a graphical front-end to a client-side rdesktop/xfreerdp installation;
  • A Thin Client Environment is available;
  • A Session Broker that supports centralized configuration and load balancing;
  • And many.

Install X2Go Server

X2Go server and client installation is much easier compared to other remote desktop applications. X2Go development team has made separate repositories for different operating systems.

The following instructions describes how to install X2Go server on various distributions. As I mentioned before, the X2Go can only be installed in Linux based systems.

On Ubuntu 14.04:

Run the following commands to add X2Go repository and install it in Ubuntu 14.04 or higher versions.

sudo apt-get install software-properties-common
sudo add-apt-repository ppa:x2go/stable
sudo apt-get update
sudo apt-get install x2goserver x2goserver-xsession

On Ubuntu 12.04:

For Ubuntu 12.04 and previous versions, you can add X2Go repository and install it as shown below.

sudo apt-get install python-software-properties
sudo add-apt-repository ppa:x2go/stable
sudo apt-get update
sudo apt-get install x2goserver x2goserver-xsession

On Debian 7:

First add X2Go repository. To do that, edit,

sudo vi /etc/apt/sources.list.d/x2go.list

Add the following lines:

# X2Go Repository (release builds)
deb http://packages.x2go.org/debian wheezy main
# X2Go Repository (sources of release builds)
deb-src http://packages.x2go.org/debian wheezy main

# X2Go Repository (nightly builds)
#deb http://packages.x2go.org/debian wheezy heuler
# X2Go Repository (sources of nightly builds)
#deb-src http://packages.x2go.org/debian wheezy heuler

Add X2Go GPG key:

sudo apt-key adv --recv-keys --keyserver keys.gnupg.net E1F958385BFE2B6E

Then, update software repository list and install X2Go server using the following commands:

sudo apt-get install x2goserver x2goserver-xsession

On Fedora 19 and later:

X2Go server and client packages are available in the default repositories of Fedora 19 and later versions. So, install X2Go server using command:

sudo yum install x2goserver

On RHEL 7/Scientific Linux 7/CentOS 7 systems:

Add EPEL repository first.

yum install epel-release

Then, install X2Go server package using command:

yum install fuse-sshfs
yum install x2goserver x2goserver-xsession

On RHEL 6/Scientific Linux 6/CentOS 6 systems:

Similarly, add EPEL repository in CentOS/RHEL/Scientific Linux 6.x systems:

yum install epel-release

Then, install X2Go server package using command:

yum install fuse-sshfs
yum install x2goserver x2goserver-xsession

On openSUSE systems:

Add X2Go repository as shown below. Replace the version number with your own.

zypper ar http://packages.x2go.org/opensuse/<distro-version>/extras x2go-extras
zypper ar http://packages.x2go.org/opensuse/<distro-version>/main x2go-release

Then, install X2Go server using command:

zypper in x2goserver x2goserver-xsession

On SUSE systems:

Add X2Go repository as shown below. Replace the version number with your own.

zypper ar http://packages.x2go.org/sle/<distro-version>/extras x2go-extras
zypper ar http://packages.x2go.org/sle/<distro-version>/main x2go-release

Then, install X2Go server using command:

zypper in x2goserver x2goserver-xsession

OpenSUSE 11 and SLES/SLED 11 do not support /etc/sudoers.d as a place for custom sudoers config files.

If you are using any of these distributions and are having issues regarding running Qt applications with elevated privileges (e.g., via kdesu or sudo), please use this workaround.

Copy the contents of the “x2goserver” file residing in the documentation directory /usr/share/doc/packages/x2goserver.

Get elevated privileges. Either via:

su

or

sudo -i
Then, launch:
visudo
Paste the previously copied content at the end of the sudoers file. Save and exit your editor.

On Gentoo:

Currently X2Go cannot connect to an openssh server compiled with the HPN patch. To make sure x2goserver works on your Gentoo server, you must recompile net-misc/openssh with HPN support disabled. Add the following line to /etc/portage/packages. use:

net-misc/openssh -hpn

Then recompile net-misc/openssh, update the configuration file, and restart the sshd server, as follows:

emerge -1 net-misc/openssh
dispatch-conf
/etc/init.d/sshd restart

Note: A local X.Org installation is not required on the X2Go Server

Install X2Go Client

X2Go Client is available for Windows, Mac OS X, and many Linux distributions.

Add X2Go repository as shown above in the X2Go server installation section depending upon the distribution you use.

Then, install X2Go client using command:

On Debian and Ubuntu like systems:

sudo apt-get install x2goclient

On RHEL and CentOS like systems:

yum install x2goclient

On SUSE and openSUSE like systems:

zypper in x2goclient

Usage

From your client systems, launch X2Go client either from Menu or Unity Dash.

Enter the Session name, remote system’s IP address, remote system’s user name, and desktop environments (Ex.LXDE,  KDE etc.).

For example, here I select “Connect to local desktop” session.

Finally, click Ok to continue.

Image may be NSFW.
Clik here to view.
Session preferences - Lubuntu 14.10 Desktop_001

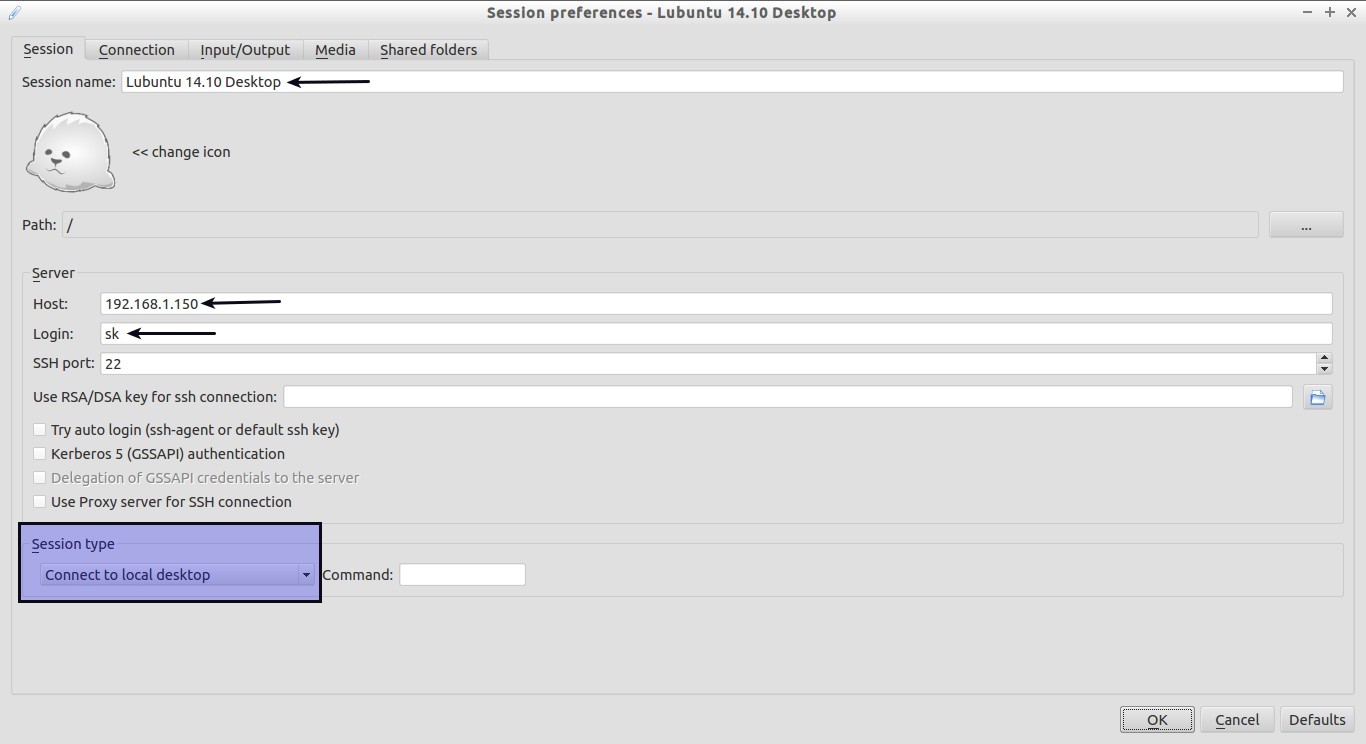
Click on the session name to continue.

Image may be NSFW.
Clik here to view.
X2Go Client_002

Now, enter the remote system’s password and click Ok to continue.

Image may be NSFW.
Clik here to view.
X2Go Client_003

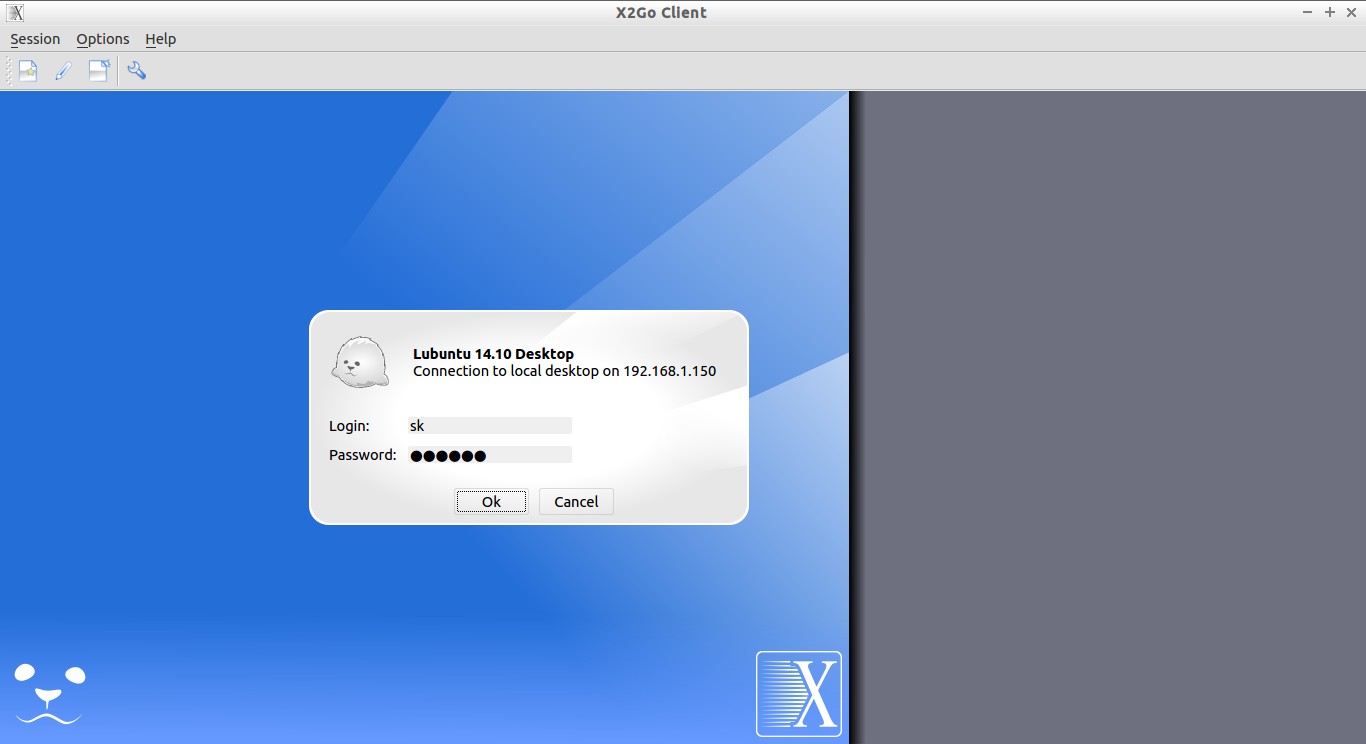
You might the get the following warning message.

Host key verification failed

Host key for server changed.
It is now: 192.168.1.150:22 - 8a:b6:ca:43:fb:fe:e2:53:2f:39:89:31:0b:23:04:0e
This can be an indication of a man-in-the-middle attack.
Somebody might be eavesdropping on you.
For security reasons, it is recommended to stop the connection.
Do you want to terminate the connection?

Just ignore the warning by clicking on the “No” button and continue.

Image may be NSFW.
Clik here to view.
Host key verification failed_005

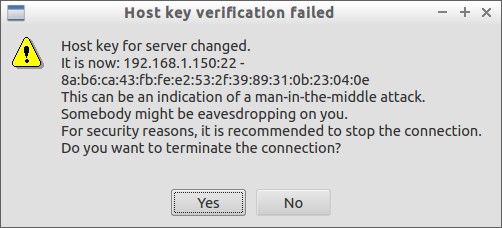
Click Yes to continue.

Image may be NSFW.
Clik here to view.
Host key verification failed_006

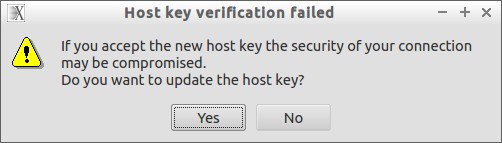
Select the type of access: Full or view only.

Here, I select “Full access”.

Image may be NSFW.
Clik here to view.
X2Go Client_004

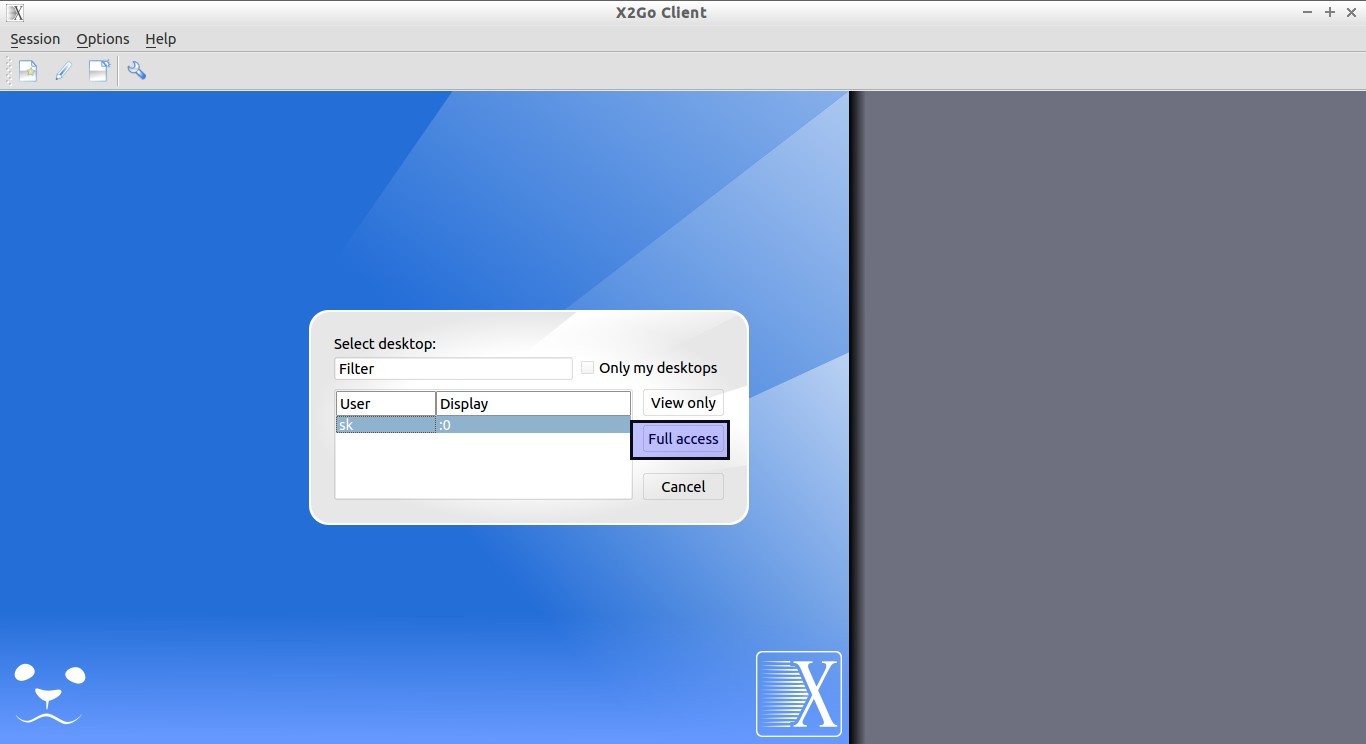
Congratulations! Now, you can access your remote desktop. This is how my Lubuntu 14.10 remote desktop session looks.

Image may be NSFW.
Clik here to view.
Lubuntu 14.10 Desktop_007

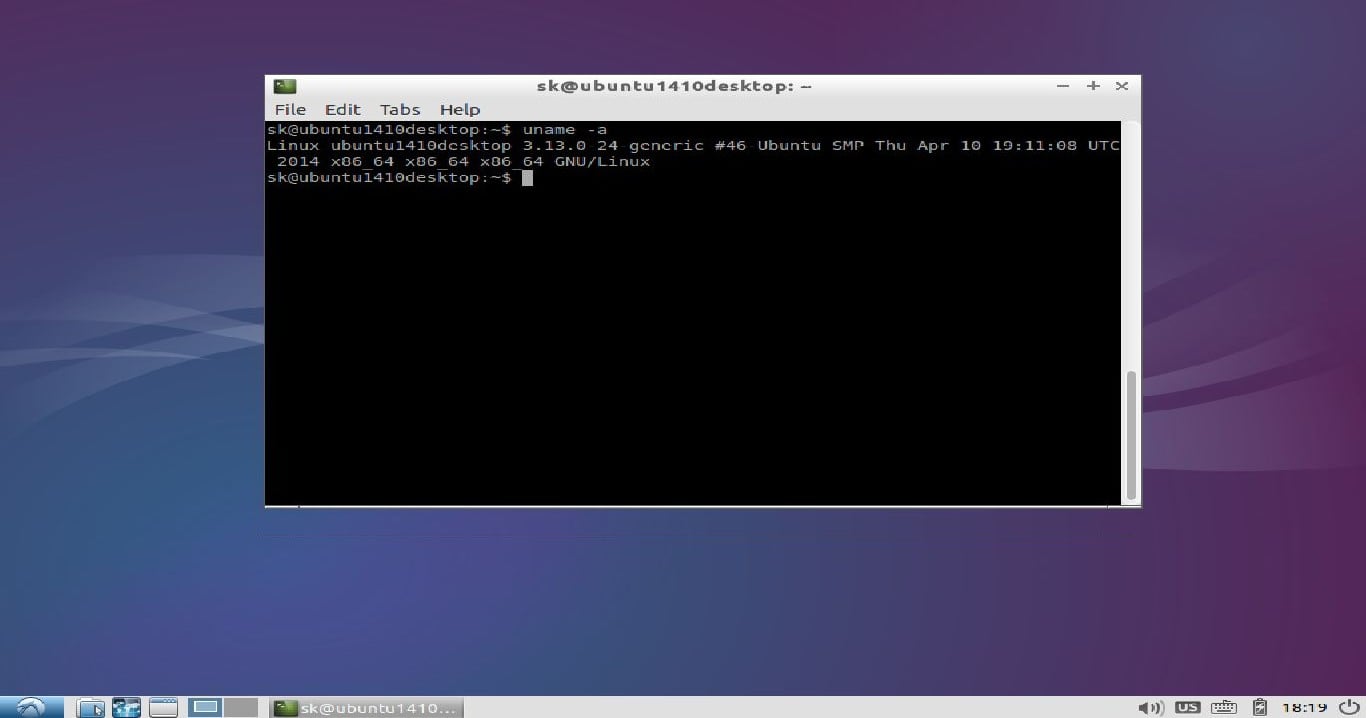
Now, you can explore your remote system as the way you do locally. Also, you can create multiple different sessions with different DEs. And, many users can access the same session simultaneously.

Conclusion

X2Go is a perfect tool for thin client environment. While testing this tool, I faced some problems. I can’t access other desktop environments like Unity, KDE, LXDE. But, I hope there must be a work around to solve those issues. Apart from that, other session types, such as Openbox, Terminal, Internet browser are worked well as expected. X2Go has options to select different resolutions for the remote sessions. Also, you can mount local shares to remote sessions if you want. All traffics are forwarded via SSH, so security won’t be big issue while using X2Go.

In case of any problems, X2Go team offers both community and professional support. If you have any problems, post your queries there.

Give it a try. I hope you won’t be disappointed.

Cheers!

---------------------------------------------------------------------
X2Go: An Open Source Remote Desktop Solution For Linux


Installation Of WordPress With OpenLiteSpeed

Image may be NSFW.
Clik here to view.


WordPress is a free and open-source blogging tool and a content management system (CMS) based on PHP and MySQL. It was released in 2003 under the second version of the GPL license. This tool combines simplicity for users and publishers which makes it flexible and easy to use. It is the most popular blogging system in use on the web at more than 60 million websites. WordPress is a powerful semantic publishing platform, it has a large set of features designed to help users to be a publisher on the internet as easy, pleasant and appealing as possible.

In this article, we will show you how to install WordPress instance using the OpenLiteSpeed web server.

To install OpenLiteSpeed, refer the following link.

WordPress features

We will start our article by listing some of the features that come as standard with WordPress:

  • WordPress is characterized by its simplicity, it so easy and quick to be online an start publishing.
  • You can create any type of website: a personal blog, a photoblog, a business website, a professional portfolio, a magazine or news website and many others. You can modify your website themes and extend them with plugins.
  • WordPress is easy to install and upgrade. You can manage your content, create draft, schedule publication and look at your post revisions.
  • You can make your content public or private, and secure posts and pages with a password.
  • WordPress supports an extended version of the Blogger API, MetaWeblog API and the MovableType API.

Create Database and Database user for WordPress

It is required to have a non-root user system with the “sudo” privileges before starting the installation. Also you must have an installed MySQL and OpenLiteSpeed systems.

Now we will start our installation, so we will create a database and database user for WordPress using the following command:

$ mysql -u root -p

You will be asked to enter the MariaDB administrative password, so we will be at the MariaDB prompt. Use the following command to create a database for our application by calling it “datawordp” (this is our choice you can choose other name)

CREATE DATABASE datawordp;

Now we will create a database user using the following command where we called it “datawordpuser”:

GRANT ALL ON datawordp.* TO datawordpuser@localhost IDENTIFIED BY 'Enter_your_password';

Don’t forget to choose a password and to replace “Enter_your_password” in the command above.

Use the following command to flush the made changes:

FLUSH PRIVILEGES;

Now exit the MariaDB prompt using the following command:

exit

Installation of the required extensions

After creating the database and the database user, and for the installation of the WordPress we will need to install some additional extensions. You will need just to type the following command:

$ sudo yum install lsphp56-gd lsphp56-process lsphp56-mbstring

The needed extensions are included in OpenLiteSpeed’s repository which will be after the installation available in your web server’s PHP instance.

Installation and configuration of the WordPress

We need now to modify the default virtual host that is presented in the openLiteSpeed configuration to be able to use it for the WordPress installation. So we will use the following command to log into the OpenLitespeed’s administrative interface:

https://your_server_domain_or_IP:7080

Select the “Virtual Hosts” from the “Configuration” item in the admin interface. Then click on the “View/edit” link which will enable you to edit the configuration of the virtual host.

After that, we will allow the index.php processing and we will do as fellow: click on the “General” tab for the virtual host and then clock on te “edit” button. Add the “index.php” before “index.html” in the field of valid index files to allow PHP index files. Then clock save.

Now we will start the installation and configuration of the WordPress. Click on the “rewrite” tab of the virtual host, then click on the “edit” button of the “rewrite control” table. Choose “yes” within the “enable rewrite” option. Click save and then you will be moved to the main rewrite menu. So click on the “edit” button for the rewrite rules table. Delete the existing rules and use the following to replace them:

RewriteRule ^/index\.php$ - [L]
RewriteCond %{REQUEST_FILENAME} !-f
RewriteCond %{REQUEST_FILENAME} !-d
RewriteRule . /index.php [L]

Then click the save button.

To know that the WordPress has its own authentication system, and the OpenLiteSpeed has also some password protected areas. So it is important to remove the unused password protection. And we will do as fellow:

We start by clicking on the “security” tab, then click “delete” link next to “SampleProtectedArea” within the “Realms list” table. You will be asked to confirm the deletion so click the “yes” button. Then click on the “context” tab and delete the /protected/ context and confirm those changes by clicking on the “yes” button again.

Now under the “actions” item of the OpenLiteSpeed interface select the “Graceful Restart”:

Image may be NSFW.
Clik here to view.
12

Then you can check if you have any error in the “home” page. If there are some errors click on the “actions” and then “server log viewer” to get more information and know the reasons of those errors.

Before making the installation of the WordPress we have to clean up our virtual host and document root directories. So start by using the following command to delete the virtual host root directory:

$ cd /usr/local/lsws/DEFAULT

Then use the following command to remove the existing scripts in the “contexts” tab:

$ sudo rm cgi-bin/* fcgi-bin/*

And if the “fastcgi-bin/*” is already deleted in the previous section so you will get a warning. Then use the following command to remove the password and group files:

$ sudo rm conf/ht*

Type the following command to clear the contents of the document root directory:

$ sudo rm -rf html/*

Now we are ready to install the WordPress. Type the following command to start:

$ cd ~$ wget https://wordpress.org/latest.tar.gz

Extract the downloaded archive and give your directory by using the following commands:

$ tar xzvf latest.tar.gz$ cd wordpress

Then use the following command to copy the WordPress configuration file to “wp-config.php”.

$ cp wp-config-sample.php wp-config.php

Now use an editor to open the configuration file by using the following command:

$ vi wp-config.php

Find the settings for DB_name and DB_user and DB_password and change it as fellow:

// ** MySQL settings - You can get this info from your web host ** /
//** The name of the database for WordPress */
define('DB_NAME','datawordp'); 

/** MySQL database username */
define('DB_USER','datawordpuser'); 

/** MySQL database password */
define('DB_PASSWORD','Enter_your_password');

Save and close the file after making the changes.

Now we will use the following command to copy the files into our document root:

$ sudo cp -r ~/wordpress/* /usr/local/lsws/DEFAULT/html/

Use the following command to give permission of the entire directory structure to the user who runs the web server:

$ sudo chown -R nobody:nobody /usr/local/lsws/DEFAULT/html

After the installation we can get access to WordPress by going to our server’s domain or IP address using the following command:

http://your_server_domain_or_IP

and if you hadn’t switched to the port 80 during the OpenLiteSpeed installation, you can use the following command:

http://your_server_domain_or_IP:8088

You will get the first page of the WordPress installation asking you to select your language. So after choosing the language type continue. Then you will be asked to enter some information such: an administrative username, password, admin email account, a title of the site. After finishing this configuration you will be able to login using your created account and then you will be redirected to the WordPress admin dashboard, enabling you to configure your site which means that you have finished your installation.

Conclusion

In this article we showed you how to configure and install WordPress using the OpenLiteSpeed web server. This is beneficial for users who don’t have access to an SSH session that make their administration and modification easier.

---------------------------------------------------------------------
Installation Of WordPress With OpenLiteSpeed

How To Install LAMP Stack On Ubuntu 15.04

Image may be NSFW.
Clik here to view.


LAMP is a combination of operating system and open-source software stack. The acronym LAMP came from the first letters of Linux, Apache HTTP Server, MySQL or MariaDB database, and PHP/Perl/Python. This tutorial describes how to install LAMP stack on Ubuntu 15.04, and previous versions such as Ubuntu 14.10/14.04/13.10 etc.

Install LAMP Stack On Ubuntu

1. Install Apache

Apache is an open-source multi-platform web server. It provides a full range of web server features including CGI, SSL and virtual domains.

To install Apache, enter:

sudo apt-get install apache2
Test Apache:

Open your web browser and navigate to http://localhost/ or http://server-ip-address/.

Image may be NSFW.
Clik here to view.
Apache2 Ubuntu Default Page: It works - Mozilla Firefox_012

2. Install MySQL

MySQL is a relational database management system (RDBMS) that runs as a server providing multi-user access to a number of databases, though SQLite probably has more total embedded deployments

sudo apt-get install mysql-server mysql-client

During installation, you’ll be asked to setup the MySQL “root” user password. Enter the password and click Ok.

Image may be NSFW.
Clik here to view.
sk@server: ~_001

Re-enter the password.

Image may be NSFW.
Clik here to view.
sk@server: ~_002

MySQL is installed now.

You can verify the MySQL server status using command:

On Ubuntu 15.04:

sudo systemctl status mysql

On Ubuntu 14.10 and previous versions:

sudo service mysql status

Sample output:

● mysql.service - MySQL Community Server
   Loaded: loaded (/lib/systemd/system/mysql.service; enabled; vendor preset: enabled)
   Active: active (running) since Wed 2015-04-29 13:33:09 IST; 7s ago
 Main PID: 3740 (mysqld_safe)
   CGroup: /system.slice/mysql.service
           ├─3740 /bin/sh /usr/bin/mysqld_safe
           └─4087 /usr/sbin/mysqld --basedir=/usr --datadir=/var/lib/mysql --...

Apr 29 13:33:08 server systemd[1]: Starting MySQL Community Server...
Apr 29 13:33:08 server mysqld_safe[3740]: 150429 13:33:08 mysqld_safe Can't ....
Apr 29 13:33:08 server mysqld_safe[3740]: 150429 13:33:08 mysqld_safe Loggin....
Apr 29 13:33:08 server mysqld_safe[3740]: 150429 13:33:08 mysqld_safe Starti...l
Apr 29 13:33:09 server systemd[1]: Started MySQL Community Server.
Hint: Some lines were ellipsized, use -l to show in full.

3. Install MariaDB

If you don’t want to use MySQL community edition, use MariaDB.

MariaDB is a drop in replacement for MySQL. It is a robust, scalable and reliable SQL server that comes rich set of enhancements.

First you have to remove existing MySQL packages if any. To completely uninstall MySQL along with its configuration files, enter the following commands one by one:

sudo systemctl stop mysql
sudo apt-get remove --purge mysql-server mysql-client mysql-common
sudo apt-get autoremove
sudo apt-get autoclean
sudo rm -rf /var/lib/mysql/
sudo rm -rf /etc/mysql/

After removing MySQL, run the following command to install MariaDB.

sudo apt-get install mariadb-server

Alternatively, you can install it using MariaDB repository if you want to try most recent version of MariaDB. Run the following commands to add PPA. As of writing this, MariaDB PPA is not yet updated to Ubuntu 15.04. However, we can use the repository of Ubuntu 14.10 instead.

sudo apt-get install software-properties-common
sudo apt-key adv --recv-keys --keyserver hkp://keyserver.ubuntu.com:80 0xcbcb082a1bb943db
sudo add-apt-repository 'deb http://ftp.kaist.ac.kr/mariadb/repo/10.0/ubuntu utopic main'

Update the software sources list and install MariaDB using following commands:

sudo apt-get update
sudo apt-get install mariadb-server

During installation you will be asked to set mysql ‘root’ user password. Enter the password twice, and complete the installation.

Note: In Ubuntu 15.04, MariaDB won’t ask you to set root user password during installation.

Also, you can’t set password using command:

mysql_secure_installation

It will throw the following error.

ERROR 1698 (28000): Access denied for user 'root'@'localhost'

To fix this error, log in to mysql prompt without password as root user:

sudo mysql -u root

Then, run the following commands one by one in the mysql prompt:

use mysql;
update user set plugin='' where User='root';
flush privileges;
\q

That’s it. Now, set database administrative “root” user password using command. Press Enter and go with the default settings.

mysql_secure_installation

Sample output:

NOTE: RUNNING ALL PARTS OF THIS SCRIPT IS RECOMMENDED FOR ALL MariaDB
      SERVERS IN PRODUCTION USE!  PLEASE READ EACH STEP CAREFULLY!

In order to log into MariaDB to secure it, we'll need the current
password for the root user.  If you've just installed MariaDB, and
you haven't set the root password yet, the password will be blank,
so you should just press enter here.

Enter current password for root (enter for none): 
OK, successfully used password, moving on...

Setting the root password ensures that nobody can log into the MariaDB
root user without the proper authorisation.

Set root password? [Y/n] y
New password: 
Re-enter new password: 
Password updated successfully!
Reloading privilege tables..
 ... Success!

By default, a MariaDB installation has an anonymous user, allowing anyone
to log into MariaDB without having to have a user account created for
them.  This is intended only for testing, and to make the installation
go a bit smoother.  You should remove them before moving into a
production environment.

Remove anonymous users? [Y/n] 
 ... Success!

Normally, root should only be allowed to connect from 'localhost'.  This
ensures that someone cannot guess at the root password from the network.

Disallow root login remotely? [Y/n] 
 ... Success!

By default, MariaDB comes with a database named 'test' that anyone can
access.  This is also intended only for testing, and should be removed
before moving into a production environment.

Remove test database and access to it? [Y/n] 
 - Dropping test database...
ERROR 1008 (HY000) at line 1: Can't drop database 'test'; database doesn't exist
 ... Failed!  Not critical, keep moving...
 - Removing privileges on test database...
 ... Success!

Reloading the privilege tables will ensure that all changes made so far
will take effect immediately.

Reload privilege tables now? [Y/n] 
 ... Success!

Cleaning up...

All done!  If you've completed all of the above steps, your MariaDB
installation should now be secure.

Thanks for using MariaDB!

Check if mariadb is running or not, using the following command:

sudo service mysql status

Sample output:

● mysql.service - LSB: Start and stop the mysql database server daemon
   Loaded: loaded (/etc/init.d/mysql)
   Active: active (running) since Wed 2015-04-29 13:57:57 IST; 15min ago
     Docs: man:systemd-sysv-generator(8)
   CGroup: /system.slice/mysql.service
           ├─2527 /bin/bash /usr/bin/mysqld_safe
           ├─2528 logger -p daemon.err -t /etc/init.d/mysql -i
           └─2684 /usr/sbin/mysqld --basedir=/usr --datadir=/var/lib/mysql --...

Apr 29 13:57:58 server /etc/mysql/debian-start[2735]: mysql.servers          ...
Apr 29 13:57:58 server /etc/mysql/debian-start[2735]: mysql.table_stats      ...
Apr 29 13:57:58 server /etc/mysql/debian-start[2735]: mysql.tables_priv      ...
Apr 29 13:57:58 server /etc/mysql/debian-start[2735]: mysql.time_zone        ...
Apr 29 13:57:58 server /etc/mysql/debian-start[2735]: mysql.time_zone_leap_se...
Apr 29 13:57:58 server /etc/mysql/debian-start[2735]: mysql.time_zone_name   ...
Apr 29 13:57:58 server /etc/mysql/debian-start[2735]: mysql.time_zone_transit...
Apr 29 13:57:58 server /etc/mysql/debian-start[2735]: mysql.user             ...
Apr 29 13:57:58 server /etc/mysql/debian-start[2790]: Triggering myisam-recov...
Hint: Some lines were ellipsized, use -l to show in full.

4. Install PHP

PHP (recursive acronym for PHP: Hypertext Preprocessor) is a widely used open-source general purpose scripting language that is especially suited for web development and can be embedded into HTML.

Install PHP with following command:

sudo apt-get install php5 php5-mysql libapache2-mod-php5

To test PHP, create a sample “testphp.php” file in Apache document root folder.

sudo nano /var/www/html/testphp.php

Add the following lines.

<?php
phpinfo();
?>

Restart apache2 service.

On Ubuntu 15.04:

sudo systemctl restart apache2

On Ubuntu 14.10 and lower versions:

sudo service apache2 restart

Navigate to http://server-ip-address/testphp.php. It will display all the details about php such as version, build date and commands etc.

Image may be NSFW.
Clik here to view.
phpinfo() - Mozilla Firefox_003

If you want to install all php modules at once, enter the command sudo apt-get install php* and restart the apache2 service. To verify the modules, open web browser and navigate to http://server-ip-address/testphp.php. You will able to see all installed php modules.

5. Manage MySQL Databases (Optional)

Install phpMyAdmin

phpMyAdmin is a free open-source web interface tool used to manage your MySQL databases. It is available in the Official Debian repositories. So install it with command:

sudo apt-get install phpmyadmin

Select the Web server that should be automatically configured to run phpMyAdmin. In my case, it is apache2.

Image may be NSFW.
Clik here to view.
sk@server: ~_004

The phpMyAdmin must have a database installed and configured before it can be used. This can be optionally handled by dbconfig-common.

Select ‘Yes’ to configure database for phpmyadmin wjth dbconfig-common.

Image may be NSFW.
Clik here to view.
sk@server: ~_006

Enter password of the database’s administrative user.

Image may be NSFW.
Clik here to view.
sk@server: ~_007

Enter MySQL application password phpmyadmin.

Image may be NSFW.
Clik here to view.
sk@server: ~_008

Re-enter the password.

Image may be NSFW.
Clik here to view.
sk@server: ~_009

Success! phpMyAdmin installation is installed.

Additional Note: if you followed all steps carefully, phpMyAdmin should work just fine. In case phpMyAdmin is not working, please do the following steps.

Open terminal, and type:

sudo nano /etc/apache2/apache2.conf

Add the following line at the end.

Include /etc/phpmyadmin/apache.conf

Save and Exit. Restart apache service:

On Ubuntu 15.04:

sudo systemctl restart apache2

On Ubuntu 14.10 and lower versions:

sudo /etc/init.d/apache2 restart

6. Access phpMyAdmin Web Console

Now, you can access the phpmyadmin console by navigating to http://server-ip-address/phpmyadmin/ from your browser.

Enter your MySQL username and password which you have given in previous steps. In my case its “root” and “ubuntu”.

Image may be NSFW.
Clik here to view.
phpMyAdmin - Mozilla Firefox_010

You will be redirected to PhpMyAdmin main web interface.

Image may be NSFW.
Clik here to view.
192.168.1.100 - localhost | phpMyAdmin 4.2.12deb2 - Mozilla Firefox_011

From here, you can manage your MySQL databases from phpMyAdmin web interface.

That’s it. Your LAMP stack is ready to use.

---------------------------------------------------------------------
How To Install LAMP Stack On Ubuntu 15.04

Camicri Cube Server: An Offline And Portable Package Manager For Debian, Ubuntu, And Linux Mint

Image may be NSFW.
Clik here to view.


About Camicri Cube Server

As we all know, we must have an Internet connection in our Linux system for downloading and installing applications, right? Yes of course! But wait, what are you going to do if you don’t have an Internet connection, or the Internet connection is dead slow? This will be definitely a headache while downloading and installing packages in your Linux desktop using slow Internet connection.

Of course, you can manually download the applications from other Internet enabled system, transfer the downloaded applications to a CD or removable devices, and install them in your Offline system (The System with no or slow Internet connection). But, the problem is many Linux users do not exactly know what are the required dependencies for the applications that they wanted to install. What could you do if you have such situation? Leave all the worries now. Today, we introduce an offline package manager called Camicri Cube Server.

Using Camicri Cube Server, we can download any packages along with all required dependencies from an Internet connected system (Windows or Linux), and we can install the downloaded packages in the offline computer. Sounds good? Yes, It is! Cube Server is a package manager just like Synaptic and Ubuntu Software Center, but it is portable package manager. Cube Server will work in Windows and all DEB based systems, including Ubuntu, Linux Mint, Elementary OS etc.

Camicri Cube Server (2015) is the successor of Camicri Cube 1.0 (2013). Compared to Cube 1.0, which is written in C# programming language, Cube Server is written in Vala, an open source programming language by GNOME community. It doesn’t use any GUI toolkits ( GTK or QT ). Cube Server uses HTML, CSS and Javascript, to be loaded by a web browser, as a front end UI. It will run on both Windows and Linux platforms (Cross platform). The main goal of this project is to enable the offline Linux users to download and install Linux applications easily.

How It works?

Cube Server will collect the complete details of your offline computer, such as OS details, installed applications and more. Then, we will copy the cube application using any USB thumb drive, and use it on the other Internet connected system, and download the list of applications you want to install. After downloading all required packages, head back to your offline computer and start installing the downloaded packages. Cube Server is developed and maintained by Jake R. Capangpangan, a Computer Science graduate, and currently working as Software Design Engineer in Philippines.

Installation

For the purpose of this tutorial, we will be using two Linux systems.

  • Online System (Internet connected) – Lubuntu 14.04 LTS Desktop
  • Offline System (No Internet) – Ubuntu 15.04 Desktop

Usage

1. Download And Install Cube Server package In Online System (Ubuntu 14.04)

Download Cube Server latest version from the official Launchpad Page. Make sure you have downloaded the correct version depending upon your offline computer architecture. As I use 64 bit system, I downloaded the 64bit version.

wget https://launchpad.net/cube-server/trunk/0.1/+download/cube-server-installer-0.1.91_Linux64bit.zip

Extract the cube-server zip file.

unzip cube-server-installer-0.1.91_Linux64bit.zip

Now, install it using command:

sudo ./cube-server-installer install

Sample output:

Camicri Cube Server Installer ( cube-server 0.91 )
Created by Jake R. Capangpangan <camicrisystems@gmail.com>

This will install cube-server. Press enter key to proceed...
Installing cube system...
gtk-update-icon-cache: Cache file created successfully.
Installation finished.

To remove cube-server, run:

sudo ./cube-server-installer remove

Now, Copy the ‘cube-server-installer.zip’ file to any USB drives and go to your Offline system. Because, we don’t have Internet connection to download and install cube-server in our offline machine.

Note:

It is also available now to download via apt-get by entering the following commands to the terminal.

sudo add-apt-repository ppa:camicrisystems/daily
sudo apt-get update 
sudo apt-get install cube-server

2. Steps needs to be done In Offline system(Ubuntu 15.04)

Plug your USB drive and copy the cube-server-installer zip file to any location of your choice.

Extract the cube-server zip file.

unzip cube-server-installer-0.1.91_Linux64bit.zip

Now, install it using command:

sudo ./cube-server-installer install

Sample output:

Camicri Cube Server Installer ( cube-server 0.91 )
Created by Jake R. Capangpangan <camicrisystems@gmail.com>

This will install cube-server. Press enter key to proceed...
Installing cube system...
gtk-update-icon-cache: Cache file created successfully.
Installation finished.

To remove cube-server, run:

sudo ./cube-server-installer remove

Now, Launch Cube Server either from Unity or Menu.

Image may be NSFW.
Clik here to view.
Menu_002

Cube Server will open in a new browser window.

Enter the Project name (Ex.sk) and click Create. As I mentioned above, this will create a new project with complete details of your system such as OS details, list of installed applications, list of repositories etc.

Image may be NSFW.
Clik here to view.
Camicri Cube Server (0.1.91) - Mozilla Firefox_004

After a few seconds, you will see a new message that says: ‘Project sk is created’. Now, click the Open button.

Image may be NSFW.
Clik here to view.
Selection_005

Cube Server will scan all your system’s repositories and list of the available packages.

Image may be NSFW.
Clik here to view.
Camicri Cube Server (0.1.91) - Mozilla Firefox_008

Since, we don’t have Internet connection, we can’t install any applications at present. So, click on the Quit button on the top right corner.

That’s it. Now the new project has been created. The new project will be saved in cube-system folder in your home directory.

Go to your cube-system/projects directory and copy the newly created project (In my case it’s sk) to your flash drive.

Image may be NSFW.
Clik here to view.
Selection_009

Now, go back again to the online system (Lubuntu 14.04).

3. Steps needs to be done in Online system (Lubuntu 14.04 LTS)

The following steps needs to be done on the Internet connected system. In our case, It’s Lubuntu 14.04.

Plug in the flash drive and copy the project(Ex. sk folder in the flash drive) to the projects directory in the cube-system directory.

Image may be NSFW.
Clik here to view.
Selection_003

As you see, I copied the ‘sk’ folder to the cube-system/projectss in my online system.

Now, Launch Cube Server either from Unity Dash or Menu or Terminal.

Select your project and click the Open button.

Image may be NSFW.
Clik here to view.
Camicri Cube Server (0.1.91) - Mozilla Firefox_004

The following window will open.

Image may be NSFW.
Clik here to view.
Camicri Cube Server (0.1.91) - Mozilla Firefox_005

Now, it is time to download new repositories, upgrade outdated installed applications and download new applications. First, let us download Repositories.

To do that, go to Download -> Download Repositories from the Main menu.

Click ‘Okay, do it’ button to continue.

Image may be NSFW.
Clik here to view.
Selection_006

The repositories will be downloaded now.

Image may be NSFW.
Clik here to view.
Selection_007

A ‘Update System’ notice will appear. You must do this when you go back to your original computer, so that your computer will know the latest list also. Finally, click ‘Okay’ to close this dialogue box.

Image may be NSFW.
Clik here to view.
Selection_008

After downloading repositories, we need to download applications with available updates. Check the ‘Main List’ to find the list of available applications with updates. Click the ‘Upgradable Package’ under the Main List to show all applications that needs to be upgraded.

As you see below, we have 32 outdated packages that needs to be updated.

Image may be NSFW.
Clik here to view.
Camicri Cube Server (0.1.91) - Mozilla Firefox_009

To download applications, click ‘Mark -> Mark All Upgradable Package’ from the Navigation bar.

Image may be NSFW.
Clik here to view.
Selection_010

In the navigation bar, click ‘Download -> Download All Marked’ to download all marked applications.

Image may be NSFW.
Clik here to view.
Selection_011

Finally, click ‘Okay’ to download all application updates.

Image may be NSFW.
Clik here to view.
Selection_012

Cube Server will start to download all updates.

Image may be NSFW.
Clik here to view.
Selection_013

We downloaded all updates now.

What we have done so far is we just download the updates for the existing installed applications. Now, let us see how to download a new application, so that we can install it in our offline system later.

Downloading New Applications

For example, here I am going to download the apache2 Package.

To do that click on the Available Packages under the Main List. Enter the name of the package in the search box, and hit Search button.

Image may be NSFW.
Clik here to view.
Camicri Cube Server (0.1.91) - Mozilla Firefox_016

The Cube Server will fetch the details of the application that you are looking for. Hit the “Download” button.

Image may be NSFW.
Clik here to view.
Selection_017

Cube will start to download the apache2 package with all its dependencies. If you want to search and download more packages, click Mark -> Mark All Downloaded Packages from the navigation bar. Then, search the required packages. You can mark as many as packages you want to install on your original computer. Once you marked all packages, click Download All marked button from the Navigation bar.

After updating repositories, outdated packages, and downloading new applications, close the Cube Server application. Then, copy the latest Projects folder from the cube-system directory to any flash drive or external hdd, and go back to your Offline system.

Image may be NSFW.
Clik here to view.
Selection_018

4. Steps needs to be done In Offline computer (Ubuntu 15.04)

Copy the latest ‘sk’ folder from your removable storage device (Flash drive) to the projects folder (Replacing the old
one).

Launch Cube Server either from Unity or Menu. Select your project and click Open.

Image may be NSFW.
Clik here to view.
Selection_010

Now, let us update our system. To do that, click System -> Update System from the Navigation bar.

Image may be NSFW.
Clik here to view.
Selection_011
Click ‘Okay do it’ to continue.

Image may be NSFW.
Clik here to view.
Selection_012

After updating your system, it is time to install your downloaded packages.

You can do it in four different ways:

1. You can Install all downloaded packages:

To do that, Click Mark -> Mark All Downloaded Packages.

Image may be NSFW.
Clik here to view.
Selection_013

Then, click Install -> All Marked Packages.

Image may be NSFW.
Clik here to view.
Selection_014

2. Install only upgraded packages:

Click Mark -> Mark All Upgradable Packages.

Image may be NSFW.
Clik here to view.
Selection_015

Then, click Install -> All Marked Packages.

Image may be NSFW.
Clik here to view.
Selection_014

3. Install Only Satisfied Downloaded packages:

This will install only downloaded applications with complete package dependencies downloaded also.

Image may be NSFW.
Clik here to view.
Selection_016

4. Install Specific packages:

In this method, we install only a specific application. Go to Downloaded Packages under the Main List and select the application you want to install.

Image may be NSFW.
Clik here to view.
Camicri Cube Server (0.1.91) - Mozilla Firefox_017

I want to install all downloaded packages with updates, so I go with the first method. Click Okay to install all downloaded packages.

Image may be NSFW.
Clik here to view.
Selection_018

Enter the Authentication password to continue. The update process will take a while depending upon the total number of applications.

Image may be NSFW.
Clik here to view.
Terminal_019

That’s it.

Conclusion

Using Cube Server, you can download the required packages from any Internet connected system, and then you can install them in your offline computer without Internet connection. This is one of the best and useful tool ever I have used. Give it a try you won’t be disappointed.

In case, you have any questions or encountered a problem, contact the developer at camicrisystems@gmail.com.

Cheers!

---------------------------------------------------------------------
Camicri Cube Server: An Offline And Portable Package Manager For Debian, Ubuntu, And Linux Mint

Install And Configure OpenLDAP In Ubuntu 15.04 And Debian 8

Image may be NSFW.
Clik here to view.


About OpenLDAP

OpenLDAP is a free open source Light Weight Directory Access protocol developed by the OpenLDAP project. It is a platform independent protocol, so that it runs on all Linux/Unix like systems, Windows, AIX, Solaris and Android.

OpenLDAP includes:

  • slapd – stand-alone LDAP daemon (server)
  • libraries implementing the LDAP protocol, and
  • utilities, tools, and sample clients.

In this tutorial, let us see how to install and configure OpenLDAP in Ubuntu / Debian server. Due to lack of resources and time, I tested this how-to only in Ubuntu 15.04. However, the following steps should work on Debian 7/8 and previous versions of Ubuntu, including Ubuntu 14.10/14.04/13.10/13.04/12.10 etc. If you had any issues while installing OpenLDAP in other distros, feel free to let me know, I will check and update this how-to ASAP.

Well, let us begin to setup LDAP server.

Here is my LDAP server’s details:

Operating System : Ubuntu 15.04
Hostname         : server.unixmen.local
IP Address       : 192.168.1.100

Replace the above values with your own.

Install And Configure OpenLDAP

First let us see how to install OpenLDAP in DEB based systems.

1. Install OpenLDAP

Enter the following command in Terminal to install openldap.

Switch to root user:

sudo su

Or

su

Run the following command to install OpenLDAP.

apt-get install slapd ldap-utils

During the installation, you’ll be asked to set password for the LDAP admin account. Enter your admin password here.

Image may be NSFW.
Clik here to view.
root@server: -home-sk_001

Re-enter the password.

Image may be NSFW.
Clik here to view.
root@server: -home-sk_002

OpenLDAP is installed now. Let’s go to the configuration task.

2. Configure OpenLDAP

Edit “/etc/ldap/ldap.conf” file,

vi /etc/ldap/ldap.conf

Find, uncomment and replace ‘BASE’ and ‘ URI’ values with your domain name and IP Address as shown below.

#
# LDAP Defaults
#
# See ldap.conf(5) for details
# This file should be world readable but not world writable.
BASE    dc=unixmen,dc=local
URI     ldap://server.unixmen.local ldap://server.unixmen.local:666
#SIZELIMIT      12
#TIMELIMIT      15
#DEREF          never
# TLS certificates (needed for GnuTLS)
TLS_CACERT      /etc/ssl/certs/ca-certificates.crt

Save and close the file.

Next, we should reconfigure the slapd with the updated values.

dpkg-reconfigure slapd

The following screen should appear. Select “No” and press Enter.

Image may be NSFW.
Clik here to view.
root@server: -home-sk_003

Enter the DNS domain name.

Image may be NSFW.
Clik here to view.
root@server: -home-sk_004

Enter the Organization name (i.e your company name).

Image may be NSFW.
Clik here to view.
root@server: -home-sk_005

Enter the LDAP admin password which you created in the earlier step.

Image may be NSFW.
Clik here to view.
root@server: -home-sk_006

Re-enter the password.

Image may be NSFW.
Clik here to view.
root@server: -home-sk_007

Select the backend database. I go with defaults.

Image may be NSFW.
Clik here to view.
root@server: -home-sk_008

Select whether you want to delete the database automatically or keep it when slapd is removed. Here i want to keep my old database, hence i clicked No.

Image may be NSFW.
Clik here to view.
root@server: -home-sk_009

Select Yes to move old database.

Image may be NSFW.
Clik here to view.
root@server: -home-sk_010

Select No and Press Enter.

Image may be NSFW.
Clik here to view.
root@server: -home-sk_011

That’s it. We have successfully configured OpenLDAP. Let us go ahead and check whether it’s working or not.

Test LDAP Server

Run the following command to test OpenLDAP:

ldapsearch -x

Sample output:

# extended LDIF
#
# LDAPv3
# base <dc=unixmen,dc=local> (default) with scope subtree
# filter: (objectclass=*)
# requesting: ALL
#

# unixmen.local
dn: dc=unixmen,dc=local
objectClass: top
objectClass: dcObject
objectClass: organization
o: unixmen
dc: unixmen

# admin, unixmen.local
dn: cn=admin,dc=unixmen,dc=local
objectClass: simpleSecurityObject
objectClass: organizationalRole
cn: admin
description: LDAP administrator

# search result
search: 2
result: 0 Success

# numResponses: 3
# numEntries: 2

If you see the ‘Success’ message in your output, then Congratulations! LDAP Server is working!!

LDAP Server Administration

Administration of LDAP server in command mode is bit difficult. We can’t remember all LDAP commands. So, we will use an easier GUI administration tool called “phpldapadmin” to manage, configure, and administer LDAP server.

Install phpLDAPadmin

phpLDAPadmin is a web-based LDAP administration tool for managing your LDAP server. Using phpLDAPadmin, you can browse your LDAP tree, view LDAP schema, perform searches, create, delete, copy and edit LDAP entries. You can even copy entries between servers.

Enter the following command to install phpLDAPAdmin:

apt-get install phpldapadmin

Create a symbolic link for phpldapadmin directory.

ln -s /usr/share/phpldapadmin/ /var/www/html/phpldapadmin

On Ubuntu 14.10 and lower versions, run:

ln -s /usr/share/phpldapadmin/ /var/www/phpldapadmin

Edit “/etc/phpldapadmin/config.php” file,

vi /etc/phpldapadmin/config.php

Set the correct timezone. To do that, find and uncomment the following line and set your Timezone.

[...]
$config->custom->appearance['timezone'] = 'Asia/Kolkata';
[....]

Scroll down further and Replace the domain names with your own values.

To do that, Find “Define LDAP Servers” section in the config file and edit the following lines as shown below.

[...]
// Set your LDAP server name //
$servers->setValue('server','name','Unixmen LDAP Server');
[...]
// Set your LDAP server IP address // 
$servers->setValue('server','host','192.168.1.100');
[...]
// Set Server domain name //
$servers->setValue('server','base',array('dc=unixmen,dc=local'));
[...]
// Set Server domain name again//
$servers->setValue('login','bind_id','cn=admin,dc=unixmen,dc=local');
[...]

Restart the apache service.

systemctl restart apache2

On Ubuntu 14.10 and older versions, run:

service apache2 restart

Make sure that you have opened apache server port “80” and LDAP default port “389” in your firewall/router configuration.

ufw allow 80

Sample output:

Rules updated
Rules updated (v6)
ufw allow 389

Sample output:

Rules updated
Rules updated (v6)

The above steps are not necessary for Debian systems.

Test phpLDAPadmin

Open your web browser and navigate to: “http://192.168.1.100/phpldapadmin”.

The following screen should appear.

Image may be NSFW.
Clik here to view.
phpLDAPadmin (1.2.2) - - Mozilla Firefox_012

Click “login” on the left pane. Enter the LDAP admin password that you have created during OpenLDAP installation, and click “Authenticate”.

Image may be NSFW.
Clik here to view.
phpLDAPadmin (1.2.2) - - Mozilla Firefox_014

Now the main console screen of phpldapadmin will open.

You can see the LDAP domain “unixmen.local” and other details on the left.

Image may be NSFW.
Clik here to view.
phpLDAPadmin (1.2.2) - - Mozilla Firefox_015

From here, you can add additional objects, such as Organizational Unit, Users and groups etc.

Creating Objects

1. Create Organizational Unit(OU):

Lets create some sample objects from the phpldapadmin console. First, we will create an OU.

Click on the “+” sign near the line “dc=unixmen” and click “Create new entry here” link.

Image may be NSFW.
Clik here to view.
Selection_016

Scroll down and Select “Generic-Organizational Unit”.

Image may be NSFW.
Clik here to view.
Selection_017

Enter the name of the Organizational unit (Ex.sales) and Click “Create Object”.

Image may be NSFW.
Clik here to view.
Selection_018

Finally, click “Commit”.

Image may be NSFW.
Clik here to view.
Selection_019

You can find the newly created OU in main LDAP section on the left.

Image may be NSFW.
Clik here to view.
Selection_020

2. Create Group:

Click on the sales OU on the left pane and click on “Create a child entry” link.

Image may be NSFW.
Clik here to view.
phpLDAPadmin (1.2.2) - - Mozilla Firefox_021

In the next window, Select “Generic: Posix Group”.

Image may be NSFW.
Clik here to view.
Selection_022

Enter the name of the group and click Create Object button. For example, here i enter the group name as “sales-group”.

Image may be NSFW.
Clik here to view.
Selection_023

Click Commit to save changes.

Image may be NSFW.
Clik here to view.
Selection_024

Now you can see that the newly created group called “sales-group” under the sales OU.

Image may be NSFW.
Clik here to view.
Selection_025

3. Create User:

Now, let us create a new user under sales-group.

Click on the sales-group on the left.

Image may be NSFW.
Clik here to view.
Selection_025

Select Create a child entry link button.

Image may be NSFW.
Clik here to view.
Selection_026

In the next window, Select “Generic: User Account”.

Image may be NSFW.
Clik here to view.
Selection_027

Enter the user details such as common name, GID number, last name, Login shell, user password and user id etc., as shown in the below screen shot and click Create object. For example. here I am going to create a user called “kumar”.

Image may be NSFW.
Clik here to view.
Selection_028

And then Click “Commit” to save the changes.

Image may be NSFW.
Clik here to view.
Selection_029

Now the newly created user “kumar” will be found under “sales-group” object.

Image may be NSFW.
Clik here to view.
Selection_031

Also, you can verify the newly created objects are really existing with command:

ldapsearch -x

Sample output:

# extended LDIF
#
# LDAPv3
# base <dc=unixmen,dc=local> (default) with scope subtree
# filter: (objectclass=*)
# requesting: ALL
#

# unixmen.local
dn: dc=unixmen,dc=local
objectClass: top
objectClass: dcObject
objectClass: organization
o: unixmen
dc: unixmen

# admin, unixmen.local
dn: cn=admin,dc=unixmen,dc=local
objectClass: simpleSecurityObject
objectClass: organizationalRole
cn: admin
description: LDAP administrator

# sales, unixmen.local
dn: ou=sales,dc=unixmen,dc=local
objectClass: organizationalUnit
objectClass: top
ou: sales

# sales-group, sales, unixmen.local
dn: cn=sales-group,ou=sales,dc=unixmen,dc=local
gidNumber: 500
cn: sales-group
objectClass: posixGroup
objectClass: top

# kumar, sales-group, sales, unixmen.local
dn: cn=kumar,cn=sales-group,ou=sales,dc=unixmen,dc=local
cn:: IGt1bWFy
gidNumber: 500
homeDirectory: /home/users/kumar
sn: kumar
loginShell: /bin/sh
objectClass: inetOrgPerson
objectClass: posixAccount
objectClass: top
uidNumber: 1000
uid: kumar

# search result
search: 2
result: 0 Success

# numResponses: 6
# numEntries: 5

As you see in the above output, the new objects, namely ‘sales’, ‘sales-group’, and ‘kumar’ has been successfully created under the main LDAP domain. Similarly, you can create as many as objects you wanted.

Installing and configuring OpenLDAP in Debian and Ubuntu and derivatives is really easy and fun. Even a novice users can easily setup a working LDAP server within an hour.

Now OpenLDAP Server is ready to use.

I have successfully installed and configured LDAP server, what now? Please refer next article How To Configure Linux Clients To Authenticate Using OpenLDAP.

Good luck!

---------------------------------------------------------------------
Install And Configure OpenLDAP In Ubuntu 15.04 And Debian 8

Configure Linux Clients To Authenticate Using OpenLDAP

Image may be NSFW.
Clik here to view.


This is the second part of our previous tutorial, titled how to install and configure OpenLDAP server on Debian and Ubuntu systems. In this guide let us see how to configure Linux clients to authenticate using OpenLDAP server. I have tested this Guide on Debian 8 desktop and Ubuntu 15.04 desktop, it worked perfectly without any issues. And also, this guide should on other Debian and Ubuntu distributions. If you find any problems, feel free to let me know. I will check and update this tutorial ASAP.

For the purpose of this tutorial, we will be using Debian 8 MATE desktop as LDAP client.

My client system’s details:

  • Operating system: Debian 8 MATE desktop
  • IP Address: 192.168.1.150/24

My LDAP Server’s details:

  • Operating system: Ubuntu 15.04 server
  • IP Address: 192.168.1.100/24

Configure Linux Clients To Authenticate Using OpenLDAP

Here, I am going to split this tutorial into two sections. First, we’ll see how to install LDAP client on Debian 8, and then we’ll see how to configure Debian 8 desktop to authenticate.

1. Install LDAP client

I assume that you’ve had a working LDAP server already. If not, refer the above link to setup OpenLDAP server in Debian and Ubuntu and its derivatives.

Now let us install the required packages in our LDAP client.

Switch to root user:

sudo su

Or

su

Run the following command from your Terminal to install LDAP client packages.

apt-get install libnss-ldap libpam-ldap nscd

During installation, you will be asked a variety of questions. Read them carefully and enter the appropriate values.

First enter the ldap server IP address as shown in the below screenshot.

Image may be NSFW.
Clik here to view.
sk@debian: ~_001

Note that you should enter LDAP server URI as ldap://ip-address-of-ldapserver/. Using IP address is always recommended to avoid failures when domain name services are unavailable.

Then enter the distinguished name of the search base. This value should match with your LDAP server’s /etc/phpldaadmin/config.php file values. In my case it’s dc=unixmen, dc=local.

Image may be NSFW.
Clik here to view.
sk@debian: ~_002

Select Ldap version to use as 3. It is recommended to use highest available version.

Image may be NSFW.
Clik here to view.
sk@debian: ~_003

Enter LDAP administrative account details.

In our case, it was: cn=admin, dc=unixmen.com, dc=local.

Image may be NSFW.
Clik here to view.
sk@debian: ~_005

Enter LDAP administrative password:

Image may be NSFW.
Clik here to view.
sk@debian: ~_006

The next window will say that you have to manually edit nsswitch.conf file. Click Ok to continue.

Image may be NSFW.
Clik here to view.
sk@debian: ~_007

Now the libnss-ldap package has been installed. Now, we should enter the same answers for libpam-ldap, i.e the above questions will be repeated for libpam-ldap.

We don’t need to act the client LDAP admin account as local root, hence we will select No.

Image may be NSFW.
Clik here to view.
sk@debian: ~_008

Select No.

Image may be NSFW.
Clik here to view.
sk@debian: ~_009

Now, let us reconfigure libnss-ldap to improve debconf configuration by entering the following command:

dpkg-reconfigure libnss-ldap

Make sure that the LDAP server URI is correct.

Image may be NSFW.
Clik here to view.
sk@debian: ~_010

Make sure that the LDAP server search base:

Image may be NSFW.
Clik here to view.
sk@debian: ~_011

LDAP version to use:

Image may be NSFW.
Clik here to view.
sk@debian: ~_012

LDAP database doesn’t require login, hence we select No.

Image may be NSFW.
Clik here to view.
sk@debian: ~_013

Select No.

Image may be NSFW.
Clik here to view.
sk@debian: ~_014

Select No.

Image may be NSFW.
Clik here to view.
sk@debian: ~_015

Finally, Select Ok.

Image may be NSFW.
Clik here to view.
sk@debian: ~_016

That’s it. Now we have installed ldap client packages. 

2. Configure LDAP Client

We must update our client system to look for LDAP server by adjusting their configuration files.

To do so, First edit file /etc/ldap/ldap.conf,

nano /etc/ldap/ldap.conf

Uncomment the following lines and Enter your LDAP server search BASE and URI as shown below.

[...]
BASE    dc=unixmen,dc=local
URI     ldap://192.168.1.100
[...]

Edit file /etc/nsswitch.conf,

nano /etc/nsswitch.conf

Find the following three lines and adjust them as shown below.

[...]
passwd:         compat ldap
group:          compat ldap
shadow:         compat ldap
[...]
netgroup:       ldap
[...]

Now restart nscd service:

systemctl restart nscd

On Ubuntu 14.10/Debian 7 and previous versions:

service nscd restart

PAM Configuration

Now we should verify the PAM configuration. The PAM configuration is modified during libnss-ldap installation. But it is advisable to verify the PAM configuration files as look like below.

Edit file /etc/pam.d/common-auth,

nano /etc/pam.d/common-auth

Make sure this file contains the following lines.

[...]
auth    [success=2 default=ignore]      pam_unix.so nullok_secure try_first_pass
auth    [success=1 default=ignore]      pam_ldap.so use_first_pass
[...]
auth    requisite                       pam_deny.so
[...]
auth    required                        pam_permit.so
[...]

Edit file /etc/pam.d/common-account,

nano /etc/pam.d/common-account
[...]
account [success=2 new_authtok_reqd=done default=ignore]        pam_unix.so
account [success=1 default=ignore]      pam_ldap.so
[...]
account requisite                       pam_deny.so
[...]
account required                        pam_permit.so
[...]

Edit file nano /etc/pam.d/common-password,

nano /etc/pam.d/common-password
[...]
password        [success=2 default=ignore]      pam_unix.so obscure sha512
password        [success=1 user_unknown=ignore default=die]     pam_ldap.so use_authtok try_first_pass
[...]
password        requisite                       pam_deny.so
[...]
password        required                        pam_permit.so
[...]

Edit file /etc/pam.d/common-session,

nano /etc/pam.d/common-session

Add the following line at the bottom.

[...]
session  required                                         pam_mkhomedir.so

The above line will create a HOME directory for LDAP users who does not have home directory when login to LDAP server.

Edit file /etc/pam.d/common-session-noninteractive,

nano /etc/pam.d/common-session-noninteractive
[...]
session [default=1]                     pam_permit.so
[...]
session requisite                       pam_deny.so
[...]
session required                        pam_permit.so
[...]
session required        pam_unix.so
session optional                        pam_ldap.so

Restart nscd service to save changes.

systemctl restart nscd

On Debian 7/Ubuntu 14.10 and lower versions:

service nscd restart

Reboot your client system and try to login with your LDAP user from client system.

Log In To LDAP Server

Now, we have configured our client to be able to log in to our OpenLDAP server. Let us try to login using any ldap users created in the openldap server. Please note that this LDAP user doesn’t exist in the local client system. Don’t be confused.

I have already created a user named “kumar” in my OpenLDAP server. Refer the section Sample Configuration in my previous tutorial.

So, now let us login with user “kumar”.

Enter your LDAP user name and password.

Image may be NSFW.
Clik here to view.
Debian 8 Desktop [Running] - Oracle VM VirtualBox_004

Please note that the user named “kumar” is not a local user. We have created this user in our previous guide using phpLDAPAdmin tool..

Congratulations! Now, you will be able to log in to your client system with LDAP user.

Image may be NSFW.
Clik here to view.
Debian 8 Desktop [Running] - Oracle VM VirtualBox_005

Let us check who exactly is this user.

Open Terminal, and run:

whoami

Sample output:

kumar

Image may be NSFW.
Clik here to view.
Selection_006

Run pwd command from the Terminal to know the user’s present working directory:

pwd

Sample output:

/home/users/kumar

Image may be NSFW.
Clik here to view.
Selection_007

You should see that the home directory you selected for your user on the LDAP server is being used on this machine. It has been created on-demand to serve the LDAP user.

You should now be able to authenticate multiple computers using a centralized LDAP server. Your LDAP users will be allowed to use any of the machines you configure in this way, as long as they have the valid login credentials.

Initially this how-to will look bit difficult, but if you follow the steps carefully you will be able to setup the complete LDAP server/client.

Good Luck!

Reference: Setup OpenLDAP On Debian

---------------------------------------------------------------------
Configure Linux Clients To Authenticate Using OpenLDAP

How To Install And Configure QEMU In Ubuntu

Image may be NSFW.
Clik here to view.


About QEMU

As a Linux enthusiast, I have been testing so many Open Source and Linux applications, and Distros everyday. Mostly, I use Oracle VirtualBox for testing and playing different operating systems. VirtualBox is a popular virtualization tool to deploy or test different kind of distros. We can deploy as many as guest OSs within the host operating using Oracle VirtualBox. Like Oracle Virtualbox, there are many virtualization products available, such as Vmware, openVZ, KVM, Proxmox etc. Today, we will discuss about QEMU.

QEMU is a generic and open source machine emulator and virtualizer. It is free and open source tool that allows users to create and manage Virtual machines inside the host operating system. The resources of the host operating system, such as Hard drive, RAM, Processor, will be divided and shared by the guest operating systems(Virtual machines).

When used as a machine emulator, QEMU can run OSes and programs made for one machine (e.g. an ARM board) on a different machine (e.g. your own PC). By using dynamic translation, it achieves very good performance.

When used as a virtualizer, QEMU achieves near native performances by executing the guest code directly on the host CPU. QEMU supports virtualization when executing under the Xen hypervisor or using the KVM kernel module in Linux. When using KVM, QEMU can virtualize x86, server and embedded PowerPC, and S390 guests.

QEMU has two operating modes:

  • Full system emulation: In this mode, QEMU emulates a full system (for example a PC), including a processor and various peripherals. It can be used to launch different Operating Systems without rebooting the PC or to debug system code.
  • User mode emulation (Linux host only): In this mode, QEMU can launch Linux processes compiled for one CPU on another CPU. For example, it can be used to launch Wine or to ease cross-compilation and cross-debugging.

QEMU can run without a host kernel driver and yet gives acceptable performance.

QEMU will work fine in the following hardware:

  • PC (x86 or x86_64 processor) ;
  • ISA PC (old style PC without PCI bus) ;
  • PREP (PowerPC processor) ;
  • G3 Beige PowerMac (PowerPC processor) ;
  • Mac99 PowerMac (PowerPC processor, in progress) ;
  • Sun4m/Sun4c/Sun4d (32-bit Sparc processor) ;
  • Sun4u/Sun4v (64-bit Sparc processor, in progress) ;
  • Malta board (32-bit and 64-bit MIPS processors) ;
  • MIPS Magnum (64-bit MIPS processor) ;
  • ARM Integrator/CP (ARM) ;
  • ARM Versatile baseboard (ARM) ;
  • ARM RealView Emulation/Platform baseboard (ARM) ;
  • Spitz, Akita, Borzoi, Terrier and Tosa PDAs (PXA270 processor) ;
  • Luminary Micro LM3S811EVB (ARM Cortex-M3) ;
  • Luminary Micro LM3S6965EVB (ARM Cortex-M3) ;
  • Freescale MCF5208EVB (ColdFire V2) ;
  • Arnewsh MCF5206 evaluation board (ColdFire V2) ;
  • Palm Tungsten|E PDA (OMAP310 processor) ;
  • N800 and N810 tablets (OMAP2420 processor) ;
  • MusicPal (MV88W8618 ARM processor) ;
  • Gumstix “Connex” and “Verdex” motherboards (PXA255/270) ;
  • Siemens SX1 smartphone (OMAP310 processor) ;
  • AXIS-Devboard88 (CRISv32 ETRAX-FS) ;
  • Petalogix Spartan 3aDSP1800 MMU ref design (MicroBlaze) ;
  • Avnet LX60/LX110/LX200 boards (Xtensa).

For user emulation, x86 (32 and 64 bit), PowerPC (32 and 64 bit), ARM, MIPS (32 bit only), Sparc (32 and 64 bit), Alpha, ColdFire(m68k), CRISv32 and MicroBlaze CPUs are supported.

1. Install QEMU in Ubuntu

In this let us see how to install and configure QEMU in Ubuntu 14.04 LTS, and how to create and manage virtual machines.

QEMU is available in the default repositories of Ubuntu. So, we can install it with front-end tool Virt Manager using command:

sudo apt-get install qemu-kvm qemu virt-manager virt-viewer libvirt-bin

After installing the above packages, reboot your system.

2. Creating Virtual machines

Now, let us create a new virtual machine. For the purpose of this tutorial, let us create a new Ubuntu 15.04 server.

First create the Virtual hard disk image for the new VM. For example, let us create 20GB size hard disk image.

qemu-img create ubuntu.img 20G

Or you can create the image with the Qemu’s default disk image format ‘qcow2′ using the following command:

qemu-img create -f qcow2 ubuntu.qcow 20G

Then, download the Ubuntu 15.04 server installation image and boot the Virtual machine. I already downloaded the installation image and kept it in my home directory.

To boot the Virtual machine, run:

qemu-system-x86_64 -hda ubuntu.img -boot d -cdrom /home/sk/Soft_Backup/OS\ Images/New/ubuntu-15.04-server-amd64.iso -m 640

For 32bit VM, use:

qemu-system-xi386 -hda ubuntu.img -boot d -cdrom /home/sk/Soft_Backup/OS\ Images/New/ubuntu-15.04-server-i386.iso -m 640

Here, I have allocated 640MB RAM to my guest OS.

When the boot the screen appears, hit Enter key and continue the installation as usual.

Image may be NSFW.
Clik here to view.
QEMU_002

Image may be NSFW.
Clik here to view.
QEMU_003

After the installation is done, the system can be booted with:

qemu -hda ubuntu.img -m 640

That’s it.

Don’t like command line way? Creating and managing VMs from command line might be bit difficult to some user. No worries, we can also create VMs using GUI tool called Virtual Machine Manager(Virt Manager).

3. Create and manage Virtual machines using Virt Manager

Launch Virtual Machine Manager(Virt manager) either from the Menu or Unity Dash. The default Interface of Virt Manager will look like below.

Image may be NSFW.
Clik here to view.
Virtual Machine Manager_001

Now, we will create and install Ubuntu 15.04 desktop virtual machine.

To create a virtual machine, go to File -> New Virtual machine.

Select how would like to install the operating system.

You can install guest OS using local ISO image/CDROM, Network install, PXE server, or importing existing disk images. Also, you can select the guest OS architecture from the Advanced options.

Image may be NSFW.
Clik here to view.
New VM_003

Select the local install media.

Image may be NSFW.
Clik here to view.
New VM_004

Choose the amount of RAM and no of CPUs.

Image may be NSFW.
Clik here to view.
New VM_005

Enter your virtual hard drive size. The default is 8GB.

Image may be NSFW.
Clik here to view.
New VM_006

Enter your guest OS name. And, Select the Network type from the Advanced options. Finally, click Finish.

Image may be NSFW.
Clik here to view.
New VM_016

Once you click the Finish button, the guest OS will automatically start to boot.

Image may be NSFW.
Clik here to view.
Ubuntu15.04 Virtual Machine_009

That’s it. Now, continue and install the Guest OS as the way you do in normal system.

Image may be NSFW.
Clik here to view.
Ubuntu15.04 Virtual Machine_010

To view the number of installed guest OSs, go to File -> View manager.

Image may be NSFW.
Clik here to view.
Virtual Machine Manager_011

To view the Virtual machine details, Select the Virtual machine and go to Edit -> Virtual Machine Details.

Click on the ‘Show virtual hardware details’ from the menu bar.

Image may be NSFW.
Clik here to view.
Ubuntu15.04 Virtual Machine_014

From here, you can view, modify your OS hardware details.

Image may be NSFW.
Clik here to view.
Ubuntu15.04 Virtual Machine_015

That’s it. Cheers!!

Reference:

---------------------------------------------------------------------
How To Install And Configure QEMU In Ubuntu

How To Install ONLYOFFICE – An Online Collaboration Suite For SME

Image may be NSFW.
Clik here to view.


About ONLYOFFICE

ONLYOFFICE, formerly known as Teamlab Office, is a free, open source, web-based collaboration platform for small and medium-size organizations that enables you to manage projects, customer relations and documents in one place. It is currently available in more than 20 languages.

ONLYOFFICE suite is available as two different flavours.

  • ONLYOFFICE Free Edition ;
  • ONLYOFFICE Enterprise Edition.

The features comparison of both editions are given in this link.

ONLYOFFICE suites comprises the following three servers:
  1. Document Server ;
  2. Community Server ;
  3. Mail Server.

Let us see the brief introduction and the respective features of each server.

1. Document Server:

ONLYOFFICE Document Server is a free collaborative online office suite comprising viewers and editors for texts, spreadsheets and presentations, fully compatible with Office Open XML formats: .docx, .xlsx, .pptx and enabling collaborative editing in real time.

Document Server comprises following:

  • ONLYOFFICE Document Editor ;
  • ONLYOFFICE Spreadsheet Editor ;
  • ONLYOFFICE Presentation Editor ;
  • Collaborative editing ;
  • Hieroglyph support.

2. Community Server:

ONLYOFFICE Community Server is a free open source collaborative system developed to manage documents, projects, customer relationship and email correspondence, all in one place.

Community Server consists of the following features.

  • Cross platform solution: Linux, Windows ;
  • Document management ;
  • Integration with Google Drive, Box, Dropbox, OneDrive, OwnCloud ;
  • File sharing ;
  • Document embedding ;
  • Access rights management ;
  • Customizable CRM ;
  • Web-to-lead form ;
  • Invoicing system ;
  • Project Management ;
  • Gantt Chart ;
  • Milestones, task dependencies and subtasks ;
  • Time tracking ;
  • Automated reports ;
  • Blogs, forums, polls, wiki ;
  • Calendar ;
  • Email Aggregator ;
  • People module (employee database) ;
  • Instant Messenger ;
  • Support of more than 20 languages/

3. Mail Server:

ONLYOFFICE Mail Server is a full-featured mail server solution developed on the base of the iRedMail package, containing the following components: Postfix, Dovecot, SpamAssassin, ClamAV, OpenDKIM, and Fail2ban.

Integrated with ONLYOFFICE Community Server, Mail Server allows to:

  • connect your own domain name ;
  • create mailboxes ;
  • add aliases for each mailbox ;
  • create mailbox groups.

System Requirements

Here is the minimum list software and hardware requirements to deploy ONLYOFFICE.

Software requirements:

  • Ubuntu 12.04 (LTS) (64-bit) or later ;
  • Fedora 20 (64-bit) or later ;
  • CoreOS 647.0.0 (64-bit) or later ;
  • Docker version 1.4.1 or later.
Hardware requirements:
  • RAM: 4GB or more ;
  • Processor: 2 Core or better ;
  • HDD: at least 40GB of free disk space.

Install ONLYOFFICE

We can install ONLYOFFICE in two different methods.

  1. Install ONLYOFFICE Using Docker ;
  2. Install ONLYOFFICE Using Repository.

1. Install ONLYOFFICE Using Docker

Installing Prerequisites:

To deploy and run ONLYOFFICE Online Editors, you will need Docker v.1.4.1 or later installed on your machine.

Just to remind, Docker is an open-source project that automates the deployment of applications inside software containers.

To install Docker on Ubuntu and CentOS, refer the following link.

Also, the installation instructions for a lot of Linux distributions are available on the Docker official website.

Next, We have to install Docker compose.

First, install ‘pip; package using command:

sudo apt-get install python-pip

In Fedora:

sudo yum install python-pip

Now, install docker-compose package using command:

sudo pip install -U docker-compose

That’s it. To verify docker-compose installation, run:

docker-compose --version

Sample output:

docker-compose 1.2.0

Install ONLYOFFICE Free Edition:

Now, Install the whole ONLYOFFICE Free Edition at once using the following commands:

wget https://raw.githubusercontent.com/ONLYOFFICE/Docker-CommunityServer/master/docker-compose.yml
sudo docker-compose up -d

Sample output:

Creating sk_documentserver_1...
Pulling image onlyoffice/documentserver:latest...
Pulling repository onlyoffice/documentserver
ddf4d6a0999b: Pulling dependent layers
e9e06b06e14c: Downloading    20 MB
.
.
.

Docker will pull all three servers (Community, Document, and Mail) along with all dependencies. This will take a while depending upon your Internet connection speed.

After installing all Docker images, verify them using command:

sudo docker images

Sample output:

REPOSITORY                   TAG                 IMAGE ID            CREATED             VIRTUAL SIZE
onlyoffice/communityserver   latest              c9658f59b752        11 days ago         1.183 GB
onlyoffice/documentserver    latest              ddf4d6a0999b        2 weeks ago         1.837 GB
onlyoffice/mailserver        latest              47ca4c54969c        5 weeks ago         1.22 GB

As you see above, the three Docker images have been downloaded.

Now, let us run a server, for example Document server, using command:

sudo docker run -i -t -d -p 80:80 onlyoffice/documentserver

Sample output:

2ea7863af76013b30855de36321dfe4850c9479cc15955f706b8bc35db302fd5

To view the list of running Docker images, run:

sudo docker ps

Sample Output:

CONTAINER ID IMAGE COMMAND CREATED STATUS PORTS NAMES
2ea7863af760 onlyoffice/documentserver:latest "/bin/sh -c 'bash -C 6 minutes ago Up 6 minutes 0.0.0.0:80->80/tcp, 443/tcp gloomy_pasteur

That’s it.

Similarly, you can run all other Docker images(ONLYOFFICE Community/mail server etc) as shown above. Be mindful that you must run each server on different port.

For more details about working with Docker images, refer the following tutorial.

Access ONLYOFFICE Web console

To open your ONLYOFFICE Document server, enter localhost (http://127.0.0.1 or http://IP-address) in the address bar of your browser. You should see the following screen.

Image may be NSFW.
Clik here to view.
ONLYOFFICE™ - Mozilla Firefox_001

Congratulations!! now, you can start using the Document server. From now you can use the ONLYOFFICE online editors to create, edit, view, and delete word documents, excel sheets, and presentation files etc.

ONLYOFFICE Online Editors can be easily integrated into your website or cloud application via API provided. Thus you get a chance to provide users with the most advanced online document editors for text docs, spreadsheets and presentations.

Why ONLYOFFICE beats all the existing online processors?

  • In the eye of users: it combines the formatting quality of MS Office & online collaboration of Google Docs (real-time co-editing and commenting).
  • In the eye of tech enthusiasts: it’s built with the use of HTML5 element, Canvas.

To view a Sample document, click on the on the Sample Document link in the web console. This will open a new tab.

Here is the sample demo.docx file.

Image may be NSFW.
Clik here to view.
ONLYOFFICE™ - Mozilla Firefox_002

To upload a new document, click “Choose file” button and select the files on your PC.

Image may be NSFW.
Clik here to view.
ONLYOFFICE™ - Mozilla Firefox_003

Now, you can view or edit the uploaded document. Let us view the uploaded to see how it looks in the online editor.

The document will open in a new tab.

Image may be NSFW.
Clik here to view.
ONLYOFFICE™ - Mozilla Firefox_004

To edit the document, click the Edit button in the web console, make the changes and click the save button.

Also, you can integrate the Document server with collaborative system. For more details about installing ONLYOFFICE Community Server integrated with Document and Mail Servers, refer the official documentation page.

2. Install ONLYOFFICE Using Repository in Ubuntu

Let me show you how to install ONLYOFFICE in Ubuntu 14.04 LTS server.

To install ONLYOFFICE from the repository, first of all you need to download ONLYOFFICE GPG signing key:

sudo wget http://download.onlyoffice.com/repo/onlyoffice.key 

And add it to the system:

sudo apt-key add onlyoffice.key

Then add ONLYOFFICE repository to the list stored in the /etc/apt/sources.list file. Open this file using any available text editor (e.g. nano):

sudo nano /etc/apt/sources.list

Add the following record:

deb http://download.onlyoffice.com/repo/debian squeeze main

Update the package cache:

sudo apt-get update

Now to install ONLYOFFICE from the repository execute the following command:

sudo apt-get install onlyoffice

During installation, you’ll be asked to setup MySQL root user password.

Image may be NSFW.
Clik here to view.
sk@server: ~_002

Re-enter the password:

Image may be NSFW.
Clik here to view.
sk@server: ~_003

Enter password for ONLYOFFICE database:

Image may be NSFW.
Clik here to view.
sk@server: ~_004

That’s it. ONLYOFFICE has been installed.

Access ONLYOFFICE Web console

Open your web browser and navigate to http://IP-Address/.

The ONLYOFFICE initialization process will start. It will just take few minutes.

Image may be NSFW.
Clik here to view.
ONLYOFFICE™ - Mozilla Firefox_005

After few minutes, a registration window will open. Enter a valid email id, select language, Timezone, and setup a password to access the ONLYOFFICE web console.

Image may be NSFW.
Clik here to view.
Portal Setup - Go through these easy steps to start your web office easily - Mozilla Firefox_007

This is how ONLYOFFICE Dashboard looks.

Image may be NSFW.
Clik here to view.
Menu_009

From you can Create, edit, save and share documents. Connect your Google Drive, Dropbox and Box accounts and have all documents in one place.

Please note that you must activate your email entered while registering to get access to all the portal features.

Also, you can setup the CRM, Mail server, create, manage projects and peoples etc.

ONLYOFFICE Document portal:

Image may be NSFW.
Clik here to view.
My Documents - Documents - Mozilla Firefox_010

ONLYOFFICE Projects page:

Image may be NSFW.
Clik here to view.
Projects - Projects - Mozilla Firefox_011

ONLYOFFICE CRM:

Image may be NSFW.
Clik here to view.
All Contacts - CRM - Mozilla Firefox_012

ONLYOFFICE mail:

Image may be NSFW.
Clik here to view.
Inbox - Mail - ONLYOFFICE™ - Mozilla Firefox_013

ONLYOFFICE People:

Image may be NSFW.
Clik here to view.
People - People - Mozilla Firefox_015

ONLYOFFICE Community page:

Image may be NSFW.
Clik here to view.
Blogs - Community - Mozilla Firefox_016

If you have any problems or questions about ONLYOFFICE, please contact the support team at dev.onlyoffice.org.

Reference:

---------------------------------------------------------------------
How To Install ONLYOFFICE – An Online Collaboration Suite For SME


Install Oracle VirtualBox And Manage It Using phpVirtualBox On Ubuntu 15.04 Headless Server

Image may be NSFW.
Clik here to view.


We can easily install Oracle VirtualBox on any GUI Linux desktops. But, what about in a Linux Server that has no GUI? It is not that difficult. This tutorial describes how to install Oracle VirtualBox in Ubuntu 15.04 headless server. The same procedure should work on Ubuntu 14.04 LTS server and other older versions.

Here is my test box details:

  • OS: Ubuntu 15.04 Server (No GUI)
  • IP Address: 192.168.1.101/24

Preparing Ubuntu 15.04 Server

Before installing VirtualBox, we have to do a couple of tasks.

First of all, update your server with command:

sudo apt-get update && sudo apt-get upgrade -y

Now, install the following prerequisites which will need by oracle VirtualBox.

sudo apt-get install build-essential dkms unzip -y

Reboot your server once to take effect all the changes.

Install Oracle VirtualBox

Edit /etc/apt/sources.list file:

sudo nano /etc/apt/sources.list

Add the latest oracle virtualbox repository to your Ubuntu server. You can download the oracle virtualbox latest repository from here.

Since, we’re using Ubuntu 15.04, I added the following line.

[...]
deb http://download.virtualbox.org/virtualbox/debian vivid contrib

Add the virtualbox public key:

wget -q http://download.virtualbox.org/virtualbox/debian/oracle_vbox.asc -O- | sudo apt-key add -

Now, update the repository and install latest oracle virtualbox version.

sudo apt-get update
sudo apt-get install VirtualBox-4.3 -y

After installing virtualbox, add the system user sk to the vboxusers group. sk is the system normal user that I have created already. You can create and use a separate new user as your wish. If you use different user, log out and log in back to that user and do the rest of the steps.

sudo usermod -aG vboxusers sk

Now, run the following command to check if virtualbox kernel modules are loaded or not.

sudo /etc/init.d/vboxdrv status

Sample output:

VirtualBox kernel modules (vboxdrv, vboxnetflt, vboxnetadp, vboxpci) are loaded.

If it, not loaded, run the following command to load them:

sudo /etc/init.d/vboxdrv setup

Install Oracle VirtualBox Extension pack

Starting with VirtualBox 4.0, we should install Extension pack that will help us to manage and connect our remote guest consoles via web interface. This Extension pack provides the following functionalities to the VirtualBox guests.

  • The virtual USB 2.0 (EHCI) device
  • VirtualBox Remote Desktop Protocol (VRDP) support
  • Host webcam passthrough
  • Intel PXE boot ROM
  • Experimental support for PCI passthrough on Linux hosts

VirtualBox extension pack should be same version as VirtualBox base package. Download Extension pack for VirtualBox 4.3 from here.

wget http://download.virtualbox.org/virtualbox/4.3.28/Oracle_VM_VirtualBox_Extension_Pack-4.3.28-100309.vbox-extpack

Then, Install Extension pack as shown below.

sudo VBoxManage extpack install Oracle_VM_VirtualBox_Extension_Pack-4.3.28-100309.vbox-extpack

Sample output:

0%...10%...20%...30%...40%...50%...60%...70%...80%...90%...100%
Successfully installed "Oracle VM VirtualBox Extension Pack".

That’s it. Oracle VirtualBox and Extension pack have been installed successfully on our Ubuntu 15.04 server. Start using Oracle VirtualBox!

Create and manage VMs from command line

First, let us create a Ubuntu 14.04 server VM with 512MB RAM and 8GB virtual hdd.

To do that, run:

VBoxManage createvm --name "Ubuntu 14.04" --register

Sample output:

Virtual machine 'Ubuntu 14.04' is created and registered.
UUID: c5f89cfd-b0ee-40da-93b8-d4d3a5324bea
Settings file: '/home/sk/VirtualBox VMs/Ubuntu 14.04/Ubuntu 14.04.vbox'

Next, assign the RAM size and network card mode(Bridge or NAT).

VBoxManage modifyvm "Ubuntu 14.04" --memory 512 --acpi on --boot1 dvd --nic1 bridged --bridgeadapter1 eth0

Assign virtual hard drive size.

VBoxManage createhd --filename Ubuntu_14_04.vdi --size 8000

Sample Output:

0%...10%...20%...30%...40%...50%...60%...70%...80%...90%...100%
Disk image created. UUID: 8d48aef4-eb92-4181-aed1-63ccbae0f2b1

Add Storage controller:

VBoxManage storagectl "Ubuntu 14.04" --name "IDE Controller" --add ide

Attach the Virtual hard drive file(vdi) to the storage controller using command:

VBoxManage storageattach "Ubuntu 14.04" --storagectl "IDE Controller" --port 0 --device 0 --type hdd --medium /home/sk/Ubuntu_14_04.vdi

Now, Assign the Ubuntu ISO media using command:

VBoxManage storageattach "Ubuntu 14.04 Server" --storagectl "IDE Controller" --port 1 --device 0 --type dvddrive --medium /home/sk/ubuntu-14.04-server-i386.iso

That’s it. The new VM has been created.

To know about VBoxManage command, run:

VBoxManage --help

Or, refer the Official guide.

Now, start the VM using command:

VBoxHeadless --startvm "Ubuntu 14.04"

To stop a running VM, enter the following command:

VBoxManage controlvm "Ubuntu 14.04" poweroff

Similarly we can pause a VM, using command:

VBoxManage controlvm "Ubuntu 14.04" pause

To reset a VM, enter:

VBoxManage controlvm "Ubuntu 14.04" reset

To learn more about VBoxHeadless options, run:

VBoxHeadless --help

Sample output:

Oracle VM VirtualBox Headless Interface 4.3.28
(C) 2008-2015 Oracle Corporation
All rights reserved.

Usage:
   -s, -startvm, --startvm <name|uuid>   Start given VM (required argument)
   -v, -vrde, --vrde on|off|config       Enable (default) or disable the VRDE
                                         server or don't change the setting
   -e, -vrdeproperty, --vrdeproperty <name=[value]> Set a VRDE property:
                                         "TCP/Ports" - comma-separated list of ports
                                         the VRDE server can bind to. Use a dash between
                                         two port numbers to specify a range
                                         "TCP/Address" - interface IP the VRDE server
                                         will bind to
   --settingspw <pw>                     Specify the settings password
   --settingspwfile <file>               Specify a file containing the settings password
   -c, -capture, --capture               Record the VM screen output to a file
   -w, --width                           Frame width when recording
   -h, --height                          Frame height when recording
   -r, --bitrate                         Recording bit rate when recording
   -f, --filename                        File name when recording. The codec used
                                         will be chosen based on the file extension

For more details, refer the official manual.

Creating and managing might be bit difficult and time consuming method for some lazy administrators. If you are one of them, there is another way to create and manage VMs in the headless from a Remote system web browser using a tool called “phpvirtualbox”.

You can use Oracle VirtualBox GUI client called “phpvirtualbox” to easily create and manage virtual machines via a web browser from any remote desktop system.

What is phpVirtualBox?

phpVirtualBox is an open source, web-based client written using PHP. It can be used to manage and administer Oracle VirtualBox headless instances.

Install phpVirtualBox

Before installing phpVirtualBox, we have to install Apache web server and PHP.

sudo apt-get install apache2 php5 php5-mysql libapache2-mod-php5 php-soap

Restart the web server to take effect the changes.

sudo /etc/init.d/apache2 restart

Now, Download the latest version from the phpVirtualBox official site.

wget http://sourceforge.net/projects/phpvirtualbox/files/phpvirtualbox-4.3-3.zip

Extract the zip file using the following command:

unzip phpvirtualbox-4.3-3.zip

Move the extracted folder to your apache root folder.

sudo mv phpvirtualbox-4.3-3 /var/www/html/phpvirtualbox

Configure phpVirtualBox

Edit phpVirtualBox config.php file:

sudo cp /var/www/html/phpvirtualbox/config.php-example /var/www/html/phpvirtualbox/config.php
sudo nano /var/www/html/phpvirtualbox/config.php

Change the username/password for system user that runs VirtualBox. In our case, the username/password is sk/ubuntu.

[...]
var $username = 'sk';
var $password = 'ubuntu';
[...]

Save and close the file.

Create a file called /etc/default/virtualbox:

sudo nano /etc/default/virtualbox

Append the following line:

VBOXWEB_USER=sk

Now, start vboxweb-service, and make it to start automatically on every reboot.

sudo /etc/init.d/vboxweb-service start

Sample output:

Starting VirtualBox web service ...done.

Access phpVirtualBox Web console

Now, go to any client systems that has installed with GUI desktop environements, and try to access the URL http://ip-address-of-virtualbox-headless-server/phpvirtualbox from the web browser.

Now, try again the same URL mentioned above. The following screen should appear. Enter the username/password.

The default username/password is admin/admin.

Image may be NSFW.
Clik here to view.
phpVirtualBox - VirtualBox Web Console - Mozilla Firefox_001

Now, you’ll be redirected to the phpVirtualBox main dashboard.

Image may be NSFW.
Clik here to view.
phpVirtualBox - VirtualBox Web Console - Mozilla Firefox_002

From here, you can create, modify, delete, and manage virtual machines as the way you do in the normal VirtualBox GUI application.

Creating sample Virtual Machine

Let us create a sample virtual machine to install Ubuntu 14.04 Server.

Click on the New button on the top left corner and enter the Virtual machine name.

Image may be NSFW.
Clik here to view.
phpVirtualBox - VirtualBox Web Console - Mozilla Firefox_003

Set the Memory size for the virtual machine.

Image may be NSFW.
Clik here to view.
phpVirtualBox - VirtualBox Web Console - Mozilla Firefox_004

You can either create a new hard drive file or select one from the list or from another location using the folder icon. The recommended size of the hard drive is 8 GB.

Here, I am going to create a new hard drive. So, Select “Create a virtual hard drive now” option.

Image may be NSFW.
Clik here to view.
phpVirtualBox - VirtualBox Web Console - Mozilla Firefox_005

Please choose the type of file that you would like to use for the new virtual hard drive. If you do not need to use it with other virtualization software you can leave this setting unchanged.

Image may be NSFW.
Clik here to view.
phpVirtualBox - VirtualBox Web Console - Mozilla Firefox_006

Choose whether the new virtual hard drive file should grow as it is used (dynamically allocated) or it should be created at its maximum size (fixed size).

Image may be NSFW.
Clik here to view.
phpVirtualBox - VirtualBox Web Console - Mozilla Firefox_007

Enter the size of the virtual hdd.

Image may be NSFW.
Clik here to view.
phpVirtualBox - VirtualBox Web Console - Mozilla Firefox_008

That’s it. The virtual machine has been created. Start installing the OS, and use the virtual machine.

Image may be NSFW.
Clik here to view.
phpVirtualBox - VirtualBox Web Console - Mozilla Firefox_010

phpVirtualBox tool will definitely help the system administrators who have only headless Ubuntu server, and also the installation is not that difficult. So, You can easily run virtual machines as many as your hardware supports from your headless Ubuntu server. Unfortunately, phpVirtualBox only allows you to create 32bit guests. if you want to deploy, 64bit guests, follow the command line way. It was not difficult either.

Hope this tool will help you in someway. Cheers!

Reference Links:

---------------------------------------------------------------------
Install Oracle VirtualBox And Manage It Using phpVirtualBox On Ubuntu 15.04 Headless Server

How To Setup LogicalDOC In Ubuntu 15.04

Image may be NSFW.
Clik here to view.


LogicalDOC is a Document Management System. It is useful for all kind of small and medium enterprises, and it could play a very important role in knowledge resource management of Educational Organizations.

This tutorial describes how to install LogicalDOC in Ubuntu 15.04

Prerequisites

Minimum System requirement: 2.0 GHz Processor, 1 GB RAM, minimum 10 GB of Storage.

Minimum Software requirements: MySQL, JAVA jdk7, Ubuntu 9/RHEL 6/CentOS 6/Suse Enterprise Linux 10.

Installation

We will be using Ubuntu 15.04 Desktop OS 64bit for this demonstration.

First switch to root user using command:

su

1. Install mysql.

apt-get install mysql-server

Image may be NSFW.
Clik here to view.
logicaldoc_mysql

Assign password for mysql root user:

Image may be NSFW.
Clik here to view.
mysql_logicaldoc_passwd

Now create database schema for logicaldoc.

mysql -u root -p <press enter, give password>

Create database with name “logicaldoc”

mysql> CREATE DATABASE logicaldoc;

Image may be NSFW.
Clik here to view.
create_database

And create a user called “logicaldoc”.

mysql> CREATE USER logicaldoc;

Set password for user “logicaldoc”.

mysql> SET PASSWORD FOR logicadoc@'%'=PASSWORD('P@ssw0rd');

Give all privileges to user “logicaldoc”

mysql> GRANT ALL PRIVILEGES ON logicaldoc.* TO logicaldoc@'%' identified by 'P@ssw0rd';

Image may be NSFW.
Clik here to view.
grant privileges

save and exit from the MySQL prompt.

Make sure you installed latest version of openJDK.

java -version

If you haven’t installed Java yet, refer the following link.

Install Community version of Logicaldoc from following this link.

I have tested this setup with Trail version of Logicaldoc, but the installation instructions are same for both.

Go to the download folder and  unzip this package, start installation.

java -jar logicaldoc-installer.jar

Select Language, and press ok.

Image may be NSFW.
Clik here to view.
1

Press next.

Image may be NSFW.
Clik here to view.
2

Accept Terms and Conditions, and press next.

Image may be NSFW.
Clik here to view.
3

Select installation path.

Image may be NSFW.
Clik here to view.
4

Keep default settings and press next.

Image may be NSFW.
Clik here to view.
5

Wait for the the process to get finished.

Image may be NSFW.
Clik here to view.
6

Provide relevant information, and press next.

Image may be NSFW.
Clik here to view.
7

Select your database and press next.

Image may be NSFW.
Clik here to view.
8

Provide data base credentials and press next.

Image may be NSFW.
Clik here to view.
9

Provide password and leave rest of the setting as default, and press next.

Image may be NSFW.
Clik here to view.
10

Leave default, press next.

Image may be NSFW.
Clik here to view.
11

This step will check database parameters, press next.

Image may be NSFW.
Clik here to view.
12

Installation is finished, press done.

Image may be NSFW.
Clik here to view.
13

Open your web browser and type: http://localhost:8080

Provide user id and password (default user: admin, default password: admin)Setup your server.

Image may be NSFW.
Clik here to view.
14
Image may be NSFW.
Clik here to view.
24

That’s it. Installation is finished. Have fun!

---------------------------------------------------------------------
How To Setup LogicalDOC In Ubuntu 15.04

Setup Linux Containers Using LXC On Ubuntu 15.04

Image may be NSFW.
Clik here to view.


LXC, Linux Containers, is a fast, lightweight, and operating system-level virtualization technology that allows us to host multiple isolated Linux systems (Containers) in a single host. Unlike other virtualization methods such as VirtualBox, KVM, and Vmware, the guest systems uses the same kernel of the host system. All guests will efficiently shares the resources such as CPU, RAM, Hard disk, and network etc of your original host computer. The main goal of LXC is to create a Linux environment as close as a standard Linux installation, but without the need for a separate kernel.

In this tutorial, let me show how to install LXC, and how to create Virtual Machines using LXC. Since this article was tested in Ubuntu 15.04 64bit, the same steps will work on Ubuntu 14.10 and other older versions.

Install LXC On Ubuntu

LXC is available on Ubuntu default repositories. So, Run the following command to install it on Ubuntu, and its derivatives.

sudo apt-get install lxc lxctl lxc-templates

The above command will install LXC, and everything needed by LXC.

Now, enter the following command to check everything OK.

sudo lxc-checkconfig

Sample output:

Kernel configuration not found at /proc/config.gz; searching...
Kernel configuration found at /boot/config-3.19.0-15-generic
--- Namespaces ---
Namespaces: enabled
Utsname namespace: enabled
Ipc namespace: enabled
Pid namespace: enabled
User namespace: enabled
Network namespace: enabled
Multiple /dev/pts instances: enabled

--- Control groups ---
Cgroup: enabled
Cgroup clone_children flag: enabled
Cgroup device: enabled
Cgroup sched: enabled
Cgroup cpu account: enabled
Cgroup memory controller: enabled
Cgroup cpuset: enabled

--- Misc ---
Veth pair device: enabled
Macvlan: enabled
Vlan: enabled
File capabilities: enabled

Note : Before booting a new kernel, you can check its configuration
usage : CONFIG=/path/to/config /usr/bin/lxc-checkconfig

Creating Linux Containers (Virtual Units)

LXC is usage very simple, and easy. By default, LXC has many ready made templates. To list all available templates, enter the following command:

sudo ls /usr/share/lxc/templates/

Sample output:

lxc-alpine    lxc-archlinux  lxc-centos  lxc-debian    lxc-fedora  lxc-openmandriva  lxc-oracle  lxc-sshd    lxc-ubuntu-cloud
lxc-altlinux  lxc-busybox    lxc-cirros  lxc-download  lxc-gentoo  lxc-opensuse      lxc-plamo     lxc-ubuntu

To create a new Container, the command should be as below.

Syntax:

sudo lxc-create -n <container-name> -t <template>

Example:

sudo lxc-create -n ubuntu01 -t ubuntu

The above command will create a ubuntu container with name “ubuntu01″.

Sample output:

Checking cache download in /var/cache/lxc/vivid/rootfs-amd64 ... 
Installing packages in template: ssh,vim,language-pack-en
Downloading ubuntu vivid minimal ...
I: Retrieving Release 
I: Retrieving Release.gpg 
I: Checking Release signature
I: Valid Release signature (key id 790BC7277767219C42C86F933B4FE6ACC0B21F32)
I: Retrieving Packages 
.
.
.
Generation complete.
Creating SSH2 RSA key; this may take some time ...
2048 ef:14:b4:98:fd:7a:3d:0c:cc:bd:69:17:87:03:a9:7c /etc/ssh/ssh_host_rsa_key.pub (RSA)
Creating SSH2 DSA key; this may take some time ...
1024 b1:ab:2a:4b:c4:77:2e:3f:da:ab:df:24:74:9f:69:a9 /etc/ssh/ssh_host_dsa_key.pub (DSA)
Creating SSH2 ECDSA key; this may take some time ...
256 1a:6a:93:88:05:c5:1c:10:ad:d5:f7:5a:aa:fb:04:57 /etc/ssh/ssh_host_ecdsa_key.pub (ECDSA)
Creating SSH2 ED25519 key; this may take some time ...
256 80:a8:d4:8e:3e:d2:06:a3:96:6d:51:4a:6a:a2:23:47 /etc/ssh/ssh_host_ed25519_key.pub (ED25519)
invoke-rc.d: policy-rc.d denied execution of start.

Current default time zone: 'Asia/Kolkata'
Local time is now:      Fri Jun 12 15:03:30 IST 2015.
Universal Time is now:  Fri Jun 12 09:33:30 UTC 2015.


##
# The default user is 'ubuntu' with password 'ubuntu'!
# Use the 'sudo' command to run tasks as root in the container.
##

The new Ubuntu container has been created now. Note that the default username and its password of the Container at the last line of the above output. This will be needed while you logging into the virtual host.

Starting Containers

After creating the containers, start it using the following command.

sudo lxc-start -n ubuntu01 -d

Now, log in to the container with command:

sudo lxc-console -n ubuntu01

Enter the username and password of the container. As you know, the default username and password will be generated while creating new containers. In my case, the default username is ubuntu, and password is ubuntu.

Sample output:

Image may be NSFW.
Clik here to view.
sk@server: ~_001

Now, start using the new virtual unit (container). You can now install, remove, configure packages in this new container as the way you do in a normal physical machine.

Similarly, you can create virtual hosts as many as you want to.

For example, to create a centos container, enter the following command. Be mindful that you should install “yum” package in order to create RPM based virtual units.

sudo apt-get install yum
sudo lxc-create -n centos01 -t centos

To create, opensuse container:

sudo lxc-create -n opensuse1 -t opensuse

To exit from the container’s console, and return back to your original host computer, press “ctrl+a” followed by the letter “q” from your keyboard. Now, you’ll be returned back to the original host computer’s Terminal.

Be mindful that, we didn’t power off the container. The Container is still running. We just returned back to host computer’s terminal.

To connect again to the Container’s console, run:

sudo lxc-console -n ubuntu01

Viewing the list of newly created containers

To view the list of newly generated containers, enter the following command from your original computer.

sudo lxc-ls

Sample output:

ubuntu01

As you see above, I have only one virtual unit in my host computer.

Viewing the complete details of a Container

sudo lxc-info -n ubuntu01

Sample output:

Name:           ubuntu01
State:          RUNNING
PID:            32681
IP:             10.0.3.20
CPU use:        0.53 seconds
BlkIO use:      8.00 KiB
Memory use:     17.52 MiB
KMem use:       0 bytes
Link:           vethK0MFY8
 TX bytes:      2.37 KiB
 RX bytes:      3.20 KiB
 Total bytes:   5.58 KiB

The above command shows the name, State, CPU usage, Memory usage of the container “ubuntu01″.

Viewing the IP address and state of a particular Container

To view the ip address, and state of a container, use the following command.

For example, here I am going to view my “ubuntu01″ container’s ip address and running state.

sudo lxc-ls --fancy ubuntu01

Sample output:

NAME      STATE    IPV4       IPV6  GROUPS  AUTOSTART  
-----------------------------------------------------
ubuntu01  RUNNING  10.0.3.20  -     -       NO

As you see above, the “ubuntu01″ container is currently running, and its ip address is 10.0.3.20.

Stopping Containers

You can stop a running container using “lxc-stop” command. For example, to stop a ubuntu01 container, enter the following command:

sudo lxc-stop -n ubuntu01

Now, check the state of the ubuntu01 container.

sudo lxc-ls --fancy ubuntu01

Sample output:

NAME      STATE    IPV4  IPV6  GROUPS  AUTOSTART  
------------------------------------------------
ubuntu01  STOPPED  -     -     -       NO

As you see above, the ubuntu01 container has stopped.

Cloning Containers

It’s possible to clone a new container from an existing container. For example, to clone a new container called “ubuntu02″ from an existing container “ubuntu01″, use the following commands:

sudo lxc-stop -n ubuntu01
sudo lxc-clone ubuntu01 ubuntu02

Sample output:

Created container ubuntu02 as copy of ubuntu01

Now, you can start and use “ubuntu02″ container as usual.

sudo lxc-start -n ubuntu02

Then, connect to the ubuntu02 container’s console using command:

sudo lxc-console -n ubuntu02

Sample output:

Connected to tty 1
Type <Ctrl+a q> to exit the console, <Ctrl+a Ctrl+a> to enter Ctrl+a itself

Ubuntu 15.04 ubuntu02 pts/0

ubuntu02 login: ubuntu
Password: 
Last login: Fri Jun 12 15:20:45 IST 2015 on pts/0
ubuntu@ubuntu02:~$

As you see in the above output, we just have logged in to the ubuntu02 container which is the clone of ubuntu01 container.

To power off this container, simply enter the following command:

sudo poweroff

Take snapshot of a container

It’s also possible to take snapshot of a container. To take snapshot of the container ubuntu01, enter the following commands:

sudo lxc-stop -n ubuntu01
sudo lxc-snapshot -n ubuntu01

Sample output:

lxc_container: lxccontainer.c: lxcapi_snapshot: 2953 Snapshot of directory-backed container requested.
lxc_container: lxccontainer.c: lxcapi_snapshot: 2954 Making a copy-clone.  If you do want snapshots, then
lxc_container: lxccontainer.c: lxcapi_snapshot: 2955 please create an aufs or overlayfs clone first, snapshot that
lxc_container: lxccontainer.c: lxcapi_snapshot: 2956 and keep the original container pristine.

In Ubuntu 15.04, the snapshots will be stored in /var/lib/lxc/ directory of your original host computer.

sudo ls /var/lib/lxc/

In Ubuntu 14.04 and older versions, the snapshots will be stored in /var/lib/lxcsnaps/ directory.

sudo ls /var/lib/lxcsnaps/

Sample output:

ubuntu01

Restoring Snapshots

To restore a container from the snapshot, use the following command.

sudo lxc-snapshot -n ubuntu01 -r snap0

Deleting Containers

To destroy a container completely from you original host, enter the following command:

sudo lxc-destroy -n ubuntu01

Managing Containers using LXC web console

If you not happy with LXC command line console, you can use LXC web panel to manage containers easily through your web browser.

To install LXC web panel, run the following command:

wget http://lxc-webpanel.github.io/tools/install.sh -O - | sudo bash

Sample output:

--2015-06-12 15:37:41--  http://lxc-webpanel.github.io/tools/install.sh
Resolving lxc-webpanel.github.io (lxc-webpanel.github.io)... 103.245.222.133
Connecting to lxc-webpanel.github.io (lxc-webpanel.github.io)|103.245.222.133|:80... connected.
HTTP request sent, awaiting response... 200 OK
Length: 2678 (2.6K) [application/octet-stream]
Saving to: ‘STDOUT’

-                                           0%[                                                                                        ]       0  --.-KB/s              _     __   _______  __          __  _       _____                 _ 
| |    \ \ / / ____| \ \        / / | |     |  __ \               | |
| |     \ V / |       \ \  /\  / /__| |__   | |__) |_ _ _ __   ___| |
| |      > <| |        \ \/  \/ / _ \ '_ \  |  ___/ _` | '_ \ / _ \ |
| |____ / . \ |____     \  /\  /  __/ |_) | | |  | (_| | | | |  __/ |
|______/_/ \_\_____|     \/  \/ \___|_.__/  |_|   \__,_|_| |_|\___|_|


Automatic installer

-                                         100%[=======================================================================================>]   2.62K  --.-KB/s   in 0.003s 
.
.
.
.
Cleaning up...
Cloning LXC Web Panel...
Cloning into '/srv/lwp'...
remote: Counting objects: 167, done.
remote: Total 167 (delta 0), reused 0 (delta 0), pack-reused 167
Receiving objects: 100% (167/167), 148.85 KiB | 132.00 KiB/s, done.
Resolving deltas: 100% (63/63), done.
Checking connectivity... done.

Installation complete!

Adding /etc/init.d/lwp...
Done
Starting server...done.
Connect you on http://your-ip-address:5000/

Then, access the LXC web panel using URL: http://ip-address:5000. The default username/password is admin/admin.

Image may be NSFW.
Clik here to view.
Login - LXC Web Panel - Mozilla Firefox_002

LXC Web panel Dashboard:

Image may be NSFW.
Clik here to view.
Overview - LXC Web Panel - Mozilla Firefox_003

From now on, you can create/clone/edit containers from the LXC web console. Also, you can view the list of existing containers, and edit network settings of a containers and so on.

This tutorial only shows the basic installation, and usage part of the LXC. If you want to know more about LXC, refer the LXC comprehensive guide from Ubuntu Community portal. This guide has everything you need to know about LXC, including installation, configuration, and troubleshooting of LXC.

That’s all for now. Enjoy!

Reference Links:

---------------------------------------------------------------------
Setup Linux Containers Using LXC On Ubuntu 15.04

How To Install LAMP Stack On Debian 8

Image may be NSFW.
Clik here to view.


LAMP is a combination of operating system and open-source software stack. The acronym LAMP came from the first letters of Linux, Apache HTTP Server, MySQL or MariaDB database, and PHP/Perl/Python.

This tutorial describes how to install LAMP stack on Debian 8 64 bit server. The same steps will work on Debian 7 and all previous versions.

Install LAMP Stack On Debian

1. Install Apache

Apache is an open-source multi-platform web server. It provides a full range of web server features including CGI, SSL and virtual domains.

Switch to root user using command:

su

Then, install Apache web server using the following command:

apt-get install apache2
Test Apache:

Open your web browser and navigate to http://localhost/ or http://server-ip-address/.

Image may be NSFW.
Clik here to view.
Apache2 Debian Default Page: It works - Mozilla Firefox_001

Voila! Apache web server is working!!

2. Install MySQL

MySQL is a relational database management system (RDBMS) that runs as a server providing multi-user access to a number of databases, though SQLite probably has more total embedded deployments

apt-get install mysql-server mysql-client

During installation, you’ll be asked to setup the MySQL “root” user password. Enter the password and click Ok.

Image may be NSFW.
Clik here to view.
sk@debian: ~_002

Re-enter the password.

Image may be NSFW.
Clik here to view.
sk@debian: ~_003

MySQL is installed now.

You can verify the MySQL server status using command:

On Debian 8:

systemctl status mysql

On Debian 7 and previous versions:

service mysql status

Sample output:

● mysql.service - LSB: Start and stop the mysql database server daemon
   Loaded: loaded (/etc/init.d/mysql)
   Active: active (running) since Tue 2015-06-23 17:02:44 IST; 20s ago
   CGroup: /system.slice/mysql.service
           ├─4605 /bin/sh /usr/bin/mysqld_safe
           └─4952 /usr/sbin/mysqld --basedir=/usr --datadir=/var/lib/mysql --...

Jun 23 17:02:46 debian /etc/mysql/debian-start[5011]: mysql.help_keyword     ...
Jun 23 17:02:46 debian /etc/mysql/debian-start[5011]: mysql.help_relation    ...
Jun 23 17:02:46 debian /etc/mysql/debian-start[5011]: mysql.help_topic       ...
Jun 23 17:02:46 debian /etc/mysql/debian-start[5011]: mysql.host             ...
Jun 23 17:02:46 debian /etc/mysql/debian-start[5011]: mysql.ndb_binlog_index ...
Jun 23 17:02:46 debian /etc/mysql/debian-start[5011]: mysql.plugin           ...
Jun 23 17:02:46 debian /etc/mysql/debian-start[5011]: mysql.proc             ...
Jun 23 17:02:46 debian /etc/mysql/debian-start[5011]: mysql.procs_priv       ...
Jun 23 17:02:46 debian /etc/mysql/debian-start[5074]: Checking for insecure r...
Jun 23 17:02:46 debian /etc/mysql/debian-start[5079]: Triggering myisam-recov...
Hint: Some lines were ellipsized, use -l to show in full.

3. Install MariaDB

In case you want to use MariaDB instead of MySQL community edition, follow the steps given below.

MariaDB is a drop in replacement for MySQL. It is a robust, scalable and reliable SQL server that comes rich set of enhancements.

First you have to remove existing MySQL packages if any. To completely uninstall MySQL along with its configuration files, enter the following commands one by one:

systemctl stop mysql

Or,

service mysql stop
apt-get remove --purge mysql-server mysql-client mysql-common
apt-get autoremove 
apt-get autoclean
rm -rf /var/lib/mysql/
rm -rf /etc/mysql/

After removing MySQL, run the following command to install MariaDB.

apt-get install mariadb-server

Alternatively, you can install it using MariaDB repository if you want to try most recent version of MariaDB. Run the following commands to add PPA.

apt-get install python-software-properties
apt-key adv --recv-keys --keyserver keyserver.ubuntu.com 0xcbcb082a1bb943db
add-apt-repository 'deb http://kartolo.sby.datautama.net.id/mariadb/repo/10.0/debian jessie main'

Update the software sources list and install MariaDB using following commands:

apt-get update
apt-get install mariadb-server

During installation you will be asked to set MariaDB ‘root’ user password. Enter the password twice, and complete the installation.

Image may be NSFW.
Clik here to view.
sk@debian: ~_004

Re-enter password:

Image may be NSFW.
Clik here to view.
sk@debian: ~_005

Check if mariadb is running or not, using the following command:

On Debian 8:

systemctl status mysql

On Debian 7 and previous versions:

service mysql status

Sample output:

● mysql.service - LSB: Start and stop the mysql database server daemon
   Loaded: loaded (/etc/init.d/mysql)
   Active: active (running) since Tue 2015-06-23 17:36:27 IST; 52s ago
   CGroup: /system.slice/mysql.service
           ├─2918 /bin/bash /usr/bin/mysqld_safe
           ├─2919 logger -p daemon.err -t /etc/init.d/mysql -i
           └─3060 /usr/sbin/mysqld --basedir=/usr --datadir=/var/lib/mysql --plugin-dir=/usr/lib/mysql/plugin --user=mysql --log-error=/var/log/mysql/error.log --pid...

[...]
Jun 23 17:36:29 debian /etc/mysql/debian-start[3111]: mysql.time_zone_leap_second                        OK
Jun 23 17:36:29 debian /etc/mysql/debian-start[3111]: mysql.time_zone_name                               OK
Jun 23 17:36:29 debian /etc/mysql/debian-start[3111]: mysql.time_zone_transition                         OK
Jun 23 17:36:29 debian /etc/mysql/debian-start[3111]: mysql.time_zone_transition_type                    OK
Jun 23 17:36:29 debian /etc/mysql/debian-start[3111]: mysql.user                                         OK
Jun 23 17:36:29 debian /etc/mysql/debian-start[3180]: Checking for insecure root accounts.
Jun 23 17:36:29 debian /etc/mysql/debian-start[3184]: Triggering myisam-recover for all MyISAM tables
Hint: Some lines were ellipsized, use -l to show in full.

4. Install PHP

PHP (recursive acronym for PHP: Hypertext Preprocessor) is a widely used open-source general purpose scripting language that is especially suited for web development and can be embedded into HTML.

Install PHP with following command:

apt-get install php5 php5-mysql libapache2-mod-php5

To test PHP, create a sample “testphp.php” file in Apache document root folder.

nano /var/www/html/testphp.php

Add the following lines.

<?php
phpinfo();
?>

Restart apache2 service.

On Debian 8:

systemctl restart apache2

On Debian 7 and previous versions:

service apache2 restart

Navigate to http://server-ip-address/testphp.php. It will display all the details about php such as version, build date and commands etc.

Image may be NSFW.
Clik here to view.
phpinfo() - Mozilla Firefox_006

If you want to install all php modules at once, enter the command apt-get install php* and restart the apache2 service. To verify the modules, open web browser and navigate to http://server-ip-address/testphp.php. You will able to see all installed php modules.

5. Manage MySQL Databases Using phpMyAdmin (Optional)

phpMyAdmin is a free open-source web interface tool used to manage your MySQL databases.

It is available in the Official Debian repositories.So install it with command:

apt-get install phpmyadmin

Select the Web server that should be automatically configured to run phpMyAdmin. In my case, it is apache2.

Image may be NSFW.
Clik here to view.
sk@debian: ~_007

The phpMyAdmin must have a database installed and configured before it can be used. This can be optionally handled by dbconfig-common.

Select ‘Yes’ to configure database for phpmyadmin wjth dbconfig-common.

Image may be NSFW.
Clik here to view.
sk@debian: ~_008

Enter password of the database’s administrative user.

Image may be NSFW.
Clik here to view.
sk@debian: ~_009

Enter MySQL application password phpmyadmin.

Image may be NSFW.
Clik here to view.
sk@debian: ~_010

Re-enter the password.

Image may be NSFW.
Clik here to view.
sk@debian: ~_011

Success! phpMyAdmin installation is installed.

Additional Note: if you followed all steps carefully, phpMyAdmin should work just fine. In case phpMyAdmin is not working, please do the following steps.

Open terminal, and type:

nano /etc/apache2/apache2.conf

Add the following line at the end.

Include /etc/phpmyadmin/apache.conf

Save and Exit. Restart apache service:

On Debian 8:

systemctl restart apache2

On Debian 7 and previous versions:

/etc/init.d/apache2 restart

6. Access phpMyAdmin Web Console

Now, you can access the phpmyadmin console by navigating to http://server-ip-address/phpmyadmin/ from your browser.

Enter your MySQL username and password which you have given in previous steps. In my case its “root” and “debian”.

Image may be NSFW.
Clik here to view.
phpMyAdmin - Mozilla Firefox_012

You will be redirected to PhpMyAdmin main web interface.

Image may be NSFW.
Clik here to view.
192.168.1.101 - localhost | phpMyAdmin 4.2.12deb2 - Mozilla Firefox_013

From now on, you can manage your MySQL databases from phpMyAdmin web interface.

That’s it. Your LAMP stack is ready to use.

---------------------------------------------------------------------
How To Install LAMP Stack On Debian 8

Install MySecureShell SFTP Server In Linux

Image may be NSFW.
Clik here to view.


About MySecureShell

MySecureShell is an Open Source, Multi-platform, very secure FTP server based on OpenSSH. Since it is based on OpenSSH, you have the high level of security of it MORE functionality and POWERFUL FTP server. It is easy to install, configure and administrate. The goal of MySecureShell is to offer the power and security of OpenSSH, with enhanced features (like ACL) to restrict connected users. What else you need? We can have a perfect SFTP server in minutes using MySecureShell. It will work on several types of Operating Systems like Linux, Mac OS X, Solaris, BSD and Windows (with Cygwin).

Why MySecureShell?

You might ask me why MySecureShell instead of traditional FTP server. There are several reasons including:

  • You do not have to open some dedicated firewall ports for file transfers ;
  • You are using one of the most used and secure protocol (SSH) ;
  • You do not have to manage SSL certificates to guaranty the security ;
  • As easy to use as a classical FTP server ;
  • As many or more features that you can find on any classical FTP servers ;
  • Easy to install, configure, maintain and use.

Features

Concerning about MySecureShell, we can list the following:

  • Control of bandwidth ;
  • Security rights information ;
  • Only authorized files and folders can be shown ;
  • Easy installation and administration of the server with a graphical interface ;
  • Management of activity of the server with logs ;
  • Restrictions of users by ip, groups ;
  • Power Encryption ;
  • No certificate problems non-certified or certificate generation ;
  • Support public and private keys for secure authentication without password ;
  • Only one port to open for SSH and SFTP (port 22 by default) ;
  • The protocol used is much more optimized than FTP because it is based on the protocol of the NFS ;
  • Free and open source ;
  • Advanced logging information ;
  • ACL can be made with IP/Usernam/Groups/VirtualHost/… ;
  • Confined environments (chroot, which is also available in the latest version of OpenSSH) ;
  • Restrict users to have sftp only (shell access is disabled by default) ;
  • And more…

Install MySecureShell On Linux

Add the MySecureShell repository depending upon the distribution you use. All steps should run as ‘root’ user.

To switch to root user, run:

sudo su

Or

su

On Debian:

MySecureShell is available in the default repositories of Debian 8.

To install it, simply run:

apt-get install mysecureshell

For Debian 7 and previous versions:

Edit /etc/apt/sources.list file,

nano /etc/apt/sources.list

Add the following lines:

deb http://mysecureshell.free.fr/repository/index.php/debian testing main
deb-src http://mysecureshell.free.fr/repository/index.php/debian testing main

To import GPG key, enter:

gpg --keyserver hkp://pool.sks-keyservers.net --recv-keys E328F22B; gpg --export E328F22B | apt-key add -

OR

wget -O - "http://pool.sks-keyservers.net:11371/pks/lookup?op=get&search=0x7601D76CE328F22B" | apt-key add -

Now update the source list and install MySecureShell as shown below.

apt-get update
apt-get install mysecureshell

On Ubuntu:

MySecureShell is available in the default repositories of Ubuntu 15.04, so we can install it using command:

apt-get install mysecureshell

On Ubuntu 14.04 and previous versions, Edit file “/etc/apt/sources.list” and add the following lines,

deb http://mysecureshell.free.fr/repository/index.php/ubuntu testing main
deb-src http://mysecureshell.free.fr/repository/index.php/ubuntu testing main

To import GPG key, enter:

gpg --keyserver hkp://pool.sks-keyservers.net --recv-keys E328F22B; gpg --export E328F22B | apt-key add -

OR

wget -O - "http://pool.sks-keyservers.net:11371/pks/lookup?op=get&search=0x7601D76CE328F22B" | apt-key add -

Now update the source list and install MySecureShell as shown below.

apt-get update && apt-get install mysecureshell

On RHEL/CentOS:

Edit file “/etc/yum.conf” and the following lines at the end.

[mysecureshell]
name=MySecureShell
baseurl=http://mysecureshell.free.fr/repository/index.php/centos/$basearch/
enabled=1
gpgcheck=0

Update Repository and install MySecureShell as shown below.

yum update
yum install mysecureshell

On Fedora:

Edit file “/etc/yum.conf” and add the following lines:

[mysecureshell]
name=MySecureShell
baseurl=http://mysecureshell.free.fr/repository/index.php/fedora/$basearch/
enabled=1
gpgcheck=0

Update Repository and install MySecureShell as shown below.

yum update
yum install mysecureshell

We have installed MySecureShell. Let us now see how to use it.

Usage

Adding users to MySecureShell

First, we have to find where MySecureShell is installed.

To do that, run:

whereis mysecureshell

Sample output:

mysecureshell: /usr/bin/mysecureshell /usr/share/man/man8/mysecureshell.8.gz

As you in the above output, mysecureshell installation path is /usr/bin/mysecureshell. Verifying MySecureShell installation path is must, because, we should specify that path while creating new FTP users or assign exiting users to access the SFTP server.

Now, Create a new user with command:

useradd -m -s /usr/bin/mysecureshell unixmen
passwd unixmen

Also you can assign the existing users to access and use MySecureShell using command:

sudo usermod -s /usr/bin/mysecureshell sk

Mow you can connect to your SFTP server from your clients as shown below.

sftp unixmen@192.168.1.102

Sample output:

unixmen@192.168.1.102's password: 
Connected to 192.168.1.102.
sftp>

Also you can login to your SFTP server with any graphical clients such as FileZilla from your client system.

Open your favourite FTP client (Ex.FileZilla). Enter sftp://IP-address, user name, password, and SFTP port 22 and click Connect.

Image may be NSFW.
Clik here to view.
sftp:--sk@192.168.1.102 - FileZilla_001

Unlike vsftpd or other FTP servers, MySecureShell SFTP server is lot easy to install and configure.

Configure MySecureShell

The main MySecureShell config file is /etc/ssh/sftp_config. MySecureShell will work well with default configuration. The options in the configuration are self-explanatory, so I didn’t cover them.

You can adjust or specify various options such as specify upload and download bandwidth, chroot users, the max. amount of connections etc., in the MySecureShell configuration file. You can set this options to either everybody or just for a particular group.

Say for example, Let us limit the download speed for the FTP users to 25K. To do that open MySecureShell main configuration file.

nano /etc/ssh/sftp_config

Find the following line and set the download limit to 25k under Default section.

[...]
<Default>
GlobalDownload          25k     #total speed download for all clients
[...]

Save and close the file. Restart MySecureShell service to take effect the saved changes.

service mysecureshell restart

Or,

systemctl restart mysecureshell

Now the FTP users will be able to download files at 25k speed.

MySecureShell Commands

MySecureShell has the following set of commands to administrate your SFTP server.

  • sftp-admin
  • sftp-kill
  • sftp-state
  • sftp-user
  • sftp-verif
  • sftp-who

Let us see a brief description of each command.

sftp-admin

This command allows to manage a MySecureShell waiter remotely.

Usage:

sftp-admin [ssh options] user@hostname

sftp-kill

It will disconnect the user from the FTP server.

Usage:

sftp-kill unixmen

sample output:

Kill unixmen on PID 6753
No lamer to kill ?

The above command will disconnect the user ‘unixmen’ from FTP server.

sftp-state 

It allows you to control activity of the server.

sftp-state

Sample output:

Server is up

sftp-user

This command allows you to create a SFTP user.

Usage:

sftp-user create test

The above command will create a user called test.

sftp-user delete test

The above command will delete the the user test.

sftp-user list

Sample output:

test
unixmen

The above command will list SFTP users.

sftp-verif 

This command will verify and correct problems on a MySecureShell server.

Usage:

sftp-verif

Sample output:

################################################################################
MySecureShell Verification Tool
################################################################################

### Verifing file existance ###

/bin/MySecureShell                                                       [ OK ]
/bin/sftp-who                                                            [ OK ]
/bin/sftp-kill                                                           [ OK ]
/bin/sftp-state                                                          [ OK ]
/bin/sftp-admin                                                          [ OK ]
/bin/sftp-verif                                                          [ OK ]
/bin/sftp-user                                                           [ OK ]

### Verifing rights ###

Verifing file rights of /etc/ssh/sftp_config                             [ OK ]
Verifing file rights of /bin/sftp-who                                    [ OK ]
Verifing file rights of /bin/sftp-verif                                  [ OK ]
Verifing file rights of /bin/sftp-user                                   [ OK ]
Verifing file rights of /bin/sftp-kill                                   [ OK ]
Verifing file rights of /bin/sftp-state                                  [ OK ]
Verifing file rights of /bin/sftp-admin                                  [ OK ]
Verifing file rights of /bin/MySecureShell                               [ OK ]

### Verifing rotation logs ###

Rotation logs have been found                                            [ OK ]

### Verifing server status ###

Verifing server status (ONLINE)                                          [ OK ]

### Verifing server dependencies ###

Show only error(s) :

### Verifing server configuration ###

Show only error(s) :
Trying user: root

### All tests dones ###

sftp-who

This command will tell you who is currently logged-in to the FTP server.

Usage:

sftp-who

Sample output:

--- 1 / 10 clients ---
Global used bandwidth : 0 bytes/s / 0 bytes/s
PID: 1472   Name: unixmen   IP: sk
    Home: /home/unixmen
    Status: idle    Path: 
    File: 
    Connected: 2015/06/26 17:29:44 [since 03s]
    Speed: Download: 0 bytes/s [5.00 kbytes/s]  Upload: 0 bytes/s [unlimited]
    Total: Download: 134 bytes   Upload: 23 bytes

MySecureShell GUI Front-end

Managing MySecureShell via command line is not that difficult. However if you’re looking for a graphical management tool for MSecureShell, there is a MySecureShell GUI front-end is available.

You Can install this GUI tool in any of your client system and start managing your SFTP server graphically as well as remotely. Also you have to install Java on your system before installing this front-end tool.

Please note: Before using MySecureShell GUI, you must adjust the configuration file to allow the SFTP server to be managed remotely.

To do so, go to your SFTP server, edit file /etc/ssh/sftp_config,

nano /etc/ssh/sftp_config

Find and uncomment the following line.

[...]
#<Group sftp_administrator>
        IsAdmin         true            #can admin the server
[...]

Save and close the file. Restart mysecureshell service to take effect the changes.

systemctl restart mysecureshell

Or,

service mysecureshell restart

Now, download the MySecureShell client from here or download it directly from your Terminal using command:

wget http://sourceforge.net/projects/mysecureshell/files/MySecureShell%20Graphical%20Tools/v1.90/MSS_Frontend_v1.9.zip

Extract and run it as shown below.

unzip MSS_Frontend_v1.9.zip
java -jar sftp-mss.jar

The following screen should appear. Enter the your remote SFTP server username and password and click Connect.

Image may be NSFW.
Clik here to view.
Graphical Tools v1.9 for MySecureShell v1.20_002

After connecting to the SFTP server it will look like below.

Image may be NSFW.
Clik here to view.
Graphical Tools v1.9 for MySecureShell v1.20_003

Now you can manage your SFTP server remotely.

Sftp-who

To see the connected users to SFTP server click on sftp-who tab. It will show the current users connected to the SFTP server.

Image may be NSFW.
Clik here to view.
Graphical Tools v1.9 for MySecureShell v1.20_004

Sftp-state

To view the SFTP server status, click on sftp-state tab.

Image may be NSFW.
Clik here to view.
Graphical Tools v1.9 for MySecureShell v1.20_005

Config Wizard

To create user, go to Wizard tab. Select Configuration of users:

Image may be NSFW.
Clik here to view.
Graphical Tools v1.9 for MySecureShell v1.20_006

Click Create New user. Enter the new user name and password. Finally click Ok and Finish.

Image may be NSFW.
Clik here to view.
Graphical Tools v1.9 for MySecureShell v1.20_007

Also you can change the default home directory, global download/upload speed of the ftp users. To do that, go to Wizard -> Configuration of Server. Enter the new values and click Finish.

Image may be NSFW.
Clik here to view.
Graphical Tools v1.9 for MySecureShell v1.20_008

Expert Mode

In the expert mode, you can adjust/modify various configuration options like Global, Security ad Advanced security. It’s not that difficult. Every option is self-explanatory.

Image may be NSFW.
Clik here to view.
Graphical Tools v1.9 for MySecureShell v1.20_009

Log

You can analyze what’s happening in the SFTP server using logs.

Image may be NSFW.
Clik here to view.
Graphical Tools v1.9 for MySecureShell v1.20_010

That’s all for now. At this stage, you will have a working SFTP server.

Reference links:

---------------------------------------------------------------------
Install MySecureShell SFTP Server In Linux

Sbackup: A Simple Backup Solution For Linux Desktop

Image may be NSFW.
Clik here to view.


About Sbackup

Sbackup, Simple Backup, is an Open Source, easy to use backup solution intended for desktop use. It can backup any subset of files and folders. All configuration is accessible via Gnome interface. File and paths can be included and excluded directly or by regex, It supports local and as well as remote backups. Though it looks simple in use and configuration, it has many features like an advanced backup utility.

Features

The notable features of Sbackup are listed below.

  • It creates both compressed and uncompressed backups ;
  • It can split uncompressed backups into multiple parts ;
  • It support of multiple backup profiles. You can create and edit the profiles as per your requirement, but you can’t delete the default profile ;
  • It has various useful options such as logging, email notification and status icon presenting progress and notifications ;
  • It supports scheduled backups and manual backups ;
  • It can backup files either to local destinations (e.g. hard disk) or remote destinations (e.g. NAS over FTP).

Install Sbackup On Ubuntu, Linux Mint and Debian

Sbackup is available in the default repositories of Ubuntu, Debian and Linux Mint.

So, we can install it using command:

sudo apt-get install sbackup

Done!

Usage

Open up SBackup either from Dash or Menu.

At first launch, Sbackup will notify you to create a new backup profile.

Image may be NSFW.
Clik here to view.
Untitled window_001

The main interface of SBackup will look like as shown below.

Image may be NSFW.
Clik here to view.
Simple Backup Suite_002

Please not that SBackup comes with two modes:

  • Normal user mode ;
  • Administrator mode.

As the name implies, In normal mode you can’t do some tasks like scheduling backups. In Administrator mode you can have all your options enabled.

Create New profile:

As I mentioned before, SBackup won’t have any user profiles at first launch. Only “default profile” will be available. Be mindful that you can’t delete the default profile.

Now, let us create a new profile.

To create a new profile, go to Tools -> Profile Manager. The Profile Manager will look like below.

Image may be NSFW.
Clik here to view.
Configuration Profile Manager_003

You can create any number of configuration profiles of your choice. Each profile has its own set of settings including backup destination, backup format etc.

Click ‘Add’ to create a new profile, for example “sk”.

Image may be NSFW.
Clik here to view.
Untitled window_004

The new profile has been created now.

Now, select the new profile and click Edit to switch from default profile to the new profile.

Image may be NSFW.
Clik here to view.
Configuration Profile Manager_005

Now, you should see the new profile is selected in the bottom.

Image may be NSFW.
Clik here to view.
Simple Backup Suite_007

However you can use default profile and edit it as per your requirements if you wish.

Important Note: As I mentioned before, to schedule your backup you must run SBackup as root user.

In this how-to tutorial, I will be using default profile in Administrator mode.

Open up your Terminal and run the following command to open SBackup with root user privileges.

sudo sbackup-config-gtk

Or, you can open “Simple Backup – Configuration for Admins” from the Menu or Dash.

The above command will open SBackup with default profile with administrative mode.

Now, let us discuss about each sections in SBackup.

General section:

In General section you can define how often do you want to do a full backup. The default option is 7 days. By default SBackup will do full backup every 7 days. Then you can define the compression format for your backup file.

Image may be NSFW.
Clik here to view.
Simple Backup Suite_001

Include section:

This tab is pretty self-explanatory. You can include the files/folders that you want to backup using SBackup. Here you can either select individual files or entire folder to backup.

For example, I deleted all directories in the include section and added single directory called “My backup”.

Image may be NSFW.
Clik here to view.
Simple Backup Suite_002

Exclude section:

Just like Include tab, we can define the files/folders path to exclude from being backed-up by SBackup. Just select the path of the files/folders that needs to be excluded from backup. By default SBackup will exclude the the following:

  • /media ;
  • /var/run/ ;
  • /var/cache/ ;
  • /var/spool/ ;
  • /vat/tmp/.

Image may be NSFW.
Clik here to view.
Simple Backup Suite_003

Further more, you can add the file types that you want to exclude from backup such mp3 or avi etc. Also if you want to add some other file types in the exclude list, just add them by clicking on the add button.

By default SBackup won’t backup the folders .gvfs, .thumbnails,  .Trash and .cache etc.

Image may be NSFW.
Clik here to view.
Simple Backup Suite_004

Also you can omit the files/folders of certain size from backup. Here i excluded the files/folders which are bigger than 100MB in size.

Image may be NSFW.
Clik here to view.
Simple Backup Suite_005

Destination section:

This is the path where you want to store your backup file. As i mentioned above, you can backup files/folders either in your local hard drive or to an external destination such as FTP, NAS etc.

Image may be NSFW.
Clik here to view.
Simple Backup Suite_006

Note: Make sure that destination has enough free space to store the backup.

Schedule section:

In this section you can schedule the backups at a particular time. Click on the Simple radio button and select your schedule type such as hourly, daily, weekly and monthly.

Image may be NSFW.
Clik here to view.
Simple Backup Suite_007

You can configure scheduled backups either simply by choosing an interval or by a custom cron definition.

If you’re good at command line crontab, select custom and define the cron job. If you select the daily schedule type, a cron job will be created in the /etc/cron.daily/ location.

sudo ls -l /etc/cron.daily/sbackup

Sample output:

lrwxrwxrwx 1 root root 33 Jul  8 17:46 /etc/cron.daily/sbackup -> /usr/share/sbackup/sbackup-launch

Purging section:

This section gives you the option to delete the backup files after a particular period of time. By default, your backup files which are older than 30 days will be automatically deleted. Of course, you can define the period of your choice.

Image may be NSFW.
Clik here to view.
Simple Backup Suite_008

Report section:

‘Report’ is the final section. From here, you can define to receive the mail notification directly in your inbox after the backups completed.

Enter your mail id, smtp server address, email ID and password and click Test settings. Be mindful that, before test the mail settings save the configuration by clicking on the Save Configuration button on the Tool bar.

Image may be NSFW.
Clik here to view.
Simple Backup Suite_009

You’ll see a message “Test Successful” after testing your mail settings.

Backup files and folders

Now, it’s time to make sample backup.

If you want to start backup immediately, click Make Backup now button on the SBackup tool bar. or Go to Tools -> Make Backup now from the Menu bar.

Image may be NSFW.
Clik here to view.
Simple Backup Suite_010

A new window will open. Click Yes to create backup.

Image may be NSFW.
Clik here to view.
sbackup-config-gtk_011

Now you can see that a backup process will be started  in the background. You can monitor the progress of the backup by means of the status indicator displayed in the notification area.

Image may be NSFW.
Clik here to view.
Untitled window_012

After completing the backup, close SBackup and check for your backup in the destination directory. In my case my destination directory is /var/backup.

sudo ls /var/backup

Sample output:

2015-07-08_18.30.07.054463.sk.ful  2015-07-08_18.30.08.037350.sk.inc

Restore backup

Open “System Backup – Restoration for admins” from the Menu or run the following command to open SBackup in Administrator mode.

From your Terminal run command:

sudo sbackup-restore-gtk

In the SBackup restoration window, select the date to get the list of the available backups and select the  any one of the available snapshots.

Then, Click on the any one of the files to restore on the Restoration management pane. Once you done, click restore to save them in the default location or click restore as to save the files in a custom location.

Image may be NSFW.
Clik here to view.
Simple Backup Suite_013

Now, the data will be restored from the selected backup. After successful restoration, you will see the following message.

Image may be NSFW.
Clik here to view.
Simple Backup restoration_015

Go to the backup location and see whether your files/folders are successfully restored or not.

Conclusion

As the name implies, SBackup is very very simple in-terms of installation, configuration and usage. I am really satisfied about SBackup and it perfectly does the job as it advertised. Give it a try you won’t be disappointed.

That’s all for now. Cheers!

Reference links:

The post Sbackup: A Simple Backup Solution For Linux Desktop appeared first on Unixmen.

Setup Apache Virtual Hosts On Ubuntu 15.04

Image may be NSFW.
Clik here to view.


About Virtual hosts

Virtual Hosts are used to setup more than one domain or websites using a single IP address. This is very useful if anybody wants to run multiple websites using a single IP address on single VPS.

In this tutorial, let me show how to setup virtual hosts in Apache web server on Ubuntu 15.04 server. Also, this method should work on previous Ubuntu distributions such as Ubuntu 14.10, 14.04 etc.

Scenario

For the purpose of this tutorial, I will be using Ubuntu 15.04 64bit server version, and I am going to host two testing websites namely “unixmen1.local” and “unixmen2.local”.

My test box IP address and hostname are 192.168.1.102/24 and server.unixmen.local respectively. Be sure to modify the virtual domain names as per your requirement.

Install Apache Webserver

Prior to install apache server, let us update our Ubuntu server:

To do that, run:

sudo apt-get update

Now, install apache web server using the following command:

sudo apt-get install apache2

After installing apache server, let us test whether the webserver is working properly or not by navigating to the URL http://ip-address/.

Image may be NSFW.
Clik here to view.
Apache2 Ubuntu Default Page: It works - Mozilla Firefox_001

As you see in the above picture, apache webserver is working.

Now, let us proceed to setup virtual hosts in Apache web server.

Setup Apache Virtual Hosts

1. Create Virtual Directories

Now, let us proceed to setup virtual hosts. As I mentioned earlier, I am going to host two virtual hosts called “unixmen1.local”, and “unixmen2.local”.

Create a public directory to place the two virtual hosts data.

First, let us create a directory for unixmen1.local site:

sudo mkdir -p /var/www/html/unixmen1.local/public_html

Then, create the directory for unixmen2.local site:

sudo mkdir -p /var/www/html/unixmen2.local/public_html

2. Setting Up Ownership and Permissions

The above directories are owned by root user now. We should change the ownership of these two directories to the regular user.

sudo chown -R $USER:$USER /var/www/html/unixmen1.local/public_html/
sudo chown -R $USER:$USER /var/www/html/unixmen2.local/public_html/

The “$USER” variable indicates the currently logged in user.

Set the read permissions to the Apache web root (/var/www/html/) directory, so that everyone can read files from that directory.

sudo chmod -R 755 /var/www/html/

We have created the directories for holding the websites data and assigned the necessary permissions and ownership to them.

4. Create Sample pages for Virtual Hosts

Now, we have to create the sample pages to be served through the websites.

First, let us create a sample page to the unixmen1.local virtual host.

Create a ‘index.html’ for unixmen1.local virtual host,

sudo vi /var/www/html/unixmen1.local/public_html/index.html

Add the following contents:

<html>
 <head>
 <title>www.unixmen1.local</title>
 </head>
 <body>
 <h1>Welcome To Unixmen1.local website</h1>
 </body>
</html>

Save and close the file.

Similarly, add the sample page to the second virtual host.

sudo vi /var/www/html/unixmen2.local/public_html/index.html

Add the following contents:

<html>
 <head>
 <title>www.unixmen2.local</title>
 </head>
 <body>
 <h1>Welcome To Unixmen2.local website</h1>
 </body>
</html>

Save and close the file.

5. Create Virtual Host Files

By default, Apache comes with a default virtual host file called 000-default.conf. We will copy the 000-default.conf file contents to our new virtual host files.

sudo cp /etc/apache2/sites-available/000-default.conf /etc/apache2/sites-available/unixmen1.local.conf
sudo cp /etc/apache2/sites-available/000-default.conf /etc/apache2/sites-available/unixmen2.local.conf

Make sure the virtual host files contains .conf extension at the end.

Now, modify the unximen1.local.conf file to reflect with our new own values.

sudo vi /etc/apache2/sites-available/unixmen1.local.conf

Make the relevant changes that reflect to the unixmen1 site.

<VirtualHost *:80>
        # The ServerName directive sets the request scheme, hostname and port that
        # the server uses to identify itself. This is used when creating
        # redirection URLs. In the context of virtual hosts, the ServerName
        # specifies what hostname must appear in the request's Host: header to
        # match this virtual host. For the default virtual host (this file) this
        # value is not decisive as it is used as a last resort host regardless.
        # However, you must set it for any further virtual host explicitly.
        #ServerName www.example.com

        ServerAdmin webmaster@unixmen1.local
        ServerName unixmen1.local
        ServerAlias www.unixmen1.local
        DocumentRoot /var/www/html/unixmen1.local/public_html

        # Available loglevels: trace8, ..., trace1, debug, info, notice, warn,
        # error, crit, alert, emerg.
        # It is also possible to configure the loglevel for particular
        # modules, e.g.
        #LogLevel info ssl:warn

        ErrorLog ${APACHE_LOG_DIR}/error.log
        CustomLog ${APACHE_LOG_DIR}/access.log combined

        # For most configuration files from conf-available/, which are
        # enabled or disabled at a global level, it is possible to
        # include a line for only one particular virtual host. For example the
        # following line enables the CGI configuration for this host only
        # after it has been globally disabled with "a2disconf".
        #Include conf-available/serve-cgi-bin.conf
</VirtualHost>

Like wise, modify the second virtual host file.

sudo vi /etc/apache2/sites-available/unixmen2.local.conf

Make the relevant changes that reflect to the unixmen2 site.

<VirtualHost *:80>
        # The ServerName directive sets the request scheme, hostname and port that
        # the server uses to identify itself. This is used when creating
        # redirection URLs. In the context of virtual hosts, the ServerName
        # specifies what hostname must appear in the request's Host: header to
        # match this virtual host. For the default virtual host (this file) this
        # value is not decisive as it is used as a last resort host regardless.
        # However, you must set it for any further virtual host explicitly.
        #ServerName www.example.com

        ServerAdmin webmaster@unixmen2.local
        ServerName unixmen2.local
        ServerAlias www.unixmen2.local
        DocumentRoot /var/www/html/unixmen2.local/public_html

        # Available loglevels: trace8, ..., trace1, debug, info, notice, warn,
        # error, crit, alert, emerg.
        # It is also possible to configure the loglevel for particular
        # modules, e.g.
        #LogLevel info ssl:warn

        ErrorLog ${APACHE_LOG_DIR}/error.log
        CustomLog ${APACHE_LOG_DIR}/access.log combined

        # For most configuration files from conf-available/, which are
        # enabled or disabled at a global level, it is possible to
        # include a line for only one particular virtual host. For example the
        # following line enables the CGI configuration for this host only
        # after it has been globally disabled with "a2disconf".
        #Include conf-available/serve-cgi-bin.conf
</VirtualHost>

After modifying the virtual hosts files, disable the default virtual host (000.default.conf), and enable new virtual hosts as shown below.

sudo a2dissite 000-default.conf
sudo a2ensite unixmen1.local.conf
sudo a2ensite unixmen2.local.conf

Finally, restart the apache service.

In Ubuntu 15.04:

sudo systemctl restart apache2

In Ubuntu 14.10 and previous versions:

sudo service apache2 restart

That’s it. Now, we successfully configured the apache virtual hosts on our Ubuntu server.

Testing Virtual Hosts

Edit file /etc/hosts,

sudo vi /etc/hosts

Add the virtual domain names one by one as shown below.

[...]
192.168.1.102   unixmen1.local
192.168.1.102   unixmen2.local

Save and close the file.

Open up your browser and point to the URL http://unixmen1.local or http://unixmen2.local. You should see the sample pages which we created earlier.

Unixmen1.local Test page:

Image may be NSFW.
Clik here to view.
www.unixmen1.local - Mozilla Firefox_002

Unixmen2.local Test page:

Image may be NSFW.
Clik here to view.
www.unixmen2.local - Mozilla Firefox_003

If you want to access these sites from your remote systems, you should add the actual domain name records in your DNS server. Hence, I don’t have any actual domain names and DNS server, I tested this only on my local system, and It’s worked perfectly as I expected.

Likewise, you can create and host as many as sites you wanted. Setting up Virtual Hosts in Ubuntu is not that difficult. Hope this tutorial will help you.

Cheers!

The post Setup Apache Virtual Hosts On Ubuntu 15.04 appeared first on Unixmen.


Setup Nginx Server Blocks (Virtual Hosts) On Ubuntu 15.04

Image may be NSFW.
Clik here to view.


About Server Blocks

Server Blocks (a.k.a Virtual Hosts in Apache webserver) are used to setup more than one domain or websites using a single IP address. This is very useful if anybody wants to run multiple websites using a single IP address on single VPS. VirtualHost is an Apache term. Nginx does not have Virtual hosts, it has “Server Blocks” that use the server_name and listen directives to bind to tcp sockets.

In this tutorial, let me show how to setup Server Blocks in nginx web server on Ubuntu 15.04 64bit server. Although, these steps should work on previous Ubuntu versions such as Ubuntu 14.10, 14.04 etc.

Scenario

For the purpose of this tutorial, I will be using Ubuntu 15.04 bit server edition, and I am going to host two testing websites called “unixmen1.local” and “unixmen2.local”. My test box IP address and hostname are 192.168.1.102/24 and server.unixmen.local respectively. Make sure you have replaced the virtual domain names with your own.

Install Nginx Webserver

Prior to install nginx server, let us update our Ubuntu server:

sudo apt-get update

Now, install nginx web server using the following command:

sudo apt-get install nginx

After installing nginx server, let us test whether the web server is working properly or not by navigating to the URL http://ip-address/.

Image may be NSFW.
Clik here to view.
Welcome to nginx on Ubuntu! - Mozilla Firefox_001

As you see in the above picture, nginx webserver is working.

Setup Nginx Server Blocks

1. Create Virtual Directories

Now, let us proceed to setup virtual hosts. As I mentioned earlier, I am going to host two virtual hosts called “unixmen1.local”, and “unixmen2.local”.

Create a public directory to place the two virtual hosts data.

First, let us create a directory for unixmen1.local site:

sudo mkdir -p /var/www/html/unixmen1.local/public_html

Then, create the directory for unixmen2.local site:

sudo mkdir -p /var/www/html/unixmen2.local/public_html

2. Setting Up Ownership and Permissions

The above directories are owned by root user now. We should change the ownership of these two directories to the regular user.

sudo chown -R $USER:$USER /var/www/html/unixmen1.local/public_html/
sudo chown -R $USER:$USER /var/www/html/unixmen2.local/public_html/

The “$USER” variable indicates the currently logged in user.

Set the read permissions to the Nginx web root (/var/www/html/) directory, so that everyone can read files from that directory.

sudo chmod -R 755 /var/www/html/

We have created the directories for holding the websites data and assigned the necessary permissions and ownership to them.

4. Create Sample pages for Server Blocks

Now, we have to create the sample pages to be served through the websites.

First, let us create a sample page to the unixmen1.local virtual host.

Create a ‘index.html’ for unixmen1.local virtual host,

sudo vi /var/www/html/unixmen1.local/public_html/index.html

Add the following contents:

<html>
 <head>
 <title>www.unixmen1.local</title>
 </head>
 <body>
 <h1>Welcome To Unixmen1.local website</h1>
 </body>
</html>

Save and close the file.

Similarly, add the sample page to the second virtual host.

sudo vi /var/www/html/unixmen2.local/public_html/index.html

Add the following contents:

<html>
 <head>
 <title>www.unixmen2.local</title>
 </head>
 <body>
 <h1>Welcome To Unixmen2.local website</h1>
 </body>
</html>

Save and close the file.

5. Create Server Block Files

By default, nginx comes with a default server block file called default. We will copy the “default” file contents to our new server block files.

sudo cp /etc/nginx/sites-available/default /etc/nginx/sites-available/unixmen1.local
sudo cp /etc/nginx/sites-available/default /etc/nginx/sites-available/unixmen2.local

Now, modify the unximen1.local file to reflect with our new own values.

sudo vi /etc/nginx/sites-available/unixmen1.local

Make the relevant changes that reflect to the unixmen1 site.

[...]
server {
        listen 80 default_server;
        listen [::]:80 default_server;

        # SSL configuration
        #
        # listen 443 ssl default_server;
        # listen [::]:443 ssl default_server;
        #
        # Self signed certs generated by the ssl-cert package
        # Don't use them in a production server!
        #
        # include snippets/snakeoil.conf;

        root /var/www/html/unixmen1.local/public_html;

        # Add index.php to the list if you are using PHP
        index index.html index.htm index.nginx-debian.html;

        server_name unixmen1.local www.unixmen1.local;

        location / {
                # First attempt to serve request as file, then
                # as directory, then fall back to displaying a 404.
                try_files $uri $uri/ =404;
        }
[...]

Like wise, modify the second server block file.

sudo vi /etc/nginx/sites-available/unixmen2.local

Make the relevant changes that reflect to the unixmen2 site.

[...]
[...]
server {
        listen 80 default_server;
        listen [::]:80 default_server;

        # SSL configuration
        #
        # listen 443 ssl default_server;
        # listen [::]:443 ssl default_server;
        #
        # Self signed certs generated by the ssl-cert package
        # Don't use them in a production server!
        #
        # include snippets/snakeoil.conf;

        root /var/www/html/unixmen2.local/public_html;

        # Add index.php to the list if you are using PHP
        index index.html index.htm index.nginx-debian.html;

        server_name unixmen2.local www.unixmen2.local;

        location / {
                # First attempt to serve request as file, then
                # as directory, then fall back to displaying a 404.
                try_files $uri $uri/ =404;
        }
[...]
[...]

Please note that you have to remove the default_server and ipv6only=on options in the second server block(unixmen2.local) file.

After modifying the server blocks files, disable the default server block, and enable new server blocks as shown below.

sudo rm /etc/nginx/sites-enabled/default
sudo ln -s /etc/nginx/sites-available/unixmen1.local /etc/nginx/sites-enabled/
sudo ln -s /etc/nginx/sites-available/unixmen2.local /etc/nginx/sites-enabled/

Finally, restart the nginx service.

In Ubuntu 15.04:

sudo systemctl restart nginx

In Ubuntu 14.10 and previous versions:

sudo service nginx restart

That’s it. Now, we successfully configured the nginx server blocks on our Ubuntu server.

Testing Server Blocks

Edit file /etc/hosts,

sudo vi /etc/hosts

Add the virtual domain names one by one as shown below.

[...]
192.168.1.102   unixmen1.local
192.168.1.102   unixmen2.local

Save and close the file.

Open up your browser and point to the URL http://unixmen1.local or http://unixmen2.local. You should see the sample pages which we created earlier.

Unixmen1.local Test page:

Image may be NSFW.
Clik here to view.
www.unixmen1.local - Mozilla Firefox_002

Unixmen2.local Test page:

Image may be NSFW.
Clik here to view.
www.unixmen2.local - Mozilla Firefox_004

If you want to access these sites from your remote systems, you should add the actual domain name records in your DNS server. Hence, I don’t have any actual domain names and DNS server, I tested this only on my local system, and Its worked perfectly as I expected.

Similarly, you can add as many as Server Blocks you wanted. Hope this tutorial will help you somewhere.

Good luck! Cheers!!

The post Setup Nginx Server Blocks (Virtual Hosts) On Ubuntu 15.04 appeared first on Unixmen.

Prevent Brute Force Attacks Using These Tools

Image may be NSFW.
Clik here to view.


About Brute Force Attacks

We, all, know the popular saying: “Prevention is better than cure”. If you are a Linux System administrator, you might know how the ‘brute force attack applications’ causes the problem in your local or remote servers. Imagine if your server is compromised by an unknown attacker and the data from the servers are in the wrong hand. It could definitely lead you and your organization into a biggest trouble you ever imagined. Brute force attacks are trial and error methods used by applications to decode your encrypted data. The encrypted can be any passwords or Keys. In simple, a brute force attack application will try all possible combination of passwords or keys repeatedly until find out the correct one. Depending upon the complexity of password, It will take time. If it takes too much time to find the password, your password, probably, safe and strong.

There are some intelligent tools available to block or prevent Brute force attacks. Today, we are going to discuss about the following tools.

  1. SSHGuard ;
  2. Fail2Ban.

A word of caution: Do not install both tools on the same systems. You might not be able to get the correct results.

First, let us see what is SSHGuard, and how to install and configure it to prevent brute force attacks.

1. SSHGuard

SSHGuard is a fast and lightweight monitoring tool written in C language. It monitors and protects servers  from brute force attacks using their logging activity. If someone continuously trying to access your server via SSH with many(may be four) unsuccessful attempts, the SSHGuard will block him/her for a bit by putting their IP address in iptables. Then, it will release the lock automatically after sometime. Not only SSH, it protects almost all services such as sendmail, exim, dovecot, vsftpd, proftpd and many.

Install SSHGuard

On Ubuntu/Debian, SSHGuard is available in the default repositories.

So, we can easily install it with command:

sudo apt-get install sshguard

On CentOS/RHEL 6.x:

First download and add FlexBox repository as shown below.

wget http://sourceforge.net/projects/flexbox/files/flexbox-release-1-1.noarch.rpm

Update repositories list using command:

yum repolist

Finally, install sshguard using command:

yum install sshguard

For other disros, download the respective binary file from the official site and install yourself.

Or, you can download it from here.

Configure SSHGuard with Iptables/Netfilter

The SSHGuard doesn’t have a configuration file. All you have to do is to create a new chain for SSHGuard in iptables to insert blocking rules.

For IPv4 support, run the following command with root privileges:

iptables -N sshguard

For IPv6:

ip6tables -N sshguard

Now update the INPUT chain to pass the traffic to the sshguard. Specify --dport option to protect all the ports of services using sshguard. If you want to prevent attackers from doing any traffic to the host, remove the option completely

Block all traffic from abusers

For IPv4 support:

iptables -A INPUT -j sshguard

For IPv6 support:

iptables -A INPUT -j sshguard

Block particular services such as SSH, FTP, POP, IMAP from abusers

For IPv4 support:

iptables -A INPUT -m multiport -p tcp --destination-ports 21,22,110,143 -j sshguard

For IPv6 support:

ip6tables -A INPUT -m multiport -p tcp --destination-ports 21,22,110,143-j sshguard

Finally, save the iptables rule.

service iptables save

Verify that you have NOT a default allow rule passing all ssh traffic higher in the chain. Verify that you have NOT a default deny rule blocking all ssh traffic in your firewall. In either case, you already have the skill to adjust your firewall setup.

Here is a sample ruleset that makes sense:

iptables -N sshguard

Block whatever sshguard says is bad:

iptables -A INPUT -j sshguard

Enable ssh, dns, http, https:

iptables -A INPUT -p tcp --dport 22 -j ACCEPT
iptables -A INPUT -p udp --dport 53 -j ACCEPT
iptables -A INPUT -p tcp --dport 80 -j ACCEPT
iptables -A INPUT -p tcp --dport 443 -j ACCEPT

Block everything else:

iptables -P INPUT DROP

Configure SSHGuard without Iptables/Netfilter

If you do not use iptables, the following commands will create and save an iptables configuration that does absolutely nothing except allowing sshguard to work:

iptables -F
iptables -X
iptables -P INPUT ACCEPT
iptables -P FORWARD ACCEPT
iptables -P OUTPUT ACCEPT
iptables -N sshguard
iptables -A INPUT -j sshguard

Finally save the iptables configuration:

service iptables save

That’s it. Now you have installed and configured SSHGuard to protect your ssh, ftp and other services from brute force attackers.

2. Fail2Ban

Fail2ban is an open-source intrusion prevention system that can be used to prevent brute force attacks and other suspicious malicious attacks. It scans log files (e.g. /var/log/apache/error_log) and bans IP’s that show the malicious signs such as too many password failures, seeking for exploits etc.

Generally, Fail2Ban then used to update firewall rules to reject the IP addresses for a specified amount of time, although any arbitrary other action (e.g. sending an email, or ejecting CD-ROM tray) could also be configured. Out of the box Fail2Ban comes with pre-configured filters for various services (Apache, curier, SSH etc.).

Install Fail2Ban

Login as root user and enter the following command to install Fail2Ban:

On Ubuntu/Debian:

apt-get install fail2ban

On CentOS/RHEL:

Add EPEL repository first.

yum install epel-release
yum repolist

Then, install fail2ban with command:

yum install fail2ban

Enable and start fail2ban service.

service fail2ban start
chkconfig fail2ban on

Or,

systemctl enable fail2ban
systemctl start fail2ban

Done.

Backup Fail2Ban Main Configuration File:

All configuration files will be found under /etc/fail2ban directory. The main configuration file is /etc/fail2ban/jail.conf. It’s a good idea to take backup of main config file to avoid merges during upgrades. Take local copy of /etc/fail2ban/jail.conf file as shown below:

cp /etc/fail2ban/jail.conf /etc/fail2ban/jail.local

Configure Fail2Ban

Open up /etc/fasil2ban/jail.local file using any editor:

vi /etc/fail2ban/jail.local

Find a section called [Default]. This section contains the basic set of rules that Fail2Ban will follow. Set the values as per your requirement.

Here is my settings:

[DEFAULT]

# "ignoreip" can be an IP address, a CIDR mask or a DNS host
ignoreip = 127.0.0.1/8 192.168.1.200/24
[...]
bantime  = 600
[...]
maxretry = 3

# "backend" specifies the backend used to get files modification. Available
# options are "gamin", "polling" and "auto".
# yoh: For some reason Debian shipped python-gamin didn't work as expected
#      This issue left ToDo, so polling is default backend for now

[...]
backend = auto
#
# Destination email address used solely for the interpolations in
# jail.{conf,local} configuration files.
destemail = root@localhost
[...]
#

Here,

  • ignoreip – White list your IP address that you trust to prevent blocking from Fail2Ban. You can add multiple addresses separate by a space character. Here I whitelisted the IP address 192.168.1.200. So this IP address will not be banned even if it sends unlimited number of failed log in attempts.
  • bantime – Number of seconds that a host would be banned if it is caught by Fail2Ban. The default time is 600 seconds (10 minutes). You can increase the time if you like.
  • maxretry – Number of incorrect login attempts before a host is blocked by Fail2Ban.

Service Configuration

By default, Fail2Ban contains set of pre-defined filters for various services. So you don’t need to enter any manual entries in the configuration files. All you need to do is just change the values of enabled to true or false, the respective services are automatically watched by Fail2Ban.

Here is sample output of SSH section in jail.local file.

[ssh]

enabled  = true
port     = ssh
filter   = sshd
logpath  = /var/log/auth.log
maxretry = 6

Here, let us see brief details of each entry.

  • enabled – This means that the ssh service protection is on. If you want to turn it off, just set to false.
  • port – SSH service port
  • filter – It refers to the config file containing the rules that Fail2Ban uses to find matches. By default, it is set to sshd that refers to /etc/fail2ban/filter.d/sshd.conf file.
  • logpath – The log file for failed login attempts.
  • maxretry – Number of incorrect login attempts before a host is blocked by Fail2Ban.

Once you have changed the configuration, restart Fail2Ban service to save the changes:

systemctl restart fail2ban

Or,

service fail2ban restart

You can verify the rules that added by Fail2Ban in iptables using the following command:

iptables -L

Sample output:

Chain INPUT (policy ACCEPT)
target     prot opt source               destination         
f2b-sshd   tcp  --  anywhere             anywhere             multiport dports ssh
ACCEPT     all  --  anywhere             anywhere             ctstate RELATED,ESTABLISHED
ACCEPT     all  --  anywhere             anywhere            
INPUT_direct  all  --  anywhere             anywhere            
INPUT_ZONES_SOURCE  all  --  anywhere             anywhere            
INPUT_ZONES  all  --  anywhere             anywhere            
ACCEPT     icmp --  anywhere             anywhere            
REJECT     all  --  anywhere             anywhere             reject-with icmp-host-prohibited
[...]

Testing Fail2Ban

I am going to try some random failed attempts from my local client to my Fail2Ban server.

Then, I verified the failed login attempts in the /var/log/fail2ban.log file:

cat /var/log/fail2ban.log

Sample output:

2015-07-13 15:38:15,480 fail2ban.filter         [11792]: INFO    [sshd] Found 192.168.1.100
2015-07-13 15:38:15,482 fail2ban.filter         [11792]: INFO    [sshd] Found 192.168.1.100
2015-07-13 15:38:15,483 fail2ban.filter         [11792]: INFO    [sshd] Found 192.168.1.100
2015-07-13 15:38:15,485 fail2ban.filter         [11792]: INFO    [sshd] Found 192.168.1.100
2015-07-13 15:38:15,487 fail2ban.filter         [11792]: INFO    [sshd] Found 192.168.1.100
2015-07-13 15:38:15,488 fail2ban.filter         [11792]: INFO    [sshd] Found 192.168.1.100
2015-07-13 15:38:15,490 fail2ban.filter         [11792]: INFO    [sshd] Found 192.168.1.100
2015-07-13 15:38:15,491 fail2ban.filter         [11792]: INFO    [sshd] Found 192.168.1.100
2015-07-13 15:38:15,492 fail2ban.filter         [11792]: INFO    [sshd] Found 192.168.1.100
2015-07-13 15:38:15,493 fail2ban.filter         [11792]: INFO    [sshd] Found 192.168.1.100
2015-07-13 15:38:15,495 fail2ban.filter         [11792]: INFO    [sshd] Found 192.168.1.100
2015-07-13 15:38:15,496 fail2ban.filter         [11792]: INFO    [sshd] Found 192.168.1.100
2015-07-13 15:38:16,234 fail2ban.actions        [11792]: NOTICE  [sshd] Ban 192.168.1.100

Or

iptables -L

Image may be NSFW.
Clik here to view.
Debian 7, 1 nic, internet, bridge, local repo [Running] - Oracle VM VirtualBox_004

As you seen in the above two outputs, my local IP 192.168.1.100 is banned by Fail2Ban.

Note: The banned IP address will removed after 600 seconds by default.

That’s it. Hope these tools will be useful to you somewhere.

Good luck!

The post Prevent Brute Force Attacks Using These Tools appeared first on Unixmen.

Install And Configure Bacula In Ubuntu 15.04

Image may be NSFW.
Clik here to view.


About Bacula

Bacula is an open source network backup solution that permits you to backup and restore the data from a local or a group of remote networked computers and vice versa. Bacula is very easy in terms of installation and configuration with many advanced storage management features.

In this tutorial, let us see how to install and configure Bacula on Ubuntu 15.04 server. Also, this will work on old Ubuntu versions, such as Ubuntu 14.10 and Ubuntu 14.04 etc.

My test box IP address is 192.168.1.102/24, and hostname is server.unixmen.local. Well, now let me get us into the tutorial.

Install Bacula

Bacula uses an SQL database to manage its information. We can use either MySQL or PostgreSQL database. In this tutorial, I use MySQL server.

First of all, update your Ubuntu server with command:

sudo apt-get update && sudo apt-get upgrade

Enter the following command to install MySQL server.

sudo apt-get install mysql-server

During MySQL installation, you’ll be asked to set the database administrator password. Enter the password and click Ok.

Image may be NSFW.
Clik here to view.
sk@server: ~_001

Re-enter the password:

Image may be NSFW.
Clik here to view.
sk@server: ~_002

Now, let us install bacula using the following command:

sudo apt-get install bacula-server bacula-client

By default, Bacula uses Postfix MTA. During installation, you’ll be asked to configure Postfix.

Click OK to continue.

Image may be NSFW.
Clik here to view.
sk@server: ~_003

Select ‘Internet Site’ and click Ok.

Image may be NSFW.
Clik here to view.
sk@server: ~_004

Enter server fully qualified name(FQDN):

Image may be NSFW.
Clik here to view.
sk@server: ~_005

Now, select Yes to configure database for Bacula with dbconfig-common.

Image may be NSFW.
Clik here to view.
sk@server: ~_006

Enter the MySQL database administrator password:

Image may be NSFW.
Clik here to view.
sk@server: ~_007

Set password for bacula-director-mysql to register with the database server.  If left blank, a random password will be generated.

Image may be NSFW.
Clik here to view.
sk@server: ~_008

Re-enter the password:

Image may be NSFW.
Clik here to view.
sk@server: ~_009

Done! We have successfully installed Bacula. It is time to create directories for backup and restore.

Create Backup and Restore Directories

Now, let us backup and restore directories.

sudo mkdir -p /mybackup/backup /mybackup/restore

Set permissions and ownership to the above directories:

sudo chown -R bacula:bacula /mybackup/
sudo chmod -R 700 /mybackup/

Configure Bacula

Bacula has many configuration files which we have to configure.

Update Bacula Director configuration:

sudo vi /etc/bacula/bacula-dir.conf

Find the following section, and update the restore path.

In our case, /mybackup/restore is the restore location.

[...]
Job {
  Name = "RestoreFiles"
  Type = Restore
  Client=server-fd
  FileSet="Full Set"
  Storage = File
  Pool = Default
  Messages = Standard
  Where = /mybackup/restore
}
[...]

Scroll down to “list of files to be backed up” section, and set the path of the directory to backup.

For example, I want to backup the “/home/sk” directory. So, I included this directory path in the “File” parameter.

[...]

#  By default this is defined to point to the Bacula binary
#    directory to give a reasonable FileSet to backup to
#    disk storage during initial testing.
#
    File = /home/sk
  }
[...]

Scroll down further, fins the section Exclude section. Set the list of directories to be excluded from the backup.

Here, I excluded the backup folder /mybackup directory from being backed up.

[...]

# If you backup the root directory, the following two excluded
#   files can be useful
#
  Exclude {
    File = /var/lib/bacula
    File = /nonexistant/path/to/file/archive/dir
    File = /proc
    File = /tmp
    File = /.journal
    File = /.fsck
    File = /mybackup
  }
}
[...]

Save and close file.

Update Bacula Storage Daemon settings:

Edit /etc/bacula/bacula-sd.conf file,

sudo vi /etc/bacula/bacula-sd.conf

Set the backup folder location. i.e /mybackup/backup in our case.

[...]

Device {
  Name = FileStorage
  Media Type = File
  Archive Device = /mybackup/backup
  LabelMedia = yes;                   # lets Bacula label unlabeled media
  Random Access = Yes;
  AutomaticMount = yes;               # when device opened, read it
  RemovableMedia = no;
  AlwaysOpen = no;
}
[...]

Now, check if all the configurations are valid as shown below.

If the commands displays nothing, the configuration changes are valid.

sudo bacula-dir -tc /etc/bacula/bacula-dir.conf
sudo bacula-sd -tc /etc/bacula/bacula-sd.conf

Once you done all the changes, restart all bacula services.

On Ubuntu 15.04:

sudo systemctl restart bacula-director
sudo systemctl restart bacula-fd
sudo systemctl restart bacula-sd

On Ubuntu 14.10 and previous versions:

sudo service bacula-director restart
sudo service bacula-fd restart
sudo service bacula-sd restart

That’s it. Now, bacula has been installed and configured successfully.

Manage Bacula Using Webmin

Managing and working with Bacula via command line might be bit difficult for some administrators. Thankfully, a web based Linux system administration tool called “Webmin” is available to get things much easier and faster.

Webmin is an open source, web based system administration tool for Unix/Linux. Using Webmin, you can setup and configure all services such as DNS, DHCP, Apache, NFS, and Samba etc via any modern web browsers. So, you don’t have to remember all commands or edit any configuration files manually.

Install Webmin On Ubuntu 15.04 using official repository

Add the webmin official repository:

Edit file /etc/apt/sources.list,

sudo vi /etc/apt/sources.list

Add the following lines:

deb http://download.webmin.com/download/repository sarge contrib
deb http://webmin.mirror.somersettechsolutions.co.uk/repository sarge contrib

Add the GPG key:

sudo wget http://www.webmin.com/jcameron-key.asc
sudo apt-key add jcameron-key.asc

Update the sources list:

sudo apt-get update

Install webmin using the following command:

sudo apt-get install webmin

Allow the webmin default port “10000” via firewall, if you want to access the webmin console from a remote system.

sudo ufw allow 10000

Access Webmin console

Open up your browser and navigate to the URL https://ip-address:10000/. The following screen should appear. Enter the user name and password to log in to webmin console.

Image may be NSFW.
Clik here to view.
Login to Webmin - Chromium_011

This is how my Webmin Dashboard looked.

Image may be NSFW.
Clik here to view.
Webmin 1.760 on server.unixmen.local (Ubuntu Linux 15.04) - Chromium_012

That’s it. Now you’ll be able to manage and configure your Ubuntu server graphically. Cheers!

Manage Bacula using Webmin

From the Bacula Dashboard, Go to the System tab on the left pane and click on the Module configuration link.

If it not found under System tab, search it from the unused modules section.

Image may be NSFW.
Clik here to view.
Webmin 1.760 on server.unixmen.local (Ubuntu Linux 15.04) - Chromium_013

The following screen should appear. Click “Module Configuration” tab.

Image may be NSFW.
Clik here to view.
Webmin 1.760 on server.unixmen.local (Ubuntu Linux 15.04) - Chromium_014

Select MySQL in the database section. Enter the MySQL database administrator password, and click Save button.

Image may be NSFW.
Clik here to view.
Webmin 1.760 on server.unixmen.local (Ubuntu Linux 15.04) - Chromium_015

That’s it. Now, you’ll be able to configure Bacula from webmin easily. Start adding backup clients, volumes and schedule the jobs.

Image may be NSFW.
Clik here to view.
Webmin 1.760 on server.unixmen.local (Ubuntu Linux 15.04) - Chromium_016

For more about Bacula installation and configuration, refer the Official documentation page.

Cheers!

Reference links:

The post Install And Configure Bacula In Ubuntu 15.04 appeared first on Unixmen.

How To Install ConfigServer Security And Firewall In Linux

Image may be NSFW.
Clik here to view.


About ConfigServer Security and Firewall

ConfigServer Security and Firewall, also known as CSF, is an opensource software firewall application. It is working based on iptables. CSF developed their own Straight-forward SPI iptables firewall script by Way to the Web Limited. And firewall configuration script created to provide better security for your server while giving you an easy to use, advanced interface for managing your firewall settings. CSF configures your server’s firewall to lock down public access to services and only allow certain connections, such as logging in to FTP, checking your email, or loading your websites.

Features

ConfigServer Firewall Provides,

  • Straight-forward SPI iptables firewall script ;
  • Daemon process checking ;
  • login authentication failures check (ssh, mail server, ftp & cpanel) ;
  • SSH & SU login notification ;
  • Alert for spam mail scripts ;
  • Suspicious process reporting ;
  • Excessive user processes reporting ;
  • Suspicious file reporting ;
  • BOGON packet protection ;
  • Port Scan tracking and blocking ;
  • Permanent and Temporary IP blocking ;
  • IPv6 Support with ip6tables ;
  • Permanent and Temporary IP allow ;
  • SYN Flood protection ;
  • IDS (Intrusion Detection System) ;
  • And more.

Install ConfigServer Firewall

In this article, we are going to explain about ConfigServer Security & Firewall (CSF) installation and configuration in Linux. I tested this in my Ubuntu 14.04 LTS server, but this installation procedure is common for all the Linux distribution.

Make sure you have installed the following perl modules. These modules are required for Statistical Graphs available from the csf UI. It is dependent on graphical libraries being installed for your OS (e.g. libgd, libpng, etc.) The Perl module itself can be installed as shown below.

On RedHat/CentOS/:

yum install perl-GDGraph perl-libwww-perl

On Debian/Ubuntu:

sudo apt-get install libgd-graph-perl libwww-perl

Now, download the latest CSF from the official download page.

cd /opt
sudo wget https://download.configserver.com/csf.tgz

Extract csf.tgz file using command:

sudo tar -zxvf csf.tgz

A word of caution: You should not run any other iptables firewall configuration script. For example, if you previously used APF(Advanced Policy Firewall)+BFD(Brute Force Detection) you can remove the combination (which you will need to do if you have them installed otherwise they will conflict):

Go to csf directory,

cd csf/

… and run the following command to APF and BFD:

sudo sh remove_apf_bfd.sh

Sample output:

Removing apf and/or bfd…

remove_apf_bfd.sh: 5: remove_apf_bfd.sh: apf: not found
remove_apf_bfd.sh: 11: remove_apf_bfd.sh: /sbin/chkconfig: not found
remove_apf_bfd.sh: 12: remove_apf_bfd.sh: /sbin/chkconfig: not found

As you see in the above output, I don’t have APF & BFD in my system.

Now, let us go further and install CSF using command:

sudo ./install.sh

Sample output:

Selecting installer...

Running csf generic installer

Installing generic csf and lfd

Check we're running as root

Checking Perl modules...mode of ‘os.pl’ changed from 0755 (rwxr-xr-x) to 0700 (rwx------)
Configuration modified for Debian/Ubuntu/Gentoo settings /etc/csf/csf.conf
ok

[....]

Don't forget to:
1. Configure the following options in the csf configuration to suite your server: TCP_*, UDP_*
2. Restart csf and lfd
3. Set TESTING to 0 once you're happy with the firewall, lfd will not run until you do so
‘lfd.sh’ -> ‘/etc/init.d/lfd’
‘csf.sh’ -> ‘/etc/init.d/csf’
mode of ‘/etc/init.d/lfd’ retained as 0755 (rwxr-xr-x)
mode of ‘/etc/init.d/csf’ retained as 0755 (rwxr-xr-x)
 Removing any system startup links for /etc/init.d/lfd ...
 Removing any system startup links for /etc/init.d/csf ...
 Adding system startup for /etc/init.d/lfd ...
 /etc/rc0.d/K20lfd -> ../init.d/lfd
 /etc/rc1.d/K20lfd -> ../init.d/lfd
 /etc/rc6.d/K20lfd -> ../init.d/lfd
 /etc/rc2.d/S80lfd -> ../init.d/lfd
 /etc/rc3.d/S80lfd -> ../init.d/lfd
 /etc/rc4.d/S80lfd -> ../init.d/lfd
 /etc/rc5.d/S80lfd -> ../init.d/lfd
 Adding system startup for /etc/init.d/csf ...
 /etc/rc0.d/K80csf -> ../init.d/csf
 /etc/rc1.d/K80csf -> ../init.d/csf
 /etc/rc6.d/K80csf -> ../init.d/csf
 /etc/rc2.d/S20csf -> ../init.d/csf
 /etc/rc3.d/S20csf -> ../init.d/csf
 /etc/rc4.d/S20csf -> ../init.d/csf
 /etc/rc5.d/S20csf -> ../init.d/csf
‘/etc/csf/csfwebmin.tgz’ -> ‘/usr/local/csf/csfwebmin.tgz’

Installation Completed

After installing CSF, you can safely remove the zip file and csf directory using command:

cd /opt/
sudo rm -Rf csf/ csf.tgz

Next, test whether you have the required iptables modules:

sudo perl /usr/local/csf/bin/csftest.pl

Sample output:

Testing ip_tables/iptable_filter...OK
Testing ipt_LOG...OK
Testing ipt_multiport/xt_multiport...OK
Testing ipt_REJECT...OK
Testing ipt_state/xt_state...OK
Testing ipt_limit/xt_limit...OK
Testing ipt_recent...OK
Testing xt_connlimit...OK
Testing ipt_owner/xt_owner...OK
Testing iptable_nat/ipt_REDIRECT...OK
Testing iptable_nat/ipt_DNAT...OK

RESULT: csf should function on this server

Cool. CSF should work in our server.

Configure CSF

Now, you should configure the TCP_IN, TCP_OUT, UDP_IN and UDP_OUT options in the csf configuration to suite your server.

To do that, edit.

sudo vi /etc/csf/csf.conf

Make the following changes:

[...]

# Allow incoming TCP ports
TCP_IN = "20,21,22,25,53,80,110,143,443,465,587,993,995"

# Allow outgoing TCP ports
TCP_OUT = "20,21,22,25,53,80,110,113,443,587,993,995"

# Allow incoming UDP ports
UDP_IN = "20,21,53"

# Allow outgoing UDP ports
# To allow outgoing traceroute add 33434:33523 to this list 
UDP_OUT = "20,21,53,113,123"

[...]

Go through the configuration file completely and make the changes as per your requirement. Once you made all changes, enable CSF, by changing the line TESTING=”1″ to TESTING=”0″ in the csf.conf file.

TESTING = "0"

Save and close the file.

Now, start CSF service as shown below.

chkconfig csf on
sudo service csf start

Note: You don’t have to run “chkcconfig” command in Debian/Ubuntu.

Sample output:

Starting csf:Flushing chain `INPUT'
Flushing chain `FORWARD'
Flushing chain `OUTPUT'
Flushing chain `PREROUTING'
Flushing chain `INPUT'
Flushing chain `OUTPUT'
Flushing chain `POSTROUTING'
Flushing chain `INPUT'
Flushing chain `FORWARD'
Flushing chain `OUTPUT'
Flushing chain `PREROUTING'
Flushing chain `INPUT'
Flushing chain `OUTPUT'
Flushing chain `POSTROUTING'
csf: FASTSTART loading DROP no logging (IPv4)
csf: FASTSTART loading DROP no logging (IPv6)

[...]
ACCEPT all opt -- in !lo out * 0.0.0.0/0 -> 0.0.0.0/0 ctstate RELATED,ESTABLISHED
ACCEPT all opt -- in * out !lo 0.0.0.0/0 -> 0.0.0.0/0 ctstate RELATED,ESTABLISHED
ACCEPT all opt in !lo out * ::/0 -> ::/0 ctstate RELATED,ESTABLISHED
ACCEPT all opt in * out !lo ::/0 -> ::/0 ctstate RELATED,ESTABLISHED
csf: FASTSTART loading TCP_IN (IPv4)
csf: FASTSTART loading TCP6_IN (IPv6)
csf: FASTSTART loading TCP_OUT (IPv4)
csf: FASTSTART loading TCP6_OUT (IPv6)
csf: FASTSTART loading UDP_IN (IPv4)
csf: FASTSTART loading UDP6_IN (IPv6)
csf: FASTSTART loading UDP_OUT (IPv4)
csf: FASTSTART loading UDP6_OUT (IPv6)
ACCEPT icmp opt -- in !lo out * 0.0.0.0/0 -> 0.0.0.0/0 icmptype 8 limit: avg 1/sec burst 5
ACCEPT icmp opt -- in * out !lo 0.0.0.0/0 -> 0.0.0.0/0 icmptype 0
ACCEPT icmp opt -- in * out !lo 0.0.0.0/0 -> 0.0.0.0/0 icmptype 8
ACCEPT icmp opt -- in !lo out * 0.0.0.0/0 -> 0.0.0.0/0 icmptype 0 limit: avg 1/sec burst 5
ACCEPT icmp opt -- in !lo out * 0.0.0.0/0 -> 0.0.0.0/0 icmptype 11
ACCEPT icmp opt -- in !lo out * 0.0.0.0/0 -> 0.0.0.0/0 icmptype 3
ACCEPT icmp opt -- in * out !lo 0.0.0.0/0 -> 0.0.0.0/0 icmptype 11
ACCEPT icmp opt -- in * out !lo 0.0.0.0/0 -> 0.0.0.0/0 icmptype 3
ACCEPT icmpv6 opt in !lo out * ::/0 -> ::/0 
ACCEPT icmpv6 opt in * out !lo ::/0 -> ::/0 
ACCEPT all opt -- in lo out * 0.0.0.0/0 -> 0.0.0.0/0 
ACCEPT all opt -- in * out lo 0.0.0.0/0 -> 0.0.0.0/0 
LOGDROPOUT all opt -- in * out !lo 0.0.0.0/0 -> 0.0.0.0/0 
LOGDROPIN all opt -- in !lo out * 0.0.0.0/0 -> 0.0.0.0/0 
ACCEPT all opt in lo out * ::/0 -> ::/0 
ACCEPT all opt in * out lo ::/0 -> ::/0 
LOGDROPOUT all opt in * out !lo ::/0 -> ::/0 
LOGDROPIN all opt in !lo out * ::/0 -> ::/0 
csf: FASTSTART loading DNS (IPv4)
csf: FASTSTART loading DNS (IPv6)
LOCALOUTPUT all opt -- in * out !lo 0.0.0.0/0 -> 0.0.0.0/0 
LOCALINPUT all opt -- in !lo out * 0.0.0.0/0 -> 0.0.0.0/0 
LOCALOUTPUT all opt in * out !lo ::/0 -> ::/0 
LOCALINPUT all opt in !lo out * ::/0 -> ::/0 
 Done

CSF Configuration has been done…!!

Next, we will discuss CSF configuration files and it’s usage.

CSF Configuration Files

You can view the csf command line options by using either:

man csf

Or

sudo csf -h

These options allow you to easily and quickly control and view csf.

All the configuration files for csf are in /etc/csf and include:

  • csf.conf: The main configuration file, it has helpful comments explaining what each option does ;
  • csf.allow: A list of IP’s and CIDR addresses that should always be allowed through the firewall ;
  • csf.deny: A list of IP’s and CIDR addresses that should never be allowed through the firewall ;
  • csf.ignore: A list of IP’s and CIDR addresses that lfd should ignore and not not block if detected ;
  • csf.*ignore: Various ignore files that list files, users, IP’s that lfd should ignore. See each file for their specific purpose and tax.

You should restart csf service if you made any changes in the configuration files.

To restart csf service, run:

sudo service csf restart

CSF Usage

Sample list of CSF Commands:
1. How to allow / whitelist an IP address?
sudo  csf -a 192.168.1.2

This will add IP address 192.168.1.2 in /etc/csf/csf.allow.

Restart the firewall after whitelisting the IP address.

2. How to remove a blocked IP address without adding to whitelist?
sudo csf -dr 192.168.1.5

This will remove the IP address 192.168.1.5 from deny list

3. How to block an IP address?
sudo csf -d 192.168.1.2 

This will add IP address 192.168.1.2 in /etc/csf/csf.deny.

4. How to check whether an IP is blocked by CSF?
sudo csf -g 192.168.1.2

The above command will show whether IP is blocked by CSF.

5. How to disable csf and lfd completely?
sudo csf -x
6. How to enable CSF firewall?
sudo csf -e
7. How to restart CSF firewall?
sudo csf -r
8. How to Flush CSF firewall?
sudo csf -f
9. How to remove an IP from csf allow list?
sudo csf -ar 192.168.1.2

This will remove IP address from /etc/csf/csf.allow.

That’s it. Start using ConfigServer Firewall and Security.

Cheers!

Reference links:

The post How To Install ConfigServer Security And Firewall In Linux appeared first on Unixmen.

Install OpenKM Document Management System In Ubuntu 15.04

Image may be NSFW.
Clik here to view.


About OpenKM

OpenKM is an Open Source, Web-based  DMS (Document Management System) that can be used as an alternative for commercial DMS solutions such as Sharepoint, Hummingbird and Documentum etc. It works well on multiple operating systems such as GNU Linux, WIndows, Mac OS X and Solaris.

OpenKM is available in three editions such as Community(Free), Cloud and Professional. You can find the detailed comparison of three versions here.

Why DMS?

As you might know, Small-Medium and Enterprises has lot of documents, images and other information electronic formats. One of the great time consumer on your organization is focused to end user information location.

DMS will help both enterprise and SME in-terms of the following criteria.

  • Reduced Storage compared to paper documents ;
  • Flexible Retrieving and Indexing ;
  • Fast and improved flexible search for documents ;
  • Security and Disaster Recovery ;
  • No loss of data and Digital Archiving ;
  • Controlled and Improved document distribution over E-mail, Web.

OpenKM Features

Believe me, OpenKM has lot of features than any other document management systems. The list of complete features is given below.

Please note that some of the features given below will not be available in Community and Cloud editions. You should upgrade to Professional edition to obtain the complete list of the below features.

  • Web-based Open Document Management System ;
  • Automatic key extraction ;
  • Thesaurus, categories, keyword cloud and metadata navigator ;
  • Integrated TWAIN scanner ;
  • OCR integration ;
  • Microsoft Office AddIns ;
  • OpenOffice Add On ;
  • AutoCAD preview ;
  • Watermark ( text – image ) ;
  • Digital signature ;
  • Generate new documents with wizard ( templates + forms ) ;
  • Cryptography ( encrypt and decrypt documents ) ;
  • Google Apps Synchronization ;
  • WebDAV ;
  • Workflow (jBPM ) ;
  • Mobile interface ( iPhone, Android, Blackberry, etc. ) ;
  • Programmable automatic cataloging ;
  • Complete activity log ;
  • Webservices API ;
  • Extensible frontend API ;
  • Integrated with LDAP and Active directory ;
  • Zonal OCR ;
  • Antivirus integration ;
  • Dicom preview ;
  • OpenMeetings integration ;
  • HTML Editor ;
  • Forum and Wiki ;
  • Zoho integration ;
  • Joomla explorer component ;
  • 2D barcode reader ;
  • CAS authentication ;
  • Expiration of documents ;
  • Dropbox integration ;
  • And more.

For the comprehensive list of features, check the following link.

Hardware and Software requirements

Like I said before, OpenKM can be installed on any operating system, including Linux, Windows, Mac OS X, etc. In order to install OpenKM you will need to install at least Java Development Kit 1.7 or higher. If you install the JRE alone, OpenKM will not run properly.

Concerning about hardware, OpenKM runs quite well on any computer with a common hardware configuration. It is recommended to have 2 GB RAM and a fast hard disk like SATA or better. A dual-core Intel based CPU with 3.20 GHz should be fine for a reduced community of users (30-50 concurrent users). Be sure to have enough disk space for the document repository and its versions.

Here is the complete details of hardware requirements.

OPENKM SMALL INSTALLATION:

With less than 25 user, repository size 10-60GB.

Minimum configuration:

  • 1GB – 2GB RAM
  • 1 – 2 Cores ( 1.86 GHz )
  • 30 – 180 GB SATA ( hard disk )

For better performance :

  • 2GB – 4GB RAM
OPENKM BASIC INSTALLATION:

With more than 50 users, repository size bigger than 150GB.

Minimum configuration:

  • 2GB – 4GB RAM
  • 2 – 4 Cores ( 2.2 GHz )
  • 250 – 500 GB SATA ( hard disk )

For better performance :

  • 4GB – 8GB RAM
  • SCSI or SATA hard disk
OPENKM MEDIUM INSTALLATION:

Between 100-300 users, repository size bigger than 500GB.

Minimum configuration:

  • 8GB – 16GB RAM
  • 8-16 Cores ( 3.6 GHz )
  • 1 TB SATA-2 ( hard disk )

For better performance :

  • SCSI hard disk or SAN
  • Recommended study
OPENKM BIG INSTALLATION:

More than 300 users, repository size bigger than 2 terabytes.

Minimum configuration:

  • 16GB RAM or more
  • 16 Cores ( 3.6 GHz ) or more
  • SAN ( high performance storage devices )

For better performance is needed study :

  • Document inserted in a minute.
  • Inserted documents typology.
  • Users typology ( creator, query users, etc. )
OPENKM ON A VIRTUALIZED SERVER:

With Less than 50 users, repository size 20-50GB.

  • 2GB RAM
  • 2 – 4 Cores ( 1.86 GHz )
  • 60-150 SATA hard disk.

A Linux host is a good choice because this OS handles heavy I/O applications like this quite well, and it is safe, secure, fast and very cheap too.

Well then, let us go and install openKM in our Ubuntu server.

Install OpenKM On Ubuntu

I tested OpenKM on Ubuntu 15.04 desktop and it worked like a charm. However, I can’t guarantee that this guide will work on other distributions, including other Ubuntu derivatives.

OpenKM requires java, so let us install it with the following command:

sudo apt-get install openjdk-8-jdk openjdk-8-jre

Check the installed Java version using command:

java -version

Sample output:

openjdk version "1.8.0_45-internal"
OpenJDK Runtime Environment (build 1.8.0_45-internal-b14)
OpenJDK 64-Bit Server VM (build 25.45-b02, mixed mode)

Now, download the latest OpenKM community version from here.

As of writing this tutorial, the latest version was 6.3.0.

wget http://sourceforge.net/projects/openkm/files/6.3/openkm-6.3.0-community-linux-x64-installer.run

Set executable permission to the downloaded installation file using command:

sudo chmod +x openkm-6.3.0-community-linux-x64-installer.run

Now run the following command to begin installation.

sudo ./openkm-6.3.0-community-linux-x64-installer.run

The following screen should appear. Click Forward to continue.

Image may be NSFW.
Clik here to view.
Setup_001

Accept the License Agreement and click Forward.

Image may be NSFW.
Clik here to view.
Setup_002

Select the installation directory and click Forward. I go with default selection.

Image may be NSFW.
Clik here to view.
Setup_003

Setup is now ready to begin installing on your computer. Click Forward to begin installation.

Image may be NSFW.
Clik here to view.
Setup_004

Please wait few minutes while Setup installs OpenKM on your system.

Image may be NSFW.
Clik here to view.
Setup_005

Click Finish to complete the setup.

Image may be NSFW.
Clik here to view.
Setup_006

Congratulations! Now, OpenKM has been installed successfully on your Ubuntu system.

You can access OpenKM using http://localhost:8080/OpenKM. Default user is “okmAdmin” with password “admin”.

OpenKM can be started from the Terminal by executing one of the following commands:

%INSTALLATION_DIR%/tomcat/bin/startup.sh

Or,

%INSTALLATION_DIR%/tomcat/bin/catalina.sh start

Access OpenKM Web Console

Click on Start OpenKM link either from your Dash or Menu. This will start the OpenKM service.

Or,

Enter the following command to start it from Terminal.

%INSTALLAION_DIR%/tomcat/bin/startup.sh

In my case, OpenKM installation path is /opt/openkm-6.3.0-community/. So I started the OpenKM service using the following command.

sudo /opt/openkm-6.3.0-community/tomcat/bin/startup.sh

Sample output:

Using CATALINA_BASE:   /opt/openkm-6.3.0-community/tomcat
Using CATALINA_HOME:   /opt/openkm-6.3.0-community/tomcat
Using CATALINA_TMPDIR: /opt/openkm-6.3.0-community/tomcat/temp
Using JRE_HOME:        /opt/openkm-6.3.0-community/java
Using CLASSPATH:       /opt/openkm-6.3.0-community/tomcat/bin/bootstrap.jar:/opt/openkm-6.3.0-community/tomcat/bin/tomcat-juli.jar
Using CATALINA_PID:    /opt/openkm-6.3.0-community/tomcat/catalina.pid
Tomcat started.

Now, Open up your web browser and access OpenKM using URL: http://localhost:8080/OpenKM. Enter the default username as “okmAdmin” with password“admin”.

Image may be NSFW.
Clik here to view.
OpenKM Login - Mozilla Firefox_007

This is how my OpenKM Administrator console looked.

Image may be NSFW.
Clik here to view.
OpenKM - Mozilla Firefox_008

From this administration console, you can create users, roles and assign roles to users, etc.

There are two important roles available, namely ROLE_ADMIN and ROLE_USER (these roles are case sensitive). All users must have either ROLE_USER or ROLE_ADMIN. This allows them to connect to the OpenKM server. Any user with ROLE_ADMIN will be able to view the whole repository without limits, and have the Administration tab enabled.

Access OpenKM Web Console From Remote Computers

By default, Tomcat only listens for connections on localhost. If you want to access OpenKM from other computers modify the file /opt/openkm-6.3.0-community/tomcat/conf/server.xml, adding the address=”0.0.0.0″ attribute to the Connector if it doesn’t already exist.

<Connector address="0.0.0.0" connectionTimeout="20000" port="8080" protocol="HTTP/1.1" redirectPort="8443"/>

For details about OpenKM administration, I suggest you to visit the OpenKM Documentation page. This page has many collection of useful manuals, including OpenKM Administration, user guides and migration guides etc. to getting started with OpenKM.

Uninstall OpenKM

To uninstall OpenKM, first you have to stop the OpenKM service.

sudo /opt/openkm-6.3.0-community/tomcat/bin/shutdown.sh

Sample output:

Using CATALINA_BASE:   /opt/openkm-6.3.0-community/tomcat
Using CATALINA_HOME:   /opt/openkm-6.3.0-community/tomcat
Using CATALINA_TMPDIR: /opt/openkm-6.3.0-community/tomcat/temp
Using JRE_HOME:        /opt/openkm-6.3.0-community/java
Using CLASSPATH:       /opt/openkm-6.3.0-community/tomcat/bin/bootstrap.jar:/opt/openkm-6.3.0-community/tomcat/bin/tomcat-juli.jar
Using CATALINA_PID:    /opt/openkm-6.3.0-community/tomcat/catalina.pid
Tomcat stopped.

As I mentioned before, /opt/openkm-6.3.0-community/ is my OpenKM installation directory.

So, to uninstall OpenKM, simply run the following command:

sudo /opt/openkm-6.3.0-community/uninstall

Click Yes to uninstall OpenKM.

Image may be NSFW.
Clik here to view.
Question_009

Now, all files including shortcuts of OpenKM will be deleted.

Image may be NSFW.
Clik here to view.
Setup_010

For more details, check the OpenKM Wiki page.

Further reading:

Reference Links:

The post Install OpenKM Document Management System In Ubuntu 15.04 appeared first on Unixmen.

Viewing all 457 articles
Browse latest View live