Quantcast
Channel: Unixmen » Linux Mint
Viewing all 457 articles
Browse latest View live

How To Setup A Local Gem Server In Ubuntu 14.04 LTS

$
0
0

Setup a Local Gem Server in Ubuntu 14.04 LTS

My Environment Setup:

Hostname       :       gem.unixlocal.com
IP Address      :       192.168.0.175
hostnamectl
ifconfig | grep inet

gem_srv_hostname

Step 1: Install ruby package:

First we need ruby package to work with gems.

Add the PPA repository and update the repo cache to get install ruby.

sudo apt-add-repository ppa:brightbox/ruby-ng-experimental
sudo apt-get update && sudo apt-get install ruby1.9.3

gem_srv_package
Check for the Ruby version using:

ruby -v

gem_srv_version

Step 2: Install & Configure Gem server:

Install any one of ruby gems and start to configure the gem Server.

sudo gem install aa

Here what ever Gems you need want to be pulled and stored here by manual, After that in future we can use these gems in client machines.

gem_srv_gem
Then start the Gem server using:

gem server --port 8808 --dir /var/lib/gems/1.9.1/ --bind 192.168.0.175 --no-daemon

gem_srv_run
Here is the explanation for above command.

gem server = start the gem server
–port = In which Port we need to run
–dir = which directory need to be used as gem repository to store and served.
–bind = Need to run in this address.
–no-daemon = dont need to be run as a daemon.

Step 3: Running in background:

If we need to run the gem server in background  while the server start-up we need to add a small script.

Create a Script file in any name:

vim gem.sh

Append the following gem server command in the created file:

gem server --port 8808 --dir /var/lib/gems/1.9.1/ --bind 192.168.0.175 --no-daemon &

Then save and exit using wq!.

Now to start it automatically when server up and running we need to add the created script file in the rc.local.

sudo vim /etc/rc.local

Append the created file location with sh to execute the command:

sh /home/unixadmin/gem.sh

save and quit rc.local using wq!

gem_srv_006

Step 4: Check Gem Server status:

Now the gem server used to run in the 192.168.1.51:8808, We can access the web interface using:

http://192.168.0.175:8808/

gem_srv_007

Step 5: Client side Configuration:

Create two files in under home directory and /etc/.

vim ~/.gemrc
vim /etc/gemrc

Add the below Content in above created files.

---
 :update_sources: true
 :sources:
 - http://192.168.0.175:8808/
 - http://gems.rubyforge.org/
 :benchmark: false
 :bulk_threshold: 1000
 :backtrace: false
 :verbose: true
 gem: --no-ri --no-rdoc
 install: --no-rdoc --no-ri
 update: --no-rdoc --no-r

gem_srv_008
Now When ever we try to install the gems for any project Gems will be served from 192.168.0.175 local server and it saves lot of time even hours.

To see the gem info navigate to http://192.168.0.175:8808/.

sudo gem install aa

gem_srv_009

To get every gems from local we have to pull and stored in gem server by manually, That’s it we have installed and setup-ed a local gem server for our home or office environment.


Advertise here with BSA

---------------------------------------------------------------------
How To Setup A Local Gem Server In Ubuntu 14.04 LTS


Lm-sensors: Monitoring CPU And System Hardware Temperature

$
0
0

It is very important to keep an eye on your system temperature. Because overheating may cause unexpected hardware failures. This brief tutorial describes how to monitor your CPU and other system hardware temperatures, fan speeds, and voltages using a command line utility called lm-sensors.

Installation

Lm-sensors will be available in the default repositories of most modern Linux operating systems.

On DEB based systems:

sudo apt-get install lm-sensors

On RPM based systems:

sudo yum install lm-sensors

Usage

After installing lm-sensors on your system, run the following command to determine which kernel modules you need to load to use lm_sensors most effectively. It is generally safe and recommended to accept the default answers to all questions, unless you know what you’re doing.

sudo sensors-detect

Sample output:

I go with default answers. Simply press Enter key to accept the default answers.

# sensors-detect revision 6170 (2013-05-20 21:25:22 +0200)
# System: Dell Inc. Inspiron N5050 [Not Specified] (laptop)
# Board: Dell Inc. 01HXXJ

This program will help you determine which kernel modules you need
to load to use lm_sensors most effectively. It is generally safe
and recommended to accept the default answers to all questions,
unless you know what you're doing.

Some south bridges, CPUs or memory controllers contain embedded sensors.
Do you want to scan for them? This is totally safe. (YES/no): 
Module cpuid loaded successfully.
Silicon Integrated Systems SIS5595...                       No
VIA VT82C686 Integrated Sensors...                          No
VIA VT8231 Integrated Sensors...                            No
AMD K8 thermal sensors...                                   No
AMD Family 10h thermal sensors...                           No
AMD Family 11h thermal sensors...                           No
AMD Family 12h and 14h thermal sensors...                   No
AMD Family 15h thermal sensors...                           No
AMD Family 15h power sensors...                             No
AMD Family 16h power sensors...                             No
Intel digital thermal sensor...                             Success!
    (driver `coretemp')
Intel AMB FB-DIMM thermal sensor...                         No
VIA C7 thermal sensor...                                    No
VIA Nano thermal sensor...                                  No

Some Super I/O chips contain embedded sensors. We have to write to
standard I/O ports to probe them. This is usually safe.
Do you want to scan for Super I/O sensors? (YES/no): 
Probing for Super-I/O at 0x2e/0x2f
Trying family `National Semiconductor/ITE'...               No
Trying family `SMSC'...                                     No
Trying family `VIA/Winbond/Nuvoton/Fintek'...               No
Trying family `ITE'...                                      No
Probing for Super-I/O at 0x4e/0x4f
Trying family `National Semiconductor/ITE'...               Yes
Found unknown chip with ID 0xfc11

Some hardware monitoring chips are accessible through the ISA I/O ports.
We have to write to arbitrary I/O ports to probe them. This is usually
safe though. Yes, you do have ISA I/O ports even if you do not have any
ISA slots! Do you want to scan the ISA I/O ports? (YES/no): 
Probing for `National Semiconductor LM78' at 0x290...       No
Probing for `National Semiconductor LM79' at 0x290...       No
Probing for `Winbond W83781D' at 0x290...                   No
Probing for `Winbond W83782D' at 0x290...                   No

Lastly, we can probe the I2C/SMBus adapters for connected hardware
monitoring devices. This is the most risky part, and while it works
reasonably well on most systems, it has been reported to cause trouble
on some systems.
Do you want to probe the I2C/SMBus adapters now? (YES/no): 
Using driver `i2c-i801' for device 0000:00:1f.3: Intel Cougar Point (PCH)
Module i2c-i801 loaded successfully.
Module i2c-dev loaded successfully.

Next adapter: i915 gmbus ssc (i2c-0)
Do you want to scan it? (yes/NO/selectively): 

Next adapter: i915 gmbus vga (i2c-1)
Do you want to scan it? (yes/NO/selectively): 

Next adapter: i915 gmbus panel (i2c-2)
Do you want to scan it? (yes/NO/selectively): 

Next adapter: i915 gmbus dpc (i2c-3)
Do you want to scan it? (yes/NO/selectively): 

Next adapter: i915 gmbus dpb (i2c-4)
Do you want to scan it? (yes/NO/selectively): 

Next adapter: i915 gmbus dpd (i2c-5)
Do you want to scan it? (yes/NO/selectively): 

Next adapter: DPDDC-B (i2c-6)
Do you want to scan it? (yes/NO/selectively): 

Now follows a summary of the probes I have just done.
Just press ENTER to continue: 

Driver `coretemp':
  * Chip `Intel digital thermal sensor' (confidence: 9)

To load everything that is needed, add this to /etc/modules:
#----cut here----
# Chip drivers
coretemp
#----cut here----
If you have some drivers built into your kernel, the list above will
contain too many modules. Skip the appropriate ones!

Do you want to add these lines automatically to /etc/modules? (yes/NO)

Unloading i2c-dev... OK
Unloading i2c-i801... OK
Unloading cpuid... OK

Next, run the following command to find the temperature.

sudo sensors

Sample output:

acpitz-virtual-0
Adapter: Virtual device
temp1:        +55.5°C  (crit = +84.0°C)

coretemp-isa-0000
Adapter: ISA adapter
Physical id 0:  +59.0°C  (high = +80.0°C, crit = +85.0°C)
Core 0:         +59.0°C  (high = +80.0°C, crit = +85.0°C)
Core 1:         +59.0°C  (high = +80.0°C, crit = +85.0°C)

As you in the above output, our system temperature is normal. Also, the output what is the higher and critical temperature. If you reached that critical level, It is recommended to take steps to reduce the temperature. Whether we shall power off the system or close/stop some running unwanted programs/processes if any.

If you’re using Laptop and having overheating issues, you might want to check the following article.

Displaying Temperature results in Fahrenheit

If you want to get the output in Fahrenheit instead of Celsius, use -f parameter.

Example:

sudo sensors -f

Sample output:

acpitz-virtual-0
Adapter: Virtual device
temp1:       +137.3°F  (crit = +183.2°F)

coretemp-isa-0000
Adapter: ISA adapter
Physical id 0: +141.8°F  (high = +176.0°F, crit = +185.0°F)
Core 0:        +141.8°F  (high = +176.0°F, crit = +185.0°F)
Core 1:        +140.0°F  (high = +176.0°F, crit = +185.0°F)

Use Lm-sensors plugins

Also, lm-sensors plugins are available for various desktop environments like GNOME, LXDE, XFCE. If you want to monitor your GUI desktop, you can download and install these plugins. These plugins can be installed via Synaptic package manager.

For example, to install plugin for XFCE desktop, open Synaptic package manager, search for XFCE4-sensors-plugin, and install it.

Synaptic Package Manager _001

For LXDE desktops, you can download and install sensors plugin here.

Want to check your hard disk temperature?

Install hddtemp package:

sudo apt-get install hddtemp

And, run the following command to find the temperature of your Hdd.

sudo hddtemp /dev/sda

Sample output:

/dev/sda: ST9500325AS: 41°C

Watching Temperature

To watch temperature values updating every two seconds, run the following command:

sudo watch sensors

Sample output:

sk@sk: ~_002

As you see in the above output, the temperature values will be updated after each 2 seconds.

That’s it. Cheers!

Lm-sensors homepage


Advertise here with BSA

---------------------------------------------------------------------
Lm-sensors: Monitoring CPU And System Hardware Temperature

An Introduction To Access Control Lists (ACL)

$
0
0

What Is Access Control List (ACL)

Access Control List (ACL) provides an additional, more flexible permission mechanism for file systems. ACLs allow you to provide different levels of access to files and folders for different users. It is designed to assist with UNIX file permissions. ACL allows you to give permissions for any user or group to any disc resource.

Prerequisites

Verify your Filesystem options

Before using ACL’s we must first verify that our filesystem has the ACL option enabled or Disable.

A common way to enable ACL support on a filesystem is to add the ACL option to a filesystems mount options in /etc/fstab. We can check if that has been done on this system by using the mount command. Now open the Terminal (Ctrl+Alt+T) and write the following command.

sudo su
mount | grep root
/dev/mapper/workstation-root on / type ext4 (rw,errors=remount-ro)

In this case the ACL option has not been added but that doesn’t mean our filesystem doesn’t have acl’s enabled. On most distributions the default filesystems have the ACL option as part of the default mount options.

Now you can check if your filesystems have ACL as part of the defaults by using the tune2fs command.

tune2fs -l /dev/mapper/workstation-root

Default mount options: user_xattr acl

As you can see on my test system the default mount options contain acl, in this case my filesystem will support acl’s even if I don’t specify it during the mount process. If your filesystem does not have acl as a default mount option, than you can add it during the mount process easily by editing the fstab file.

sudo mcedit /etc/fstab

Simply add the term acl to the mount options as shown below.

Before:

 /dev/mapper/workstation-root / ext4 errors=remount-ro 0 1

After:

 /dev/mapper/workstation-root / ext4 acl,errors=remount-ro 0 1

Once your fstab file is edited you can remount your filesystem with the mount command.

mount -o remount /
mount | grep root
/dev/mapper/workstation-root on / type ext4 (rw,acl,errors=remount-ro)

ACL Utilities

Now that your filesystem supports acl’s we must make sure that you have the acl utilities installed. My test machine is an Ubuntu server install so I will use the dpkg command.

dpkg --list | grep acl
 ii libacl1 2.2.51-5ubuntu1 Access control list shared library

Install ACL

sudo apt-get install acl

Now we check again, and it is installed.

dpkg --list | grep acl
 ii acl 2.2.51-5ubuntu1 Access control list utilities
 ii libacl1 2.2.51-5ubuntu1 Access control list shared library

Setting and Configure ACL’s with getfacl and setfacl command

Now that we have the utilities installed we can start using the setfacl and getfacl commands.

Setting ACL’s with setfacl

Now go to directory

cd /var/tmp/
ls -la | grep appdir
drwxrwxr-x 2 root appgroup 4096 May 27 10:45 appdir

To add these permissions we will use the setfacl command

setfacl -m g:testusers:r appdir/

Let’s break the command down a little bit.

-m

The -m option tells setfacl to modify the acl list for the specified directory.

g:testusers:r

This is actually the access control list that is being set. The first column is specifying g for group, the second column is the group name that I want the permissions to be set for and the last column is the permissions I want that group to have. In this case the read permission.

appdir/

This is the directory that I am setting the permissions on.

Checking the ACL list with getfacl

Once you’ve set the acl with setfacl it is common sense to check if it took effect, in order to do so you will need to use the getfacl command.

getfacl appdir/

Output

# file: appdir/
# owner: root 
# group: appgroup
user::rwx 
group::rwx
group:testusers:r--
mask::rwx
other::r-x

The output of getfacl is pretty self explanatory, you can see the rule that we added below the standard group entry.

Examples of Usages ACL

  • Removing all ACL entries from a file or directory
  • Set test users to have read access to all files in a directory
  • Set the same ACL changes recursively
  • Set the same ACL on all newly created files automatically
  • Set testuser1 to have read, write and execute access to the appuser1 directory
  • Set all users to have read, write and execute access to the shared directory
  • Remove the ACL for testuser1 on appuser1 directory

 Removing all acl entries from a file or directory

Before we start messing with ACL’s in my directory I want to clear out all of the acl’s it previously had. Doing this one by one can be a bit of a pain, its a good thing the setfacl command gives you the ability to remove all acl’s on a specified file or directory. This can be accomplished using the -b option of setfacl.

setfacl -b appdir/
getfacl appdir

Set testusers to have read access to all files in the appdir directory

This is a pretty basic acl, we want the testusers group to have read access to all files in the appdir directory.

setfacl -m g:testusers:r appdir/
getfacl appdir

Set testuser1 to have read, write and execute access to the appuser1 directory

While the user testuser1 is in the testusers group and has read access to the appuser1 directory he does not have write access. In this case we want to give him write access without giving the rest of the testusers write access. This can be done using acl’s by specifying a specific user rather than a group.

setfacl -m u:testuser1:rwx appdir/
getfacl appdir/

The user testuser1 can now create files in the appdir1 directory.

sudo -u testuser1 touch appdir/file2
ls -la appdir/file2
-rw-rw-r--+ 1 testuser1 testusers 0 May 27 12:17 appdir/file2

Set all users to have read, write and execute to the shared directory

We have now given users and groups permissions on directories and files, but what happens when we want all users to have access to a directory? Adding every users name or group could get tedious, in this case we can set the “other” or “world” permissions so that all users on a system can access this directory.

setfacl -m o::rwx shared
getfacl shared/

Another Method Setting ACL

Setting ACL With Example

To modify ACL use setfacl command. To add permissions use setfacl -m.

Add permissions to some user:

setfacl -m "u:username:permissions"

or

setfacl -m "u:uid:permissions"

Add permissions to some group:

setfacl -m "g:groupname:permissions"

or

setfacl -m "g:gid:permissions"

Remove all permissions:

setfacl -b

Remove each entry:

setfacl -x "entry"

To check permissions use:

getfacl filename

Examples

Set all permissions for user johor to file named “abc”:

setfacl -m "u:johor:rwx" abc

Check permissions

getfacl abc

Output

# file: abc
# owner: someone
# group: someone
user::rw-
user:johor:rwx
group::r-- mask::rwx
other::r--

Change permissions for user johor:

setfacl -m "u:johor:r-x" abc

Check permissions

getfacl abc

Output

# file: abc
# owner: someone
# group: someone
user::rw-
user:johor:r-x
group::r--
mask::r-x
other::r--

Remove all extended ACL entries:

setfacl -b abc

Check permissions

getfacl abc
# file: abc
# owner: someone
# group: someone
user::rw-
group::r--
other::r--

Enjoy!


Advertise here with BSA

---------------------------------------------------------------------
An Introduction To Access Control Lists (ACL)

Creating and Setting Up Your Own Forum Using phpBB

$
0
0

Introduction

phpBB is one of the most widely used free discussion board scripts. This free and very powerful application is easy to install and administer. It allows flexibility in terms of design and organization.

phpBB is a free flat-forum bulletin board software solution that can be used to stay in touch with a group of people or can power your entire website. You can create a very unique forum in minutes using the extensive database of user-created modifications and styles database containing hundreds of style and image packages.

phpBB is open source, licensed under Version 2 of the GNU GPL. True to its name, phpBB was written in the PHP programming language. phpBB 3.1 has the added benefit of being built upon the Symfony framework.

The objective of this article is to provide you with an understanding of installation and configuration of phpBB.

Features

  • Password Protected Forums
  • Mange Bookmarks & Subscriptions
  • Custom Profile Fields
  • Type-aware Parameter Handling and Database Layer
  • Posts/Reports Moderation Queue
  • Global Topics/Announcements
  • Manage Bans and Warnings
  • Group-based Memberlist Display
  • Multiple Attachments
  • and many.

Install phpBB on Ubuntu 14.10

System Requirements

phpBB requires certain technical requirements to be met for the store to operate properly. You should check to see that these server requirements are provided and installed on your web servers.

A webserver or web hosting account running on any major Operating System with support for PHP

A SQL database system, one of:

  • MySQL 3.23 or above (MySQLi supported)
  • MariaDB 5.1 or above
  • MS SQL Server 2000 or above (via ODBC)
  • MS SQL Server 2005 or above (via the native adapter, SQLSRV)
  • Oracle
  • PostgreSQL 8.3+
  • SQLite 2
  • SQLite 3

PHP 5.3.3+ (>=5.3.3, >6.0-dev (compatible)) with support for the database you intend to use.

  • getimagesize() function enabled

The following PHP modules are required.

  • json

The following PHP modules are optional, but will provide access to additional features

  • zlib Compression support
  • Remote FTP support

Step 1: Install Prerequisites

Here, we will use Apache web server with phpBB. Before get started install phpBB, you need to install a web server on Ubuntu (Apache, PHP, MySQL) called LAMP server, open terminal then running following commands:

sudo apt-get install lamp-server^

You may need to install some php5 libraries and unzip which handles .zip files on your VPS. You can install these libraries by running this simple command:

sudo apt-get install php5-gd imagemagick unzip

Step 2: Creating A MySQL Database & User

The next step is to create a database on the MySQL server for phpbbdb to store a shop’s data on.

Open the terminal and run this command to log in to MySQL server (use the MySQL password you have entered during the installation of the LAMP Server):

mysql -u root -p

Create a database for phpBB.

create database phpbbdb;

Create MySQL user administrator of phpbbdb.

create user adminphpbb;

Now Give user: admim123 a password

set password for 'phpbbdb' = password('admin123');

We will use this database information later when we are configuring OpenCart using the auto-installer.

Set  privileges adminphpbb to access database phpbbdb using this command:

grant all privileges on phpbbdbdb.* to adminphpbbdb@localhost

Now, Exit from MySQL server,by typing command:

FLUSH PRIVILEGES;
exit

Step 3: Downloading and unzipping phpBB archive

The latest version of phpBB is 3.1.3, released on 2015-02-01 can be downloaded from the phpBB website.

To download open the terminal and type in the following command:

wget https://www.phpbb.com/files/release/phpBB-3.1.3.zip

Now we will unzip this downloaded phpBB zip file in the current directory:

unzip phpBB-3.1.3.zip

We have to move the files & folders present in uploads folder into the root www folder.

sudo cp -R phpBB3/* /var/www/html/

You can now find all the core files & folders of phpBB directly sitting in your root www folder.

Move to the /var/www/html/ directory.

cd /var/www/html/

We will give the ownership of our phpBB files to the apache user by running the following command:

sudo chown www-data:www-data * -R

Add permissions for the group to the following directories and files.

sudo chmod 660 images/avatars/upload/ config.php
sudo chmod 770 store/ cache/ files/

Step 4: Web installation

With a new database freshly created, we are now ready to install phpBB directly onto a website. You should open up a web browser and enter in the web address of where they uploaded phpBB. You should be automatically greeted by the following page:

After checking the terms and conditions,  you should click on the Install tab.

You should have all the required packages already installed. Click Proceed to next step, then Start install.

The next page is Installation compatibility. The Start Install button is available at the bottom of the page.

Enter the database credentials, replacing the database name, username, and password with your own values.If you have correctly entered the database details you should see a successful database connection.

In this next step, you should set up your administrator username and password.

A confirmation that the user administrator was successfully created and  you should click on the Proceed to next step button. This will bring you to the  successful installation confirmation page.

Once you have installed phpBB, it is good practice and necessary from a security point of view to delete your install folder. We should be careful that only the install folder is to be deleted and not others folders. You can use the following command.

rm -rf /var/www/install/

and remove some permissions on the config.php file.

sudo chmod 640 /var/www/html/config.php

Now you can access your phpBB forum at your Droplet’s IP address http://your_server_ip/.

ca

Now that you have installed phpBB, you have a free alternative that will allow to build a successful online forum on your website.

The administrator of a board has many powers, including fine-tuning the board settings and managing users. You can find out more about administrators in the phpBB Administration Guide.

Enjoy!


Advertise here with BSA

---------------------------------------------------------------------
Creating and Setting Up Your Own Forum Using phpBB

How To Install LinOTP On Ubuntu 12.04 LTS

$
0
0

Security is very important nowadays especially if you run an online business want to deal with clients safely without them worrying about their account getting hacked or their cookies getting stolen. In this detailed tutorial we will show you how to install an opensource solution tool for two factor authentication.

Short Information On LinOTP

LinOTP is an opensource linux based solution to manage authentication devices for two-factor authentication with one time passwords. Being written in python programming language and open for everyone on github, it is easy to hack its code especially if you are a python developer and interested in some deep knowledge.

According to Wikipedia LinOTP provides a REST-like web API and return responses as JSON objects. Now lets go and install it on our Ubuntu 12.04 LTS systems.

Install LinOTP On Ubuntu

The first step needed to be taken to install LinOTP consists in  creating a MYSQL database so we need to make use of the following command to download and install mysql on our Ubuntu system.

sudo apt-get install mysql-server

Once the installation is finished you will be prompted to set the root’s user password for your database, which is a very important step as you will need this password later.

So make sure to not forget it!

Now log into MySQL using the following command.

mysql -u root -p

The following is showed on my console after running the above command successfully.

Execute the following sql code.

CREATE DATABASE LinOTP2;
GRANT ALL PRIVILEGES ON LinOTP2.* TO 'linotp2'@'localhost' IDENTIFIED BY 'ChangeThis';
FLUSH PRIVILEGES;

Once the execution of the above sql code is completed without errors you can exit the MySQL console with the help of the following command. Just a simple exit.

exit

Now we need to add LinOTP’s repository on our system so we can continue with the installation, but first make sure that the python-software-properties package is already installed as it will help us to add and use the repo. If not then you can install it by using the following command.

sudo apt-get install python-software-properties

It is already installed on my system.

Now use the following command to add the repository.

sudo add-apt-repository ppa:linotp/stable

Press Enter.

Update the repositories using the following command.

sudo apt-get update

To install LinOTP simply run the following command.

sudo apt-get install linotp

Type Y and press Enter.

Then you will be prompted some questions for the purpose of the configuration.

It is recommended that LinOTP can be run within a webserver like Apache, but for the purpose of this tutorial we will not cover Apache this time. Just select No.

LinOTP uses a SQL database to store its token data so you will be prompted with a question on what database you want to use. Select MySQL in our case.

You can also select none if you want to use another backend system like Microsoft SQL server or Oracle. After that you need to edit the /etc/linotp2/linotp.ini manually.

Then choose the hostname of the computer where the database is located. I will keep mine as localhost.

Enter the database name you created, mine is LinOTP2.

Leave the user as default.

Enter the password for the database.

Then once is all finished run the following command to complete the configuration.

sudo paster setup-app /etc/linotp2/linotp.ini

Run LinOTP

Open a new tab in you web browser and use the following syntax.

http://your_ip_or_localhost/manage

Done!


Advertise here with BSA

---------------------------------------------------------------------
How To Install LinOTP On Ubuntu 12.04 LTS

Tonido: A Free, Private Cloud And Streaming Media Server

$
0
0

What is Tonido?

Tonido is a cross platform, free application that allows you to access all files on your computer from a web browser, smartphone, tablet or even DLNA enabled devices. You can access your files from anywhere, and ofcourse you can share them to your friends, family, and colleagues as well. Additionally, you can create a secure private share that only authorized people are allowed to access them. As you’re the only person to access or share your files to others, you have a private and secure Cloud on your hand.

Also using Tonido, you can stream your Media such as Photos, Audios, and Videos to any devices on your network. Tonido will help you to sync files/folders on multiple systems. Tonido works great on almost all platforms and devices such as Linux, Windows, Mac, Raspberry Pi, QNAP and all major mobile phones and tablets including iPhone, iPad, Android, Windows Phone 8 and Blackberry. The good news is you’re free to customize Tonido and use your own logo, branding and Identity.

Installation

Tonido comes in two flavours. Free for SOHO users, and Paid for Enterprise. In this tutorial, We will test the free version in Ubuntu 14.04. You can install Tonido on other Linux platforms such as Fedora, RHEL, CentOS, OpenSUSE, Arch Linux, and Mepis. Find the detailed installation instructions here.

After downloading it, create working directory for Tonido.

sudo mkdir /usr/local/tonido

Go to that directory, and download the free version from the Tonido official download page.

cd /usr/local/tonido/
sudo wget http://www.tonido.com/download.php?tonido64.tar.gz

Extract the tar file.

sudo tar -zxvf tonido64.tar.gz

Now, run Tonido using command:

sudo ./tonido.sh start

Tonido Configuration

After starting Tonido, open your web browser and navigate to http://127.0.0.1:10001/. The following screen should appear.

We have to create a local account now. Enter the account name of your choice, account password, and email Id.

Tonido - Mozilla Firefox_002

Your remote access server URL will be created now. This URL will look like: http://<account-name>.tonido.com.

Tonido | skostechnix - Mozilla Firefox_003

Select the folders that can be accessed remotely via Tonido. You can change this settings later.

Tonido | skostechnix - Mozilla Firefox_005

Select the folders to index your Music, Photos and Video collection.

Tonido | skostechnix - Mozilla Firefox_008

Install the mobile apps for iOS, Android, Windows Phone and get seamless access to all your files, music, photos and videos.

Finally, click Close.

Tonido | skostechnix - Mozilla Firefox_009

Now, you’ll be redirected to your Tonido dashboard.

Tonido | skostechnix - Mozilla Firefox_010

From here, you can store your files/folders, and share them to others if you want.

Adding Media Files

You can add any kind of files like audio/video or images of your choice.

For example, we will add a video file. To do that click on the Videos button on the left.

Select the folder which contains the media files. Once you have selected the folders, click on the Index now button.

Tonido | skostechnix - Mozilla Firefox_017

Wait for minutes to index all media files. Then, have fun.

Playing music files:

Tonido | skostechnix - Mozilla Firefox_018

Playing Video files:

Tonido | skostechnix - Mozilla Firefox_019

Sharing Files

You can share files/folders to your friends, family, and colleagues or to a particular person. To do that, go to Shared files section, and select the folder you want to share.

Tonido | skostechnix - Mozilla Firefox_020

Also, you can share this folder to a particular person.

Selection_021

Sync Files/Folders

If you want to sync files/folders to multiple systems, you can install the Tonido sync tool. To do that, click the Account name drop-down box, and select Tonido Sync. As I want to use this on my desktop, I selected the Desktop application.

Menu_011

You’ll be redirected to the Tonido sync download page. Select and download the Sync app depending upon your device. For me, I downloaded and installed the desktop version.

Package Installer - tonidosync_012

Launch Tonido sync either from the Menu or Unity Dash. Select the folders you want to sync.

Headless Server Configuration

If you are running Tonido on a system without display, you will need to follow the steps below to setup Tonido correctly. First, you will have to change a config setting to create a profile remotely.

Do the following:

  1. Start Tonido first by running the tonidoconsole binary to let it initialize the config data. Stop Tonido.
  2. Navigate to the following location: ~/tonido/data
  3. Open the configex.xml file
  4. Find the following lines.
<rowentry>
 <name>WebAccess</name>
 <type>string</type>
 <value>local</value>
</rowentry>
<rowentry>
 <name>RemoteAdmin</name>
 <type>bool</type>
 <value>0</value>
</rowentry>
Change them To:
<rowentry>
 <name>WebAccess</name>
 <type>string</type>
 <value>all</value>
</rowentry>
<rowentry>
 <name>RemoteAdmin</name>
 <type>bool</type>
 <value>1</value>
</rowentry>
Save and close the file.

Start Tonido as a service in Ubuntu

Go to /etc/init.d directory. Create a new script as shown below.

sudo vi tonido_service.sh
Copy and paste the lines below into the new script.
#!/bin/bash
su <user> -c "bash -c ' /usr/local/tonido.sh $1'"
Replace the “<user>” with your own user account. Save and close the script.
Assign appropriate permission to the script.
sudo chmod 777 ./tonido_service.sh
Make the service script to run as service at every boot.
sudo update-rc.d tonido_service.sh defaults
To remove the tonido_service.sh script:
sudo update-rc.d tonido_service.sh remove
To start the script.
sudo service tonido_service.sh start
That’s it. Your private cloud and streaming media server is ready to use. For details, I suggest you to read the comprehensive usage guide from Tonido site.
Good day.

Advertise here with BSA

---------------------------------------------------------------------
Tonido: A Free, Private Cloud And Streaming Media Server

Remove The Password Of A Password Protected PDF Files

$
0
0

This brief tutorial describes how to remove the password protection from the PDF files. Please note that we are not going to hack or crack the password of PDF file. Instead, we just remove the known password of the PDF file using qpdf application from Terminal. It is really easy and fun. Let us get started.

What is Qpdf?

From the man pages,

The  qpdf program is used to convert one PDF file to another equivalent PDF file. It is capable of performing a variety of transformations such as linearization (also known as web optimization or fast web viewing), encryption, and decryption of PDF files. It also has many  options for inspecting or checking PDF files, some of which are useful primarily to PDF developers

Install Qpdf

Install Qpdf in Debian based system using command:

sudo apt-get install qpdf

In RPM based systems, we can install it using command:

sudo yum install qpdf

Remove Password Protection from PDF file

I have a password protected PDF file in my home folder, and I know the password. Be mindful that you should have your PDF file password. Otherwise, you can’t remove the password protection using this method.

My password protected PDF file name is password.pdf.

When opening the pdf file, It asks me to enter the password.

password.pdf — Password Required_001

Ofcourse, I know the password ,and I can easily open it using the password. But I really don’t want password protection.

Using the following command, I am going to remove the password from the password.pdf file, and save it with a name nopassword.pdf in the home directory.

qpdf --password='mypassword' --decrypt password.pdf nopassword.pdf

Done!

Then, I opened the PDF file, It didn’t ask to enter the password. Very easy, isn’t it?

For more details about Qpdf, I suggest you to read the Qpdf manual.

That’s it. happy weekend!


Advertise here with BSA

---------------------------------------------------------------------
Remove The Password Of A Password Protected PDF Files

Install Sublime Text 3 On Linux [Quick Tip]

$
0
0

Sublime Text is one of the text editors I love so much. switching over Linux distributions,  I find it difficult sometimes installing it on some distros. Recently it was Fedora 21. Yes I know Fedy can be used to install Sublime Text 3 but it failed this time round.

I came across Simone Vittori’s post about how to install sublime on any distro thanks to his script.

To install open Terminal and run the command below:

curl -L git.io/sublimetext | sh
➜ ~ curl -L git.io/sublimetext | sh
 % Total % Received % Xferd Average Speed Time Time Time Current
 Dload Upload Total Spent Left Speed
 0 0 0 0 0 0 0 0 --:--:-- 0:00:03 --:--:-- 0
 0 0 0 0 0 0 0 0 --:--:-- 0:00:05 --:--:-- 0
 100 1286 100 1286 0 0 198 0 0:00:06 0:00:06 --:--:-- 1427
 % Total % Received % Xferd Average Speed Time Time Time Current
 Dload Upload Total Spent Left Speed
 100 7380k 100 7380k 0 0 289k 0 0:00:25 0:00:25 --:--:-- 457k
 [sudo] password for seth:
 % Total % Received % Xferd Average Speed Time Time Time Current
 Dload Upload Total Spent Left Speed
 100 170k 100 170k 0 0 57142 0 0:00:03 0:00:03 --:--:-- 57160
Sublime Text 3 installed successfully!
Run with: subl

You should see Sublime Text 3 (Build 3065) installed now.

Credit


Advertise here with BSA

---------------------------------------------------------------------
Install Sublime Text 3 On Linux [Quick Tip]


Install VMware Tools On Linux

$
0
0

This method should work on ESXi/Vsphere/Vmware Workstation. Please follow the following instructions, It is same for installing vmware tools for linux.

How to install VMware Tools in a CentOS Guest

First, you must select option for Install/Upgrade Tools in your eSXI./Vshere/Vmware Workstation  To this,
Right click on virtual machine→ Guest Menu → Install/Upgrade Vmware Tools.

For Fusion: Virtual Machine > Install VMware Tools.
For Workstation: VM > Install VMware Tools.
For Player: Player > Manage > Install VMware Tools.

vmware

install Development tools first

CentOS:

yum groupinstall "Development Tools"

Ubuntu:

apt-get install build-essential linux-headers-$(uname -r)

Now, copy and paste the following commands in your terminal:

mkdir /mnt/cdrom
mount /dev/cdrom /mnt/cdrom
cp /mnt/cdrom/VMwareTools-*.tar.gz /tmp
umount /mnt/cdrom
tar zxf /tmp/VMwareTools*.tar.gz -C /tmp
cd /tmp/vmware-tools-distrib/
./vmware-install.pl –default

Please  follow  the instructions one by one.

Now,

Remove the installation files

rm f /tmp/VMwareTools*.tar.gz
rm -rf /tmp/vmware-tools-distrib

Done!


Advertise here with BSA

---------------------------------------------------------------------
Install VMware Tools On Linux

VeraCrypt: Secure Your Data On An Encrypted Volume

$
0
0

Introduction

As you may know, CIA, Confidentiality/Integrity/Availability, is the main key elements of Information Security. The main Job of a System Administrator/Security expert is to protect the data from unauthorized access, use, disclosure, disruption, destruction, and modification. There are n number of tools and methods are available out there to secure your data. The one we will discuss today is VeraCrypt.

VeraCrypt is a free disk encryption software. It is based on TrueCrypt, and solves many vulnerabilities and security issues found in TrueCrypt. Using VeraCrypt anyone can make an encrypted volume. Whenever you store data in VeraCrypt volume, the data will automatically be encrypted before it is saved, and decrypted after it is loaded, without any user intervention. Nobody can steal/read/edit your data on the encrypted volume without using the correct password/keyfile(s) or correct encryption keys. The entire filesystem will be encrypted including file names, folder names, contents of every file, free space, meta data, etc.

You can store files on VeraCrypt volumes as the way you do in normal volumes. Data that are being written on VeraCrypt volumes will be encrypted automatically, and data that are being copied or read from the encrypted volumes will be decrypted automatically. Once you unmount the VeraCrypt vloume, the data are inaccessible and encrypted. To access the data, you should mount the VeraCrypt volume with the correct password and/or keyfile. VeraCrypt is completely free for use, and it works well on GNU/Linux, Windows, and Mac OS X.

In this tutorial, we will see how to create a encrypted volume in local and external drive. This guide is tested on Ubuntu 14.04, and is worked for me as explained.

Installation

Download the latest version from the VeraCrypt download page.

Extract the tar file using command:

tar -xjvf veracrypt-1.0f-1-setup.tar.bz2

The above command will extract and save the files in the current directory. typically, there will be for files. Two files for command-line installation(x86 & x64 bit), and two files for GUI mode installation. I am going to install the 64bit version GUI file.

You will see the following screen. Click Install Veracrypt.

xmessage_001

Accept the license agreement.

xmessage_002

Click OK to continue.

xmessage_003

Finally press Enter to exit and complete the installation.

VeraCrypt Setup_004

We have successfully installed VeraCrypt. Let us see how to use and encrypt a volume.

1. Creating VeraCrypt Container

In this method, we will create an encrypted container inside a file. Let us see how to do it.

Launch it either from the Menu or Dash. VeraCrypt interface will look like below.

Click Create Volume.

 VeraCrypt_001

Select Create an encrypted container option.

VeraCrypt Volume Creation Wizard_002

Select Standard VeraCrypt volume.

VeraCrypt Volume Creation Wizard_003

Next, you have to specify where you want to store the encrypted volume. In my case, I created a folder called “Encrypted” in my Home folder. So, I am going to use the folder to create and mount VeraCrypt volume. Also, you have to name the file container.

VeraCrypt Volume Creation Wizard_004

Specify a New VeraCrypt Volume_005

Click Next after selecting the Volume location.

VeraCrypt Volume Creation Wizard_006

Select the Encryption Algorithm. You can choose any algorithm type. I will go with default selected encryption algorithm.

VeraCrypt Volume Creation Wizard_010

Specify the size of the container in KB, MB, or GB.

VeraCrypt Volume Creation Wizard_007

Now, we reached the important part. You should enter a strong a password consisting of minimum 20 characters, and maximum 64 characters. The password must contain a random combination of lower/upper case letters, numbers, and special characters.

VeraCrypt Volume Creation Wizard_011

Now, you have to choose any one of the option. If you want to store files larger than 4GB or less than 4GB. I will go with first option.

VeraCrypt Volume Creation Wizard_008

Select the file system.

VeraCrypt Volume Creation Wizard_012

Move your mouse pointer as randomly as possible within the following window atleast 30 seconds. This significantly increases the cryptographic strength of the encryption keys. The longer you move it, the better.

VeraCrypt Volume Creation Wizard_013

I did this for 50 seconds. Finally, click Format.

VeraCrypt Volume Creation Wizard_014

The format process will take few minutes depending upon the size.

Finally, you will see a successful installation completed wizard. Click Ok.

VeraCrypt_015

If you wish to create another volume, click Next, else click Exit.

VeraCrypt Volume Creation Wizard_016

That’s it. We successfully created the Volume. We will see how to mount and dismount it.

Mount/Dismount Volumes

Once you created the encrypted volumes, go back to the main window of VeraCrypt. Select a slot, browser to the file container location, and click Mount.

VeraCrypt_009

Enter your VeraCrypt password.

Enter password for "-home-sk-Encrypted-My Encrypted Volume"_010

Then, enter your root user password of your local system.

Administrator privileges required_011

Voila! The virtual drive has been created and mounted.

VeraCrypt_012

You can check it on your file manager too.

Selection_013

Now, you can use this virtual disk as the way you use a normal volume. Store the highly confidential data in the VeraCrypt volume and be relax. Nobody can steal your data without the correct password or/and keyfile(s).

To dismount the volume, click on the Dismount button on the VeraCrypt main interface.

VeraCrypt_014

Now, your volume will be dismounted. You or anyone no longer can access the volume. The data stored in the volume is inaccessible, safe and encrypted.

What we have seen so far is just a created a file in our local hard disk, and mount the encrypted volume on it. The second part describes how to make an encrypted volume on external drives like USB thumb drive.

2. Create Encrypted Partition/Drive

This is method is quite same as above, but with some little changes.

Launch VeraCrypt either from the Menu or Dash.

Now, Plug your USB drive, and make sure there aren’t any important data on it.

Click Create Volume.

VeraCrypt_005

Select Create a volume within a partition/drive option and click Next.

VeraCrypt Volume Creation Wizard_006

We have to choose whether you want to create a standard or Hidden veracrypt volume. I will go with default option. So I selected the first option: Standard VeraCrypt volume.

VeraCrypt Volume Creation Wizard_007

Now, select your device that you want to encrypt.

In my case, I selected my USB drive. And, make sure “Never save history” option is checked.

VeraCrypt Volume Creation Wizard_008

You may now be asked to enter your root user password.

Administrator privileges required_009

Select the Encryption Algorithm. You can choose any algorithm type. I will go with default selected encryption algorithm.

VeraCrypt Volume Creation Wizard_010

Now, we reached the important part. You should enter a strong a password consisting of minimum 20 characters, and maximum 64 characters. The password must contain a random combination of lower/upper case letters, numbers, and special characters.

VeraCrypt Volume Creation Wizard_011

Select the file system.

VeraCrypt Volume Creation Wizard_012

Move your mouse pointer as randomly as possible within the following window atleast 30 seconds. This significantly increases the cryptographic strength of the encryption keys. The longer you move it, the better.

VeraCrypt Volume Creation Wizard_013

I did this for 50 seconds. Finally, click Format.

VeraCrypt Volume Creation Wizard_014

The format process will take few minutes depending upon the size.

Finally, you will see a successful installation completed wizard. Click Ok.

VeraCrypt_015

If you wish to create another volume, click Next, else click Exit.

VeraCrypt Volume Creation Wizard_016

Mount/Dismount Volumes

Once you created the encrypted volumes, go back to the main window of VeraCrypt, select a slot and click Mount.

VeraCrypt_020

Enter the password.

Enter password for "-dev-sdb1"_021

After that, you’ll see the USB drive is mounted.

VeraCrypt_022

Now, open your file manager, and start using the encrypted volumes.

To dismount the volume, simply click on the Dismount in the VeraCrypt main window.

VeraCrypt_025

Uninstallation

If you not satisfy with VeraCrypt, you can uninstall it using command:

sudo /usr/bin/veracrypt-uninstall.sh

For more detailed usage details, refer the official VeraCrypt Documentation.

Conclusion

We have seen how to install VeraCrypt on Ubuntu and create encrypted volumes, and unmount them when not used. As far as I know, VeraCrypt is a must have and useful tool if you’re having some confidential data. Try and find yourself. You won’t be disappointed.

Cheers!


Advertise here with BSA

---------------------------------------------------------------------
VeraCrypt: Secure Your Data On An Encrypted Volume

How To Install Mumble Server On Ubuntu

$
0
0

What is Mumble Server?

Mumble is an open source, low-latency, high quality voice chat software. Mumble is a voice over IP (VoIP) application primarily designed for use by gamers, similar to programs such as TeamSpeak and Ventrilo. Mumble uses a client–server architecture which allows users to talk to each other via the same server.

Step 1

Now open the Terminal or Press (Ctrl+Alt+T). After that follow this command one by one.

sudo apt-get update
sudo apt-get upgrade

If will be asked to confirm installing any packages. Type Y and press Enter.

Step 2

Now Install Mumble Server.

sudo apt-get install mumble-server

Then install Mumble Client.

sudo apt-get install mumble

Step 3

After the installation is complete, you will run the package reconfiguration command to create some basic server and user settings.

sudo dpkg-reconfigure mumble-server
You can use your arrow keys to select your answer, then press Enter to continue.

Image 1

you will accept the default value of Yes because we want Mumble-Server to run when the server boots.

Image 2

Even if this will be a dedicated Mumble-Server, Now select Yes since this will ensure the lowest possible latency.

Mumble SuperUser Password

SuperUser is the highest-level administrative account for the server. You’ll need to log in to Mumble with this user when you want to manage the server.

Image 3

Type a password, press Tab to select Ok, and press Enter.

Step 4

Advanced Configuration

Now you will need to edit some configuration file. Open terminal then type the command.

sudo mcedit /etc/mumble-server.ini

There Just enable some command. To enable some of these settings, you will have to remove the preceding (#) character. This is referred to as un-commenting the line. Lines that start with # are not processed by the server.

1. autobanAttempts, autobanTimeframe, autobanTime,welcometext,

host,bandwidth,users,textmessagelenth,imagemessagelenght,allowhtml,

registername,registerURL (#) removed the character before this line.

When done everything. Then Click Esc button two time and select save.

Now restart Mumble-Server.

sudo service mumble-server restart

Step 5

Now connect to your Mumble Server. Open the Mumble client on your computer. 

Image 4

When Click Connect then show the audio tunning wizard. After that setting your audio tunning. Click Next Button.

Image 5

Now Add new User in the Server.

Image 6
Click Add new Button.

Image 7
Enter the information for your Mumble server. The address can be a host name or the IP address of your server. If you did not use a custom port, it will be the default port of 64738. Click OK to save settings.
Example: Your IP address like this:  192.168.10.100.
Now select your own server name and Click Connect.

Image 8
You will get the message Connected once you are successfully connected.

image 8
Now Enjoy!!!


Advertise here with BSA

---------------------------------------------------------------------
How To Install Mumble Server On Ubuntu

Linux Basics: How To Check The State Of A Network Interface Card

$
0
0

Normally, we can easily check the state of a network interface card like whether the cable plugged in to the slot or the network card is up or down in Graphical mode. What if you have only command line mode? Ofcourse, you can turn around the system and check for the cable is properly plugged in, or you can do the same easily from your Terminal. Here is how to do that. This method is almost same for Debian and RPM based systems.

Check Network Card State

I have two ethernet cards on my laptop. One, eth0,  is wired, And another, wlan0, is wireless.

Let us check the state of the eth0.

cat /sys/class/net/eth0/carrier

Sample output:

0

Or, use the following command to check the status.

cat /sys/class/net/eth0/operstate

Sample output:

down

As you see in the above results, the NIC is down or cable is not connected.

Let me plug a network cable to the eth0 slot, and check again.

After plugged in the cable, I executed the above commands:

cat /sys/class/net/eth0/carrier

Sample output:

1

Or,

cat /sys/class/net/eth0/operstate

Sample output:

up

Voila, the eth0 is up or the cable is connected to eth0.

Be mindful, it doesn’t mean that the IP address has been assigned to the eth0. The cable is just connected to that slot. That’s all.

Let us check for the wlan0 state.

cat /sys/class/net/wlan0/carrier

Sample output:

1

The result is 1, which means the wlan0 is up and connected.

Or,

cat /sys/class/net/wlan0/operstate

Sample output:

up

Likewise, you can check all the network cards on your machine.

Cheers!


Advertise here with BSA

---------------------------------------------------------------------
Linux Basics: How To Check The State Of A Network Interface Card

How To Send Alerts From Nagios Core Using Gmail And Yahoo

$
0
0

Introduction

One of the most important feature of the monitoring platform is the notification system; by default  they use the local mail daemon (postfix,mail,exim) installed on the server to send the notifications.

Using local mail daemon has many issues :

  • You need to install and configure your smtp server.
  • Maybe your mail server go down so you can’t receive the alert.
  • Maybe this kind of emails from a not verified source like nagios can be filtered by the same company antispam system.

In order to avoid all issues, In this article I am going to explain how to send alert from monitoring tool Nagios Core using an external smtp server with authentication like Gmail and Yahoo.

This task was not so easy since communicating with Gmail through a linux server was requiring permissions and certifications but with sendEmail you can do it easily.

Installation and Configuration Of SendEmail

SendEmail is an email program for sending SMTP mail from a command line. SendEmail is a lightweight program written in Perl and is unique in that it requires NO MODULES. It has an intuitive and flexible set of command-line options, making it very easy to learn and use.

SendEmail is licensed under the GNU GPL and supported many platforms like: Linux, BSD, OS X, Windows 98, Windows NT, Windows 2000, & Windows XP

System Requirements

SendEmail requires certain technical requirements to be met for the store to operate properly. You should check to see that these server requirements are provided and installed on your monitoring servers.

The following commands should be run as root user privileges.

To install those requirements use this command:

On Ubuntu:

apt-get install libio-socket-ssl-perl libnet-ssleay-perl perl

On CentOS:

yum install libio-socket-ssl-perl libnet-ssleay-perl perl

In order to send email via gmail you also need additional libraries “Net::SSLeay” and “IO::Socket::SSL” which are needed for authentication.

To install those libraries use this command:

On Ubuntu:

apt-get install 'perl(Net::SSLeay)' 'perl(IO::Socket::SSL)'

On CentOS:

yum install 'perl(Net::SSLeay)' 'perl(IO::Socket::SSL)'

Download and Installation of sendEmail

In order to start the installation , download the sendEmail tar archive:

wget http://caspian.dotconf.net/menu/Software/SendEmail/sendEmail-v1.56.tar.gz

Then extract it:

tar -zxvf sendEmail-v1.56.tar.gz

Then copy the sendEmail script to /usr/local/bin. Make use that you have root permission.

sudo cp -a sendEmail-v1.XX/sendEmail /usr/local/bin

The script needs to be executable, so go make it.

sudo chmod +x /usr/local/bin/sendEmail

Then, go ahead and run:

sendEmail

If everything work fine, you will see a usage summary of sendEmail.

send

In order to troubleshoot any eventual problem, you can  create a log file fro senEmail.

touch /var/log/sendEmail
chmod 666 /var/log/sendEmail

In order to test sending an email via Gmail, the command should look like this:

sendEmail -v -f $username -s $host -xu $username -xp $password -t $recipient -o tls=yes -u $subject -m $content

Configure Nagios Core to Send notification Using Gmail

In order to configure Nagios core to send alert using sendEmail and external smtp server like Gmail, you need to flow those steps:

Start by editing the resource.cfg file located in /usr/local/nagios/etc/resource.cfg :

vi /usr/local/nagios/etc/resource.cfg

Add the following lines with your particular smtp configuration:

$USER5$=email@address.tld
$USER7$=smtp.server.tld:25
#If you don’t use smtp authentication skip this variables and use the version B) of commands.cfg
$USER9$=username
$USER10$=password
On the case of Gmail smtp you can see this example:
$USER5$=email@gmail.com
$USER7$=smtp.gmail.com:587
$USER9$=email
$USER10$=password
Save the file resource.cfg and exit.
After this go under /usr/local/nagios/etc/objects/ and edit the file commands.cfg but that perform a backup of the config file:
cd /usr/local/nagios/etc/objects/
cp commands.cfg commands.cfg.old
Edit the commands.cfg file and you will find two commands ‘notify-host-by-email’ and ‘notify-service-by-email’
A – SMTP AUTHENTICATION COMMANDS
Now, if you use SMTP authentication replace the two commands with the following:
# 'notify-host-by-email' command definition define command{command_name notify-host-by-email command_line /usr/bin/printf "%b" "***** Nagios *****\n\nNotification Type: $NOTIFICATIONTYPE$\nHost: $HOSTNAME$\nState: $HOSTSTATE$\nAddress: $HOSTADDRESS$\nInfo: $HOSTOUTPUT$\n\nDate/Time: $LONGDATETIME$\n" | /usr/local/bin/sendEmail -s $USER7$ -xu $USER9$ -xp $USER10$ -t $CONTACTEMAIL$ -f $USER5$ -l /var/log/sendEmail -u "** $NOTIFICATIONTYPE$ Host Alert: $HOSTNAME$ is $HOSTSTATE$ **" -m "***** Nagios *****\n\nNotification Type: $NOTIFICATIONTYPE$\nHost: $HOSTNAME$\nState: $HOSTSTATE$\nAddress: $HOSTADDRESS$\nInfo: $HOSTOUTPUT$\n\nDate/Time: $LONGDATETIME$\n" }
# 'notify-service-by-email' command definition define command{command_name notify-service-by-email command_line /usr/bin/printf "%b" "***** Nagios *****\n\nNotification Type: $NOTIFICATIONTYPE$\n\nService: $SERVICEDESC$\nHost: $HOSTALIAS$\nAddress: $HOSTADDRESS$\nState: $SERVICESTATE$\n\nDate/Time: $LONGDATETIME$\n\nAdditional Info:\n\n$SERVICEOUTPUT$" | /usr/local/bin/sendEmail -s $USER7$ -xu $USER9$ -xp $USER10$ -t $CONTACTEMAIL$ -f $USER5$ -l /var/log/sendEmail -u "** $NOTIFICATIONTYPE$ Service Alert: $HOSTALIAS$/$SERVICEDESC$ is $SERVICESTATE$ **" -m "***** Nagios *****\n\nNotification Type: $NOTIFICATIONTYPE$\n\nService: $SERVICEDESC$\nHost: $HOSTALIAS$\nAddress: $HOSTADDRESS$\nState: $SERVICESTATE$\n\nDate/Time: $LONGDATETIME$\n\nAdditional Info:\n\n$SERVICEOUTPUT$" }
B- NO SMTP-AUTHENTICATION 
This is pretty much the same but without passing the authentication triggers to sendemail:
# 'notify-host-by-email' command definition define command{command_name notify-host-by-email command_line /usr/bin/printf "%b" "***** Nagios *****\n\nNotification Type: $NOTIFICATIONTYPE$\nHost: $HOSTNAME$\nState: $HOSTSTATE$\nAddress: $HOSTADDRESS$\nInfo: $HOSTOUTPUT$\n\nDate/Time: $LONGDATETIME$\n" | /usr/local/bin/sendEmail -s $USER7$ -t $CONTACTEMAIL$ -f $USER5$ -l /var/log/sendEmail -u "** $NOTIFICATIONTYPE$ Host Alert: $HOSTNAME$ is $HOSTSTATE$ **" -m "***** Nagios *****\n\nNotification Type: $NOTIFICATIONTYPE$\nHost: $HOSTNAME$\nState: $HOSTSTATE$\nAddress: $HOSTADDRESS$\nInfo: $HOSTOUTPUT$\n\nDate/Time: $LONGDATETIME$\n" }
# 'notify-service-by-email' command definition define command{command_name notify-service-by-email command_line /usr/bin/printf "%b" "***** Nagios *****\n\nNotification Type: $NOTIFICATIONTYPE$\n\nService: $SERVICEDESC$\nHost: $HOSTALIAS$\nAddress: $HOSTADDRESS$\nState: $SERVICESTATE$\n\nDate/Time: $LONGDATETIME$\n\nAdditional Info:\n\n$SERVICEOUTPUT$" | /usr/local/bin/sendEmail -s $USER7$ -t $CONTACTEMAIL$ -f $USER5$ -l /var/log/sendEmail -u "** $NOTIFICATIONTYPE$ Service Alert: $HOSTALIAS$/$SERVICEDESC$ is $SERVICESTATE$ **" -m "***** Nagios *****\n\nNotification Type: $NOTIFICATIONTYPE$\n\nService: $SERVICEDESC$\nHost: $HOSTALIAS$\nAddress: $HOSTADDRESS$\nState: $SERVICESTATE$\n\nDate/Time: $LONGDATETIME$\n\nAdditional Info:\n\n$SERVICEOUTPUT$" }
Now the configuration is finished. Before applying the new configuration, run the following command to check for any error or mistake:
/usr/local/nagios/bin/nagios -v /usr/local/nagios/etc/nagios.cfg

If there are no errors, restart the nagios service:

service nagios restart

To troubleshoot the sendemail command run the following to check in the log file:

tail -f /var/log/sendEmail

That all!.

Thanks for reading my article.


Advertise here with BSA

---------------------------------------------------------------------
How To Send Alerts From Nagios Core Using Gmail And Yahoo

How To Install Xibo On Ubuntu 14.10/14.04/12.04

$
0
0

What is Xibo?

Xibo is a great content management system that can be used for Digital Signage which is  a form of electronic display used to show messages to the public mainly in the advertisement industry. It is free of charge and this tutorial will help you to learn how to install it on an Ubuntu machine.

According to the official page Xibo includes the followings:

  • Content Management System (CMS);
  • Windows Display Client;
  • Ubuntu Display Client;
  • Ubuntu Off-line Download Client;
  • Android Display Client (Commercial Software*);
  • With Xibo the content is designed from anywhere using a web browser on the internet accessible CMS, scheduled to your Display clients and then downloaded automatically when appropriate. This manual will guide you through the application from installation to troubleshooting, from the CMS to the display clients;
  • Commercial software provided by the project sponsors.

Download And Install Requirements

Since Xibo is a web application built in php programming language we need to use the following command in order to install PHP5, Apache2, MYSQL server and the following php plugins:

  • PHP5 GD plugin
  • PHP5 MySQL plugin
  • PHP5 crypt plugin

Open a new terminal on your Ubuntu operating system (CTRL+ALT+T) machine and run the apt-get update command to update the official repositories like shown below.

sudo apt-get update

 Then use the following command to install all the requirements in order to run the Xibo CMS on Ubuntu.

sudo apt-get install apache2 mysql-server php5 php5-gd php5-mysql php5-mcrypt

Once the installation of the required packages is finished it is time to download and configure the latest Xibo application on your machine.

Download And Install Xibo On Ubuntu

The wget utility is very useful when it comes to downloading software from the commandline. I use it alot during development work and even when I test new software.

Use the wget utility like shown below.

wget https://github.com/xibosignage/xibo-cms/archive/1.7.1.tar.gz -O xibo-server.tar.gz

Then extract it using the tar utility. The option is used to indicate verbose mode which is very helpful if you want to see the output of the command displayed on your terminal.

tar xvzf xibo-server.tar.gz

Then run the following commands.

sudo mv xibo-server-142 /var/www/xibo-server
sudo chown www-data:www-data -R /var/www/xibo-server

Once you have finished create a directory for the storage of the media files you will use on Xibo. The following commands will help you do to that.

sudo mkdir /media/xibo-library
sudo chown www-data:www-data -R /media/xibo-library

Web Installation

Restart the webserver with the following command and visit the address http://127.0.0.1/xibo-server in a new tab on your favorite web browser.

sudo /etc/init.d/apache2 restart

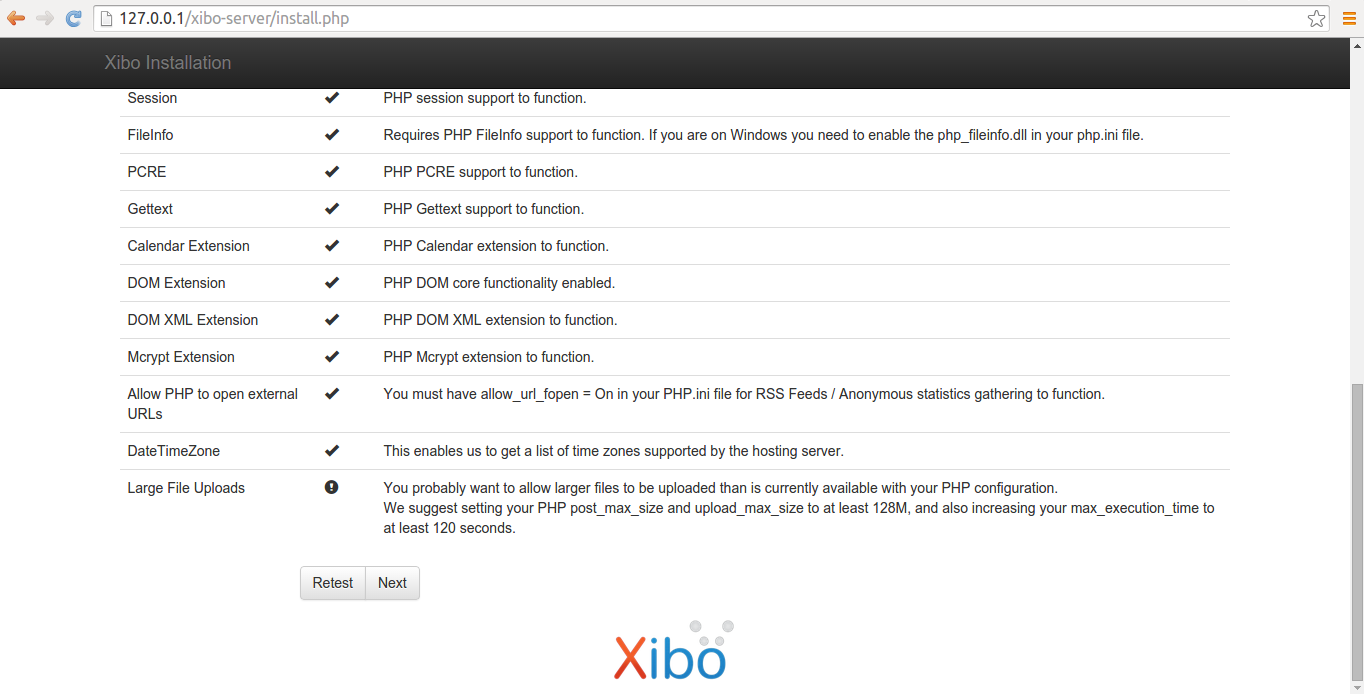
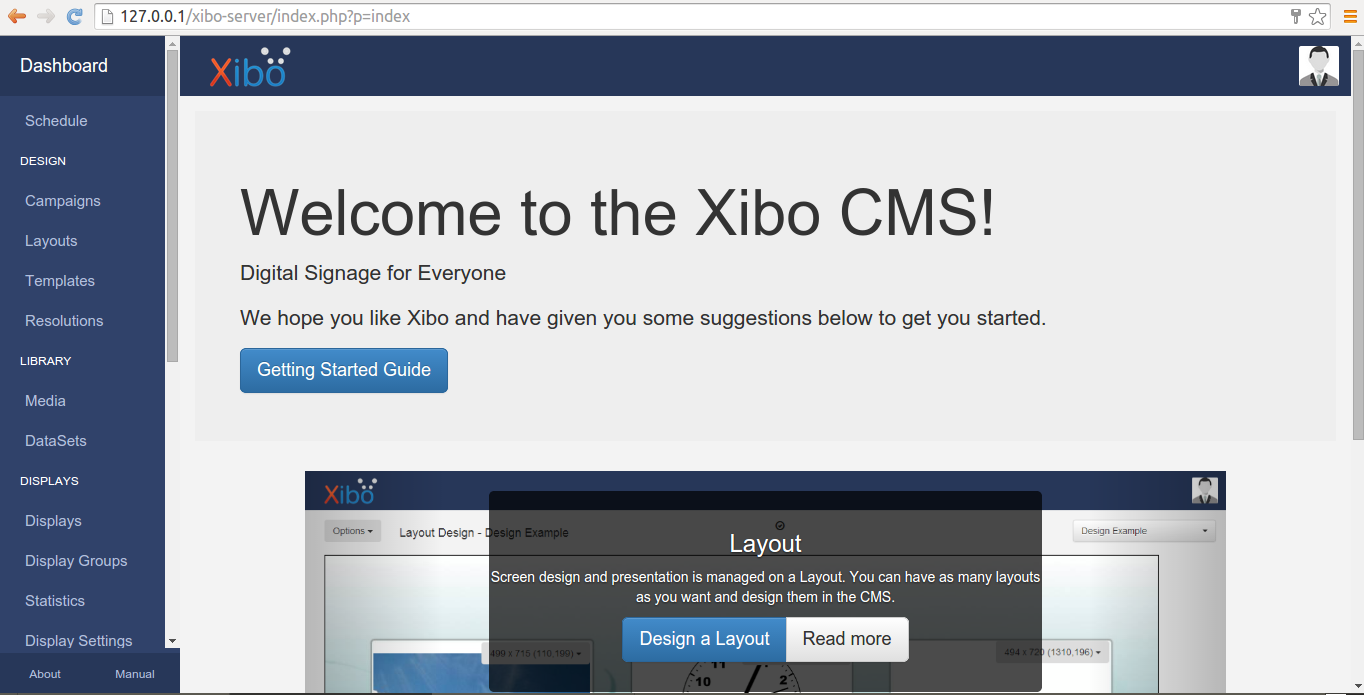
Once you visit the url in your web browser it will look like the following.

Click next to continue. There are six steps we need to follow in order to complete the installation of Xibo on your system.

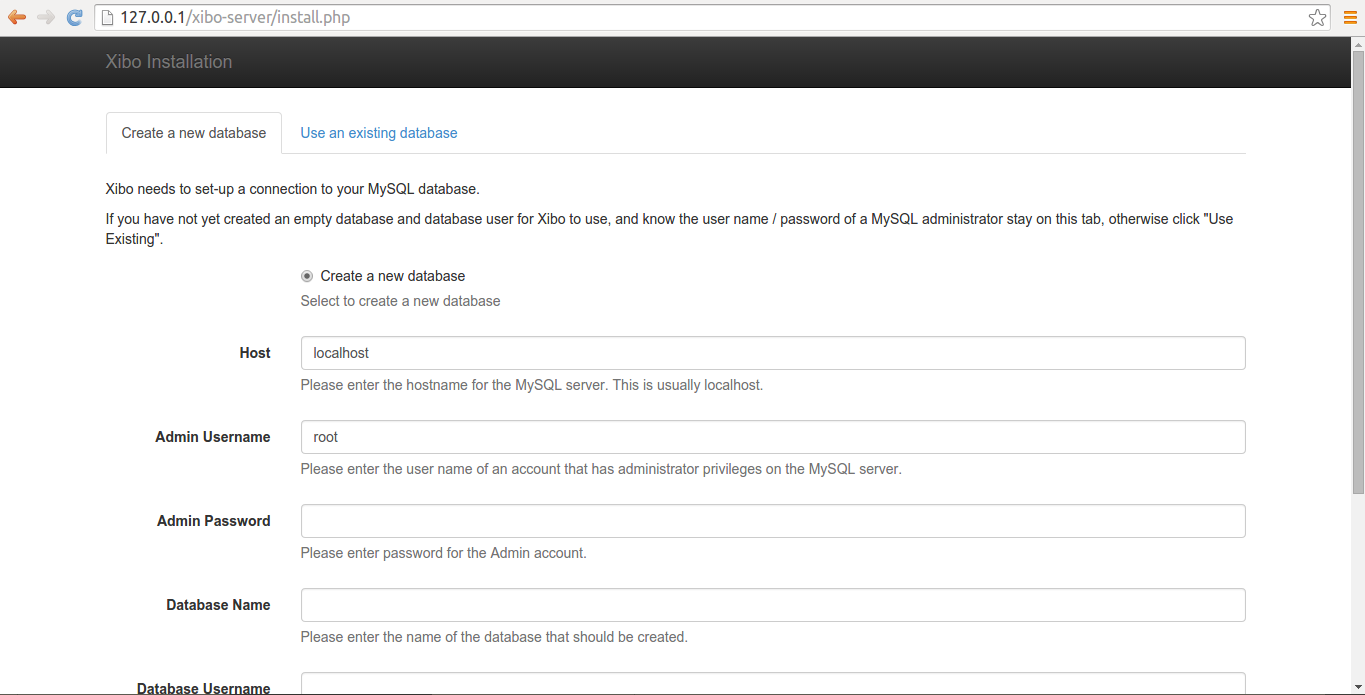
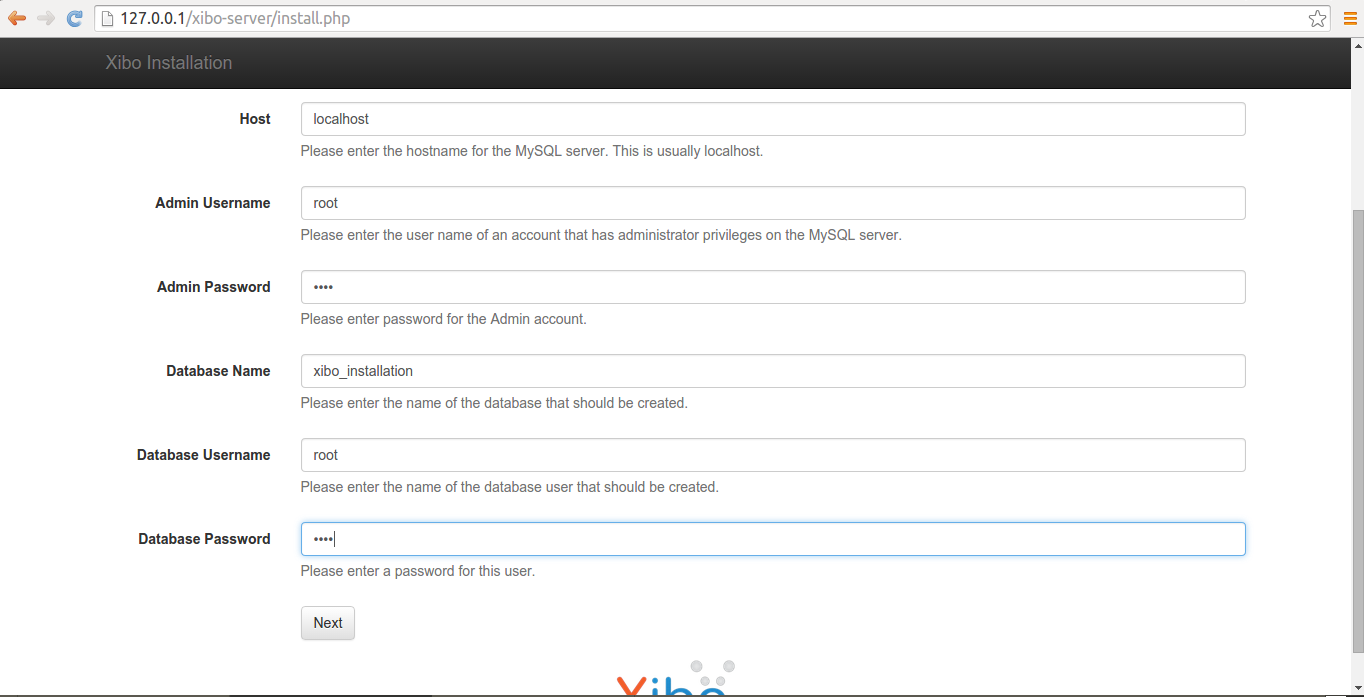
As you can clearly see from the above screenshot Xibo needs to use a connection to your MySQL database. I am going to create a new empety database and will let Xibo do it for me. I suggest you do the same. Leave host as localhost, create an admin password, database name, database username and click on next again.

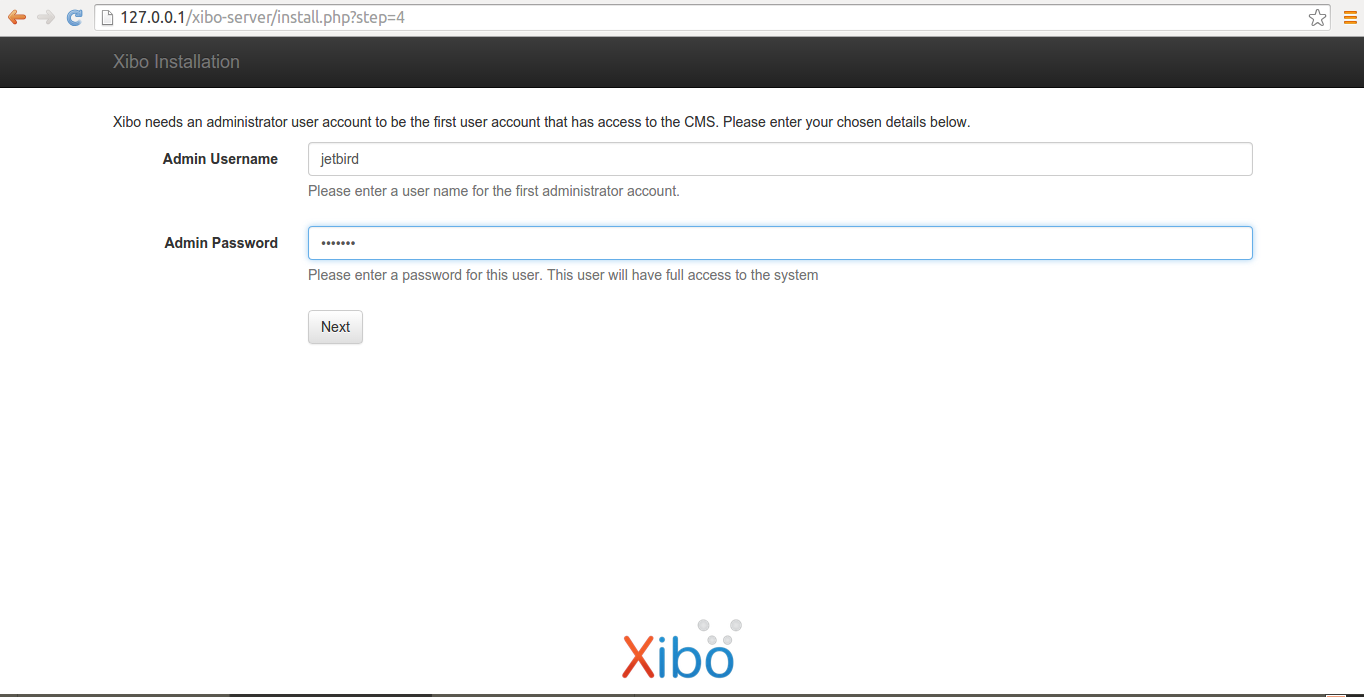
You will se the following displayed on your screen.

The above will help you to create the administrator account will gain access to the CMS. Mine are the followings. Make sure you use a strong password and an original username.

Click on next again so you can continue with the next step.

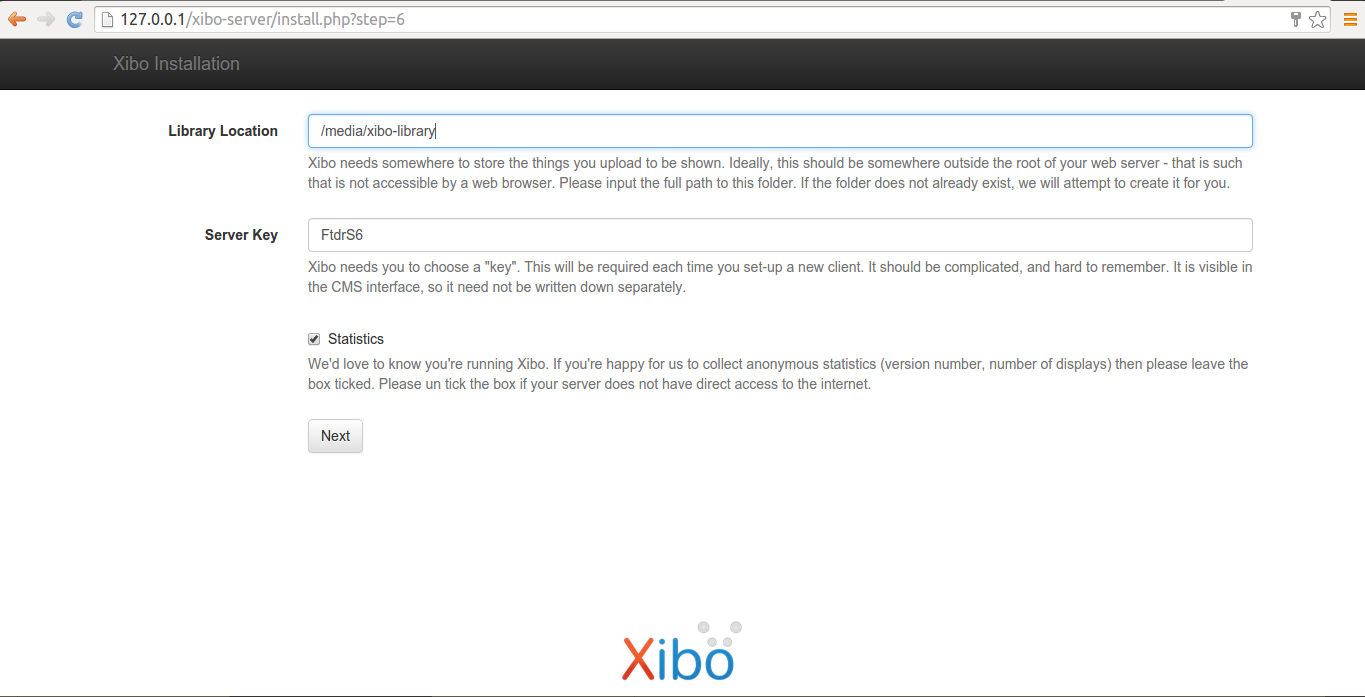
The Library Location is the place where things you upload will be stored. Put the full path location of the folder we created for the media files. It should be /media/xibo-library.

Then click on next.

Xibo is finally installed on your machine. Use the login credentials you created and login.

Done!


Advertise here with BSA

---------------------------------------------------------------------
How To Install Xibo On Ubuntu 14.10/14.04/12.04

ClipGrab: A Friendly Downloader And Converter For YouTube And Other Sites

$
0
0

About ClipGrab

We all know that we can download videos from popular websites like YouTube, Metacafe, Vimeo etc. There are many applications available to download from those sites. But, the problem is some websites doesn’t allow you to save videos to a different format. You can only download the videos in the given format by those sites. Ofcourse, there are plenty of tools available to convert the downloaded videos to different formats. However, downloading videos using one tool, and then convert them to another format using another tool might be definitely time wasting process. This is where ClipGrab comes in handy.

ClipGrab is a 2-in-1 tool that can use used to download videos from many video sites and convert them to the desired format in minutes. It supports Linux, Windows and Mac OS X platforms. ClipGrab can download videos from popular online video sites such as YouTube, Vimeo, Dailymotion etc. The list of supported video sites are given below.

  • YouTube
  • Vimeo
  • Dailymotion
  • metacafe.com
  • youku.com
  • myspass.de
  • myvideo.de
  • clipfish.de

If a site isn’t officially supported by ClipGrab, you might still be able to download videos from it. Through an advanced video-recognition system, ClipGrab allows the download from thousands of websites even if they are not listed above.

ClipGrab can convert videos to the following formats.

  • MPEG4
  • MP3
  • WMV
  • OGG Vorbis
  • OGG Theora

Install ClipGrab On Ubuntu/Linux Mint

ClipGrab has a official PPA to make the installation lot easier.

sudo add-apt-repository ppa:clipgrab-team/ppa
sudo apt-get update
sudo apt-get install clipgrab

Or you can use the NoobsLab PPA.

sudo add-apt-repository ppa:noobslab/ppa
sudo apt-get update
sudo apt-get install clipgrab

For other distribution users can download, and install ClipGrab tar file from the official page as shown below.

wget http://download.clipgrab.de/clipgrab-3.4.9.tar.gz
tar xvf clipgrab-3.4.9.tar.gz
cd clipgrab-3.4.9
sudo chmod +x clipgrab-*
sudo ./clipgrab-3.4.2.x86_64

Usage

After installing ClipGrab, launch it either from Unity Dash or Menu.

At first time, you’ll be asked to install ffmpeg or avconv if you haven’t install them on your system.

clipgrab_001

Install it using command:

sudo add-apt-repository ppa:jon-severinsson/ffmpeg
sudo apt-get update
sudo apt-get install ffmpeg
sudo apt-get install frei0r-plugins

This is how ClipGrab main interface looks.

ClipGrab - Download and Convert Online Videos_002

Enter a keyword in the search box in order to search videos on Youtube or other sites. For example, I am going to search MJ popular video namely “Dangerous”.

ClipGrab - Download and Convert Online Videos_004

As you see, ClipGrab lists the avialable videos. Select the video you want to download.

And then, select the format, quality, and finally click the button Grab this clip.

ClipGrab - Download and Convert Online Videos_005

That;s it. Now the selected video will start to download. By default, the videos will be saved in Desktop. You can change the path from the Settings Tab.

ClipGrab - 4 -_006

That’s all. Have fun. Enjoy!


Advertise here with BSA

---------------------------------------------------------------------
ClipGrab: A Friendly Downloader And Converter For YouTube And Other Sites


Internet Friendly Media Encoder – Fast and Easy x265 GUI Multimedia Encoder

$
0
0

About Internet Friendly Media Encoder(IFME)

In our previous articles, we have discussed about some popular encoders such as,

In the same series, today we will discuss yet another encoder called Internet Friendly Media Encoder or shortly known as IFME. It will help you to encode videos using x265. Using IFME, we can encode and compress videos upto 50% without losing the original quality. So you can have a number of small sized HD movies. It supports GNU/Linux and Windows.

Features

IMFE has many features including,

  • 64bit native encoder;
  • Queue encoding;
  • Easy subtitle’s and font attachment’s;
  • User friendly (GUI guided for command-line);
  • Encode in Realtime, no decoding required;
  • Multiple language support;
  • Addons/Plugins Support;
  • And more.

Install IFME on Ubuntu and derivatives

Since IFME is not available on Ubuntu repositories, Upubuntu team has made a PPA to make the installation much easier.

If you use Ubuntu 14.04 and above, run the following commands to install it.

sudo add-apt-repository -y ppa:upubuntu-com/multimedia
sudo apt-get update
sudo apt-get install ifme

Or, you can manually download and install it as shown below.

First, install the required dependencies.

sudo apt-get install mono-complete mediainfo libavformat-dev libswscale-dev libboost-all-dev

Then, download IFME from it’s official download page.

wget http://sourceforge.net/projects/ifme/files/encoder-gui/4.9.1.0/x265ui-x64_linux.tar.gz

Extract tar file.

tar -xvzf x265ui-x64_linux.tar.gz

Then, run:

sudo sh ./ifme.sh

Usage

Launch IFME either from Menu or Dash. It will look like below.

IFME v4.8.0.0 ( 'The End Is the Beginning' )_001

As you see, IFME has six tabs. Each tab is self-explanatory. If your IFME is outdated, it will automatically notify you when you launch it.

Let us see how to encode a sample video file using IFME.

Navigate to Queue tab. Click on the plus (+) sign. Select your media file.

IFME v4.8.0.0 ( 'The End Is the Beginning' )_004

You can adjust the audio/video parameters from the respective tabs. IFME has best optimized settings automatically to get the best possible encoding by default. You don’t have to adjust anything. Also, you can add a subtitle to your video files. Once you adjusted all things, click the Start button to encode your video.

The encoding process will be redirected to the Terminal.

Queue 1 of 1: Encoding video..._003

The encoding process will take long time depending upon your video size. Be patient or grab a coffee till the process gets finished.

For more details, refer the IFME official documentation.

That’s it. Happy encoding!


Advertise here with BSA

---------------------------------------------------------------------
Internet Friendly Media Encoder – Fast and Easy x265 GUI Multimedia Encoder

How To Fix “VLC does not support the audio or video format “hevc””

$
0
0

VLC media player is a free and open source media player, encoder, and streamer made the volunteers of VideoLAN community.

vlc+hevc

No suitable decoder module

VLC does not support the audio or video format “hevc.

Unfortunately there is no way for you to fix this.

The above error message is a result of trying to play a video file in VLC. The error message doesn’t give a clue either. To fix this we need to install libde265, which is an open source implementation of the h.265 video codec.

We will install libde265 via PPA. To install open Terminal and run the commands below:

sudo apt-add-repository ppa:strukturag/libde265 
sudo apt-get update 
sudo apt-get install vlc-plugin-libde265

VLC should now play these media files after installation has been completed successfully.

Enjoy!


Advertise here with BSA

---------------------------------------------------------------------
How To Fix “VLC does not support the audio or video format “hevc””

Budgie – An Elegant, Lightweight And Simple Desktop

$
0
0

About Budgie

Budgie is the flagship desktop of the Evolve OS Linux Distribution. It is designed with the modern user in mind, it focuses on simplicity and elegance. A huge advantage for the Budgie desktop is that it is not a fork of another project, but rather one written from scratch with integration in mind. The Budgie Desktop tightly integrates with the GNOME stack, employing underlying technologies to offer an alternative desktop experience. In the spirit of open source, the project is compatible with and available for other Linux distributions including Fedora and openSUSE etc. Budgie can now emulate the look and feel of the GNOME 2 desktop, optionally, via a setting in the panel preferences.

Installation

On Ubuntu and derivatives:

sudo add-apt-repository ppa:evolve-os/ppa
sudo apt-get update
sudo apt-get install budgie-desktop

On Fedora 21, install Budgie as shown below with root user:

cd /etc/yum.repos.d/
wget http://download.opensuse.org/repositories/home:ikeydoherty:evolve/Fedora_21/home:ikeydoherty:evolve.repo
yum install budgie-desktop

On Fedora 20, install Budgie as shown below with root user:

cd /etc/yum.repos.d/
wget http://download.opensuse.org/repositories/home:ikeydoherty:evolve/Fedora_20/home:ikeydoherty:evolve.repo
yum install budgie-desktop

On openSUSE:

For openSUSE Factory run the following as root:

zypper addrepo http://download.opensuse.org/repositories/home:ikeydoherty:evolve/openSUSE_Factory/home:ikeydoherty:evolve.repo
zypper refresh
zypper install budgie-desktop

For openSUSE 13.2 run the following as root:

zypper addrepo http://download.opensuse.org/repositories/home:ikeydoherty:evolve/openSUSE_13.2/home:ikeydoherty:evolve.repo
zypper refresh
zypper install budgie-desktop

For openSUSE 13.1 run the following as root:

zypper addrepo http://download.opensuse.org/repositories/home:ikeydoherty:evolve/openSUSE_13.1/home:ikeydoherty:evolve.repo
zypper refresh
zypper install budgie-desktop

For GNOME STABLE 3.12 openSUSE 13.1 run the following as root:

zypper addrepo http://download.opensuse.org/repositories/home:ikeydoherty:evolve/GNOME_STABLE_3.12_openSUSE_13.1/home:ikeydoherty:evolve.repo
zypper refresh
zypper install budgie-desktop

Or you can directly download the binary files and install it.

Packages for openSUSE Factory:
Packages for openSUSE 13.2:
Packages for openSUSE 13.1:
Packages for GNOME STABLE 3.12 openSUSE 13.1:

After downloading the required rpm, install it as shown below with root user.

rpm -Uvh budgie-desktop-8.1-3.1.i586.rpm

Using Budgie desktop

Now log out and select Budgie as your default DE and log in to your system.

Workspace 1_005

Be mindful that Budgie is still under heavy development. Your system may crash, hang, or your Budgie menu will not even show the installed applications.

Hope the developers will release the stable version soon.

That’s it. More details can be found here.

Cheers!


Advertise here with BSA

---------------------------------------------------------------------
Budgie – An Elegant, Lightweight And Simple Desktop

How To Fix “Not Enough Free Disk Space On /boot” In Ubuntu

$
0
0

Question: How To Fix “Not Enough Free Disk Space On /boot” In Ubuntu?

Today, I got the following error, but a simple one, when try to update my Lubuntu 14.04 desktop.

“Not Enough Free Disk Space On /boot”

Software Updater_002

This is because my /boot partition has caught up with unwanted old kernels, packages etc.

Answer:

I heard about Computer Janitor feature which will remove unwanted old junk files in Ubuntu Tweak tool. Using the Computer Janitor, you can clean up your system like a freshly installed system. Janitor will remove;

  • Apps cache(Firefox/Chrome cache, Software center cache);
  • Thumbnail cache;
  • Apt cache;
  • Old kernels;
  • Package configs;
  • And unneeded packages.

If you haven’t install this tool, look at the following link.

To remove unwanted junk files, open Ubuntu Tweak, and click on the Janitor option.

Ubuntu Tweak_006

Select the check the boxes to remove unwanted junk from your system, and click Clean button.

Ubuntu Tweak_007

Janitor will now start to clean up your system

Ubuntu Tweak_003

Cool! The system is clean now.

Ubuntu Tweak_008

Again I re-launched the software updater. This time it went smoothly without any issues.

Software Updater_009

That’s all. Enjoy. There are others ways also available to clean up the system. But, this seems very easy to follow. We can do system clean up in few mouse clicks.

Cheers!


Advertise here with BSA

---------------------------------------------------------------------
How To Fix “Not Enough Free Disk Space On /boot” In Ubuntu

Linux Basics: How To Find Maximum Supported RAM By Your System

$
0
0

Mostly, you will find maximum supported RAM by your system from the BIOS, Product catalog, or manuals. Here is the simple, yet useful trick, to find out maximum supported RAM using Dmidecode without opening the system chassis or referring the BIOS, product catalogs.

What is Dmidecode?

As you may know, Dmidecode is a tool for dumping a computer’s DMI (some say SMBIOS) table contents in a human-readable format. This table contains a description of the system’s hardware components, as well as other useful pieces of information such as serial numbers and BIOS revision. Using Dmidecode, you can retrieve this information without having to probe for the actual hardware.

Find out the maximum RAM supported by your system

Make sure you have installed dmidecode on your system. I think it will be automatically installed while installing your OS, but I am not sure though.

On Deb based system:

sudo apt-get install dmidecode

On RPM based system:

sudo yum install dmidecode

On SUSE/openSUSE:

sudo zypper in dmidecode

Well, we installed dmidecode. Let us find out the maximum RAM supported. To do that, enter the following command:

sudo dmidecode -t 16

Sample output:

# dmidecode 2.12
SMBIOS 2.6 present.

Handle 0x0014, DMI type 16, 15 bytes
Physical Memory Array
    Location: System Board Or Motherboard
    Use: System Memory
    Error Correction Type: None
    Maximum Capacity: 16 GB
    Error Information Handle: Not Provided
    Number Of Devices: 2

As you see in the above output, my system will support RAM upto 16GB, and it has two RAM slots. Pretty easy, isn’t it?

Well, let us find out the currently installed RAM details.

sudo dmidecode -t 17

Sample output:

# dmidecode 2.12
SMBIOS 2.6 present.

Handle 0x0017, DMI type 17, 28 bytes
Memory Device
    Array Handle: 0x0014
    Error Information Handle: 0x0000
    Total Width: Unknown
    Data Width: Unknown
    Size: No Module Installed
    Form Factor: DIMM
    Set: None
    Locator: DIMM_B
    Bank Locator: BANK 2
    Type: Unknown
    Type Detail: None
    Speed: Unknown
    Manufacturer: Not Specified
    Serial Number: Not Specified
    Asset Tag: Not Specified
    Part Number: Not Specified
    Rank: Unknown

Handle 0x0015, DMI type 17, 28 bytes
Memory Device
    Array Handle: 0x0014
    Error Information Handle: 0x0000
    Total Width: 64 bits
    Data Width: 64 bits
    Size: 4096 MB
    Form Factor: SODIMM
    Set: None
    Locator: DIMM_A
    Bank Locator: BANK 0
    Type: DDR3
    Type Detail: Synchronous
    Speed: 1067 MHz
    Manufacturer: 014F
    Serial Number: 00092AF2
    Asset Tag: 54114000     
    Part Number: JM1066KSN-4G      
    Rank: Unknown

As per the above output, I have installed one RAM in DIMM slot 1. The RAM size is 4GB, and it’s type and speed is DDR3 and 1067 MHz respectively.

Also, we can have the complete RAM details using the following commands.

sudo dmidecode -t memory
sudo dmidecode -t memory | less
sudo dmidecode -t memory | more

Sample output:

# dmidecode 2.12
SMBIOS 2.6 present.

Handle 0x0014, DMI type 16, 15 bytes
Physical Memory Array
    Location: System Board Or Motherboard
    Use: System Memory
    Error Correction Type: None
    Maximum Capacity: 16 GB
    Error Information Handle: Not Provided
    Number Of Devices: 2

Handle 0x0017, DMI type 17, 28 bytes
Memory Device
    Array Handle: 0x0014
    Error Information Handle: 0x0000
    Total Width: Unknown
    Data Width: Unknown
    Size: No Module Installed
    Form Factor: DIMM
    Set: None
    Locator: DIMM_B
    Bank Locator: BANK 2
    Type: Unknown
    Type Detail: None
    Speed: Unknown
    Manufacturer: Not Specified
    Serial Number: Not Specified
    Asset Tag: Not Specified
    Part Number: Not Specified
    Rank: Unknown

Handle 0x0015, DMI type 17, 28 bytes
Memory Device
    Array Handle: 0x0014
    Error Information Handle: 0x0000
    Total Width: 64 bits
    Data Width: 64 bits
    Size: 4096 MB
    Form Factor: SODIMM
    Set: None
    Locator: DIMM_A
    Bank Locator: BANK 0
    Type: DDR3
    Type Detail: Synchronous
    Speed: 1067 MHz
    Manufacturer: 014F
    Serial Number: 00092AF2
    Asset Tag: 54114000     
    Part Number: JM1066KSN-4G      
    Rank: Unknown

Curious to know the complete system details such as Motherboard, Memory, Bios etc? Well, enter the following command to get all details.

sudo dmidecode

Sample output:

# dmidecode 2.12
SMBIOS 2.6 present.
48 structures occupying 2173 bytes.
Table at 0x000EB840.

Handle 0xDA00, DMI type 218, 251 bytes
OEM-specific Type
    Header and Data:
        DA FB 00 DA B2 00 0D 5F 0F 37 40 7D 00 00 00 00
        00 7E 00 01 00 00 00 DC 01 00 80 02 00 DD 01 00
        80 03 00 75 01 01 80 01 00 76 01 02 80 01 00 2D
        01 03 80 01 00 2E 01 03 80 00 00 81 01 07 80 00
        00 82 01 07 80 01 00 83 01 08 80 00 00 84 01 08
        80 01 00 85 01 06 80 00 00 86 01 06 80 01 00 58
        02 05 80 00 00 57 02 05 80 01 00 9C 00 02 00 01
        00 9B 00 02 00 00 00 8A 01 03 00 01 00 89 01 03
        00 00 00 7F 01 04 00 00 00 80 01 04 00 01 00 53
        01 05 00 00 00 52 01 05 00 01 00 7B 01 06 00 00
        00 7C 01 06 00 01 00 94 01 07 00 00 00 93 01 07
        00 01 00 7D 00 08 00 00 00 2D 00 09 00 01 00 2E
        00 09 00 00 00 6E 00 0A 00 00 00 95 00 0B 00 01
        00 96 00 0B 00 00 00 2F 02 0C 00 01 00 30 02 0C
        00 00 00 50 02 0D 00 00 00 51 02 0D 00 01 00 52
        02 0D 00 02 00 FF FF 00 00 00 00

Handle 0xDA01, DMI type 218, 59 bytes
OEM-specific Type
    Header and Data:
        DA 3B 01 DA B2 00 0D 5F 0F 37 40 53 02 0D 00 03
        00 54 02 0D 00 04 00 56 02 0D 00 05 00 4B 01 0E
        00 01 00 4A 01 0E 00 00 00 EA 00 0F 00 01 00 EB
        00 0F 00 00 00 FF FF 00 00 00 00

Handle 0x0004, DMI type 4, 42 bytes
Processor Information
    Socket Designation: CPU 1
    Type: Central Processor
    Family: Core i3
    Manufacturer: Intel            
    ID: A7 06 03 01 FF FB AB BE
    Signature: Type 0, Family 6, Model 42, Stepping 7
    Flags:
        FPU (Floating-point unit on-chip)
        VME (Virtual mode extension)
        DE (Debugging extension)
        PSE (Page size extension)
        TSC (Time stamp counter)
        MSR (Model specific registers)
        PAE (Physical address extension)
        MCE (Machine check exception)
        CX8 (CMPXCHG8 instruction supported)
        APIC (On-chip APIC hardware supported)
        SEP (Fast system call)
        MTRR (Memory type range registers)
        PGE (Page global enable)
        MCA (Machine check architecture)
        CMOV (Conditional move instruction supported)
        PAT (Page attribute table)
        PSE-36 (36-bit page size extension)
        CLFSH (CLFLUSH instruction supported)
        DS (Debug store)
        ACPI (ACPI supported)
        MMX (MMX technology supported)
        FXSR (FXSAVE and FXSTOR instructions supported)
        SSE (Streaming SIMD extensions)
        SSE2 (Streaming SIMD extensions 2)
        SS (Self-snoop)
        HTT (Multi-threading)
        TM (Thermal monitor supported)
        PBE (Pending break enabled)
    Version: Intel(R) Core(TM) i3-2350M CPU @ 2.30GHz       
    Voltage: 1.1 V
    External Clock: 100 MHz
    Max Speed: 2300 MHz
    Current Speed: 2300 MHz
    Status: Populated, Enabled
    Upgrade: Other
    L1 Cache Handle: 0x0005
    L2 Cache Handle: 0x0006
    L3 Cache Handle: 0x0007
    Serial Number: To Be Filled By O.E.M.
    Asset Tag: To Be Filled By O.E.M.
    Part Number: To Be Filled By O.E.M.
    Core Count: 2
    Core Enabled: 1
    Thread Count: 2
    Characteristics:
        64-bit capable

Handle 0x0005, DMI type 7, 19 bytes
Cache Information
    Socket Designation: L1-Cache
    Configuration: Enabled, Not Socketed, Level 1
    Operational Mode: Write Back
    Location: Internal
    Installed Size: 64 kB
    Maximum Size: 64 kB
    Supported SRAM Types:
        Other
    Installed SRAM Type: Other
    Speed: Unknown
    Error Correction Type: None
    System Type: Unified
    Associativity: 8-way Set-associative

Handle 0x0006, DMI type 7, 19 bytes
Cache Information
    Socket Designation: L2-Cache
    Configuration: Enabled, Not Socketed, Level 2
    Operational Mode: Varies With Memory Address
    Location: Internal
    Installed Size: 512 kB
    Maximum Size: 512 kB
    Supported SRAM Types:
        Other
    Installed SRAM Type: Other
    Speed: Unknown
    Error Correction Type: None
    System Type: Unified
    Associativity: 8-way Set-associative

Handle 0x0007, DMI type 7, 19 bytes
Cache Information
    Socket Designation: L3-Cache
    Configuration: Enabled, Not Socketed, Level 3
    Operational Mode: Varies With Memory Address
    Location: Internal
    Installed Size: 3072 kB
    Maximum Size: 3072 kB
    Supported SRAM Types:
        Other
    Installed SRAM Type: Other
    Speed: Unknown
    Error Correction Type: None
    System Type: Unified
    Associativity: Other

Handle 0x0008, DMI type 8, 9 bytes
Port Connector Information
    Internal Reference Designator: J1A1
    Internal Connector Type: None
    External Reference Designator: PS2Mouse
    External Connector Type: PS/2
    Port Type: Mouse Port

Handle 0x0009, DMI type 8, 9 bytes
Port Connector Information
    Internal Reference Designator: J1A1
    Internal Connector Type: None
    External Reference Designator: Keyboard
    External Connector Type: PS/2
    Port Type: Keyboard Port

Handle 0x000A, DMI type 8, 9 bytes
Port Connector Information
    Internal Reference Designator: J2A2B
    Internal Connector Type: None
    External Reference Designator: Video
    External Connector Type: DB-15 female
    Port Type: Video Port

Handle 0x000B, DMI type 8, 9 bytes
Port Connector Information
    Internal Reference Designator: J3A1
    Internal Connector Type: None
    External Reference Designator: USB1
    External Connector Type: Access Bus (USB)
    Port Type: USB

Handle 0x000C, DMI type 8, 9 bytes
Port Connector Information
    Internal Reference Designator: J3A1
    Internal Connector Type: None
    External Reference Designator: USB2
    External Connector Type: Access Bus (USB)
    Port Type: USB

Handle 0x000D, DMI type 8, 9 bytes
Port Connector Information
    Internal Reference Designator: J3A1
    Internal Connector Type: None
    External Reference Designator: USB3
    External Connector Type: Access Bus (USB)
    Port Type: USB

Handle 0x000E, DMI type 8, 9 bytes
Port Connector Information
    Internal Reference Designator: J5A1
    Internal Connector Type: None
    External Reference Designator: LAN
    External Connector Type: RJ-45
    Port Type: Network Port

Handle 0x000F, DMI type 9, 17 bytes
System Slot Information
    Designation: J6B2
    Type: x16 PCI Express
    Current Usage: In Use
    Length: Long
    ID: 0
    Characteristics:
        3.3 V is provided
        Opening is shared
        PME signal is supported
    Bus Address: 0000:00:01.0

Handle 0x0010, DMI type 9, 17 bytes
System Slot Information
    Designation: J6B1
    Type: x1 PCI Express
    Current Usage: In Use
    Length: Short
    ID: 1
    Characteristics:
        3.3 V is provided
        Opening is shared
        PME signal is supported
    Bus Address: 0000:00:1c.3

Handle 0x0012, DMI type 11, 5 bytes
OEM Strings
    String 1: Dell System
    String 2: 5[0003]
    String 3: 13[P18F]

Handle 0x0013, DMI type 12, 5 bytes
System Configuration Options
    Option 1: To Be Filled By O.E.M.

Handle 0x001C, DMI type 21, 7 bytes
Built-in Pointing Device
    Type: Touch Pad
    Interface: Bus Mouse
    Buttons: 2

Handle 0x001D, DMI type 22, 26 bytes
Portable Battery
    Location: Sys. Battery Bay
    Manufacturer: Sanyo              
    Serial Number: 5390     
    Name: DELL 4YRJH22
    Chemistry: Lithium Ion
    Design Capacity: 45000 mWh
    Design Voltage: 10800 mV
    SBDS Version: 1.0                
    Maximum Error: 2%
    SBDS Manufacture Date: 2012-02-28
    OEM-specific Information: 0x00000001

Handle 0x001E, DMI type 32, 20 bytes
System Boot Information
    Status: No errors detected

Handle 0x0020, DMI type 27, 12 bytes
Cooling Device
    Type: Fan
    Status: OK
    OEM-specific Information: 0x00000000

Handle 0x0021, DMI type 28, 20 bytes
Temperature Probe
    Description: CPU Internal Temperature
    Location: Processor
    Status: OK
    Maximum Value: 127.0 deg C
    Minimum Value: 0.0 deg C
    Resolution: 1.000 deg C
    Tolerance: 0.5 deg C
    Accuracy: Unknown
    OEM-specific Information: 0x00000000

Handle 0xB000, DMI type 176, 5 bytes
OEM-specific Type
    Header and Data:
        B0 05 00 B0 00

Handle 0xB100, DMI type 177, 12 bytes
OEM-specific Type
    Header and Data:
        B1 0C 00 B1 1A 0E 00 00 00 00 00 00

Handle 0x0025, DMI type 209, 12 bytes
OEM-specific Type
    Header and Data:
        D1 0C 25 00 00 00 00 03 05 01 00 03

Handle 0x0026, DMI type 210, 12 bytes
OEM-specific Type
    Header and Data:
        D2 0C 26 00 00 00 00 03 05 20 01 03

Handle 0x0027, DMI type 211, 13 bytes
OEM-specific Type
    Header and Data:
        D3 0D 27 00 01 00 00 00 00 02 03 04 04
    Strings:
        Front               

Handle 0x0028, DMI type 212, 57 bytes
OEM-specific Type
    Header and Data:
        D4 39 28 00 70 00 71 00 01 49 50 48 9C 00 49 FC
        01 9B 00 49 FC 00 7F 01 4A FB 04 80 01 4A FB 00
        53 01 4A F7 08 52 01 4A F7 08 7B 01 4A EF 10 7C
        01 4A EF 10 FF FF 00 00 00

Handle 0x002A, DMI type 217, 8 bytes
OEM-specific Type
    Header and Data:
        D9 08 2A 00 01 02 00 00
    Strings:                                       

Handle 0x002B, DMI type 219, 11 bytes
OEM-specific Type
    Header and Data:
        DB 0B 2B 00 00 01 02 03 00 04 05
    Strings:                                                                                                    

Handle 0x002C, DMI type 220, 22 bytes
OEM-specific Type
    Header and Data:
        DC 16 2C 00 01 F0 00 00 02 F0 00 00 00 00 03 F0
        04 F0 00 00 00 00

Handle 0x002D, DMI type 221, 19 bytes
OEM-specific Type
    Header and Data:
        DD 13 2D 00 00 00 00 00 00 03 00 00 00 00 00 00
        00 00 00

Handle 0x002E, DMI type 222, 16 bytes
OEM-specific Type
    Header and Data:
        DE 10 2E 00 01 08 FF FF 00 00 00 00 00 00 00 00

Handle 0x0014, DMI type 16, 15 bytes
Physical Memory Array
    Location: System Board Or Motherboard
    Use: System Memory
    Error Correction Type: None
    Maximum Capacity: 16 GB
    Error Information Handle: Not Provided
    Number Of Devices: 2

Handle 0x0016, DMI type 20, 19 bytes
Memory Device Mapped Address
    Starting Address: 0x00000000000
    Ending Address: 0x000FFFFFFFF
    Range Size: 4 GB
    Physical Device Handle: 0x0015
    Memory Array Mapped Address Handle: 0x0018
    Partition Row Position: 1
    Interleave Position: 1
    Interleaved Data Depth: 1

Handle 0x0017, DMI type 17, 28 bytes
Memory Device
    Array Handle: 0x0014
    Error Information Handle: 0x0000
    Total Width: Unknown
    Data Width: Unknown
    Size: No Module Installed
    Form Factor: DIMM
    Set: None
    Locator: DIMM_B
    Bank Locator: BANK 2
    Type: Unknown
    Type Detail: None
    Speed: Unknown
    Manufacturer: Not Specified
    Serial Number: Not Specified
    Asset Tag: Not Specified
    Part Number: Not Specified
    Rank: Unknown

Handle 0x0018, DMI type 19, 15 bytes
Memory Array Mapped Address
    Starting Address: 0x00000000000
    Ending Address: 0x000FFFFFFFF
    Range Size: 4 GB
    Physical Array Handle: 0x0014
    Partition Width: 2

Handle 0x002F, DMI type 13, 22 bytes
BIOS Language Information
    Language Description Format: Abbreviated
    Installable Languages: 1
        eng
    Currently Installed Language: eng

Handle 0x0030, DMI type 131, 64 bytes
OEM-specific Type
    Header and Data:
        83 40 30 00 31 00 00 00 00 00 00 00 00 00 00 00
        F8 00 4B 1C FF FF FF FF 01 00 00 00 00 00 07 00
        AD 04 04 00 00 00 00 00 C8 00 FF FF 00 00 00 00
        00 00 00 00 32 00 00 00 76 50 72 6F 00 00 00 00

Handle 0x0029, DMI type 216, 9 bytes
OEM-specific Type
    Header and Data:
        D8 09 29 00 01 02 01 00 00
    Strings:
        INTEL
        0000

Handle 0x0000, DMI type 0, 24 bytes
BIOS Information
    Vendor: Dell Inc.
    Version: A05
    Release Date: 08/03/2012
    Address: 0xF0000
    Runtime Size: 64 kB
    ROM Size: 2048 kB
    Characteristics:
        MCA is supported
        PCI is supported
        BIOS is upgradeable
        BIOS shadowing is allowed
        ESCD support is available
        Boot from CD is supported
        Selectable boot is supported
        BIOS ROM is socketed
        EDD is supported
        5.25"/1.2 MB floppy services are supported (int 13h)
        3.5"/720 kB floppy services are supported (int 13h)
        3.5"/2.88 MB floppy services are supported (int 13h)
        Print screen service is supported (int 5h)
        8042 keyboard services are supported (int 9h)
        Serial services are supported (int 14h)
        Printer services are supported (int 17h)
        CGA/mono video services are supported (int 10h)
        ACPI is supported
        USB legacy is supported
        ATAPI Zip drive boot is supported
        BIOS boot specification is supported
        Targeted content distribution is supported
    BIOS Revision: 0.5
    Firmware Revision: 0.5

Handle 0x0002, DMI type 2, 15 bytes
Base Board Information
    Manufacturer: Dell Inc.
    Product Name: 01HXXJ
    Version: A05
    Serial Number: .JSQ7PA1.CN7117623M00J2.
    Asset Tag: Not Specified
    Features:
        Board is a hosting board
        Board is replaceable
    Location In Chassis: To Be Filled By O.E.M.
    Chassis Handle: 0x0003
    Type: Motherboard
    Contained Object Handles: 0

Handle 0x0003, DMI type 3, 21 bytes
Chassis Information
    Manufacturer: Dell Inc.
    Type: Portable
    Lock: Not Present
    Version: Not Specified
    Serial Number: JSR1
    Asset Tag: Not Specified
    Boot-up State: Safe
    Power Supply State: Safe
    Thermal State: Safe
    Security Status: None
    OEM Information: 0x00000000
    Height: Unspecified
    Number Of Power Cords: 1
    Contained Elements: 0

Handle 0x0001, DMI type 1, 27 bytes
System Information
    Manufacturer: Dell Inc.
    Product Name: Inspiron N5050
    Version: Not Specified
    Serial Number: JSR1
    UUID: 4C4C4544-0053-5110-8029-CAC05241
    Wake-up Type: Power Switch
    SKU Number: To be filled by O.E.M.
    Family:                       

Handle 0x0024, DMI type 208, 12 bytes
OEM-specific Type
    Header and Data:
        D0 0C 24 00 02 05 FE 00 04 05 01 02
    Strings:
        20120323
        20120323

Handle 0x0011, DMI type 10, 6 bytes
On Board Device Information
    Type: Video
    Status: Enabled
    Description: Mobile Intel SandyBridge HD Graphics

Handle 0x0015, DMI type 17, 28 bytes
Memory Device
    Array Handle: 0x0014
    Error Information Handle: 0x0000
    Total Width: 64 bits
    Data Width: 64 bits
    Size: 4096 MB
    Form Factor: SODIMM
    Set: None
    Locator: DIMM_A
    Bank Locator: BANK 0
    Type: DDR3
    Type Detail: Synchronous
    Speed: 1067 MHz
    Manufacturer: 014F
    Serial Number: 0009F2
    Asset Tag: 54114000     
    Part Number: JM1066-4G      
    Rank: Unknown

Handle 0x0031, DMI type 127, 4 bytes
End Of Table

That’s it. Happy weekend. Stay happy!


Advertise here with BSA

---------------------------------------------------------------------
Linux Basics: How To Find Maximum Supported RAM By Your System

Viewing all 457 articles
Browse latest View live